It is often said that drawing people is one of the most challenging undertakings in art. For the most part, I could agree with this assertion – if you sketch a tree and some of the branches go astray, viewer’s will be none the wiser, with the human face, even the most minor of subtleties can drastically alter a representation and as a large proportion of our brain is given over to facial recognition, the ability to draw faces takes on an even harder complexion.
I would not worry if you are starting out in art and your sketches of people end up hideously distorted, these things take time and practice and you can’t expect to pick it up just like that. If you were handed a violin with no previous training in the instrument or any similar instrument, could you be expected to play a tuneful song? For our sketch we’re just interested in capturing something of the essence in the photograph, we don’t have to strive for a likeness, though if it comes close then it is simply an added bonus.
Where to Start?
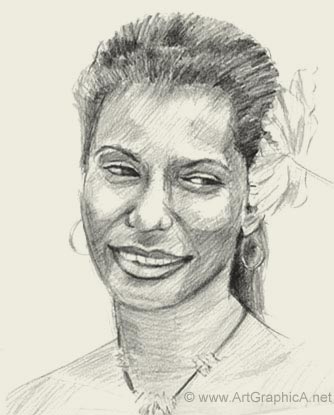
It is a good question, and there is no right or wrong answer. In practice, starting procedures vary. Many like to begin with the eyes, because drawing eyes, more often than not, capture the quintessence of a person, and getting these right can provide an excellent reference to build out upon and place our other features. In this fifteen-minute demonstration I sketch the outline of the head first – this may not always be recommended in a more detailed drawing because if you get the shape wrong it is impossible to fit the features accurately inside the contours, but for the purposes of sketching it is a quick approach.
The top of the head can be crudely represented by a circle from which we can extend down our lines to create the semblance of a jaw. It is important to establish the tilt of the head as all features will react to this same plane.
I mark in a few lines that might represent where the hairline, nose, mouth and chin lie, then set to work refining the shape of the face a little. The lines are quite light, so I apologise for them being difficult to make out in this first video clip.
Marking in the Main Features
If you practice with drawing portraits you will soon develop your own methodologies on how to proceed. Speaking for myself, I usually start by mentally visualising the negative space of the forehead so that I can mark in the eyebrows and then work down the face to include eyes, nose and mouth.
The nose can be represented by a sort of triangle, and defined at the base with a few circular motions. As a rough guideline only, the idealised distance from the hairline to the eye line is the same distance from the eye-line to the base of the nose and the same distance again from the base of the nose to the chin. Mouths are deceptively hard to get right, and feature a great many angles that are not usually picked up on by a beginner. I apologise in advance for giving you teeth do deal with too! In hindsight I might have bettered the angles and proportion of the mouth in my own rendering, but most nit-picking can be reserved for our more detailed drawings.
Eyes
Eyes can be difficult for a beginner to draw, mainly because it is a feature we all think we know very well, and so it is difficult not to draw a conceptualised version, and more often than not a beginner will make the eyes too large. If you look at an eye very closely the angles and curvature involved and really quite intricate and can be quite tricky to capture, you have to also be careful not to draw them too far apart, or too close to one another. Imagine there is a third eye between the two, and then you can’t go far wrong in setting this distance. To demonstrate this point I used my mechanical pencil as a crude measuring device in the previous video, and marked out some points at equidistant to establish their placement.
Going back to drawing what we think we see, as opposed to what is actually there. You will notice in the photograph that the iris is virtually lost in the same contrast and shadow as the pupil, and in the left eye (her right) the tear duct is also suspended in the same shadow area. Something else to bare in mind is that the white of the eye is rarely ever too white (i.e. the paper left unshaded). There is a subtle shadow cast by the upper lid, running along the top of the eye, and usually the lightest areas are closest to the iris, or in areas where the light catches tiny specks of reflected light – try to remember beneath the lids we are dealing with a spherical object, that has a three dimensional form. I give you this information just as food for thought in more detailed drawings – in our photo reference for this sketch there is not a great deal of detail to pick out, and we do not have to be overly concerned with too much correctness.
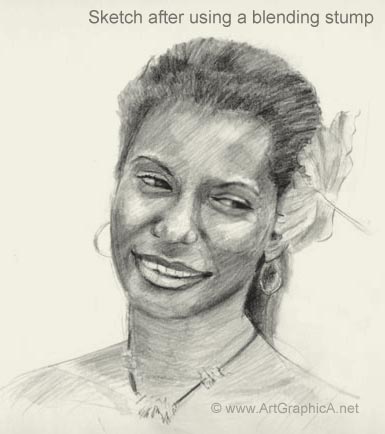
Defining the features and Shading
The shading I use is crude but quick, which is often necessary if you happen to work from life. There is little point obsessing over neat, tightly controlled, unidirectional lines in sketching; the idea is to capture an impression and perhaps values in a short space of time. Towards the end of the sketch I find myself fiddling a little bit with shading and details - this is usually a good indication to call it a day and leave things alone!
Conclusions
Remember, there is no definitive place to start, and you may develop your own methodology that you apply to every portrait drawing, or you might initiate every portrait from a different position - eyes are often a popular place to begin and work out from.
Generally speaking, the distance from the hairline to the eyeline, the eyeline to the base of the nose, and the base of the nose to the chin is the same. The width of the head is five imaginary eye lengths wide, with a third imaginary eye placed between the two real ones.
Beneath the features lie muscle and bone, and it can be beneficial to understand the basics of what lies beneath so the features do not appear to float disjointed from the overall structure.