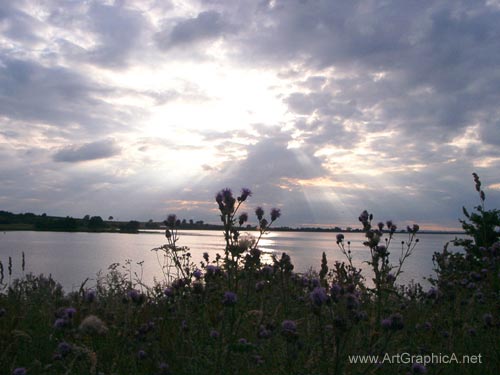
In some circumstances a photograph is almost absolutely necessary, especially when something as dynamic as clouds and sky formation becomes the focus of a drawing that might entail several hours of rendering.
We will look at how to capture the soft edges needed for clouds, how to convey the strongest sense of light, rendering a reflective water surface and the creation of dark areas needed to give the drawing maximum contrast.
MATERIALS
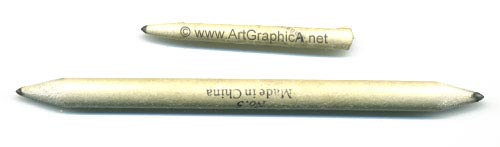
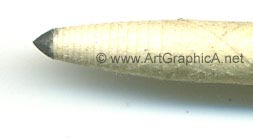
Materials are very minimalist: a mechanical pencil, drawing paper, blending stump and putty eraser. A mechanical pencil is not crucial, but if you use conventional pencils you will need to maintain the point by frequently rubbing it on a piece of sandpaper. I cannot recommend any particular products, and would certainly endorse none, but I appreciate some individuals are eager to know exactly what has been used...
The mechanical pencil is a 0.5mm Techniclick G from Pentel (I bought it from a common stationery/office supply shop), the graphite diameter is 0.5mm. 0.7 mm and 0.3mm are also common, but 0.5mm is a good all round size for shading and detailing. Different grade refills are available, although in this drawing, HB was used throughout.
The specific paper used was Windsor and Newton's A4, smooth surface, heavy-weight drawing and sketching paper - an A4 pad of 25 sheets. Windsor and Newton also produce a bristol board pad in this range. If you can, get your hands on bristol board (a paper with no discernable grain - very smooth surface), there are several companies that produce it, although it is not quite so easy to find in the UK. Bristol board should allow very fine shading and details, more so than the smooth surface, though the latter is perfectly adequate.
Putty Eraser
The kneadable putty eraser can be used to reclaim areas between clouds if need be. It was used in this demonstration to create the rays of light that cut through the clouds.
If you need a break, you can always sculpt the putty into little creatures.
Tortillion and Blending Stump
You will still find the occasional artist who will censure these tools; goodness knows why, though elitism does run high in the art world! My advice is to use them wherever you want smooth tones, because they will make light work of everything you do, dramatically reducing the time it takes to complete a drawing. No point cutting off your nose to spite your face.
The Tortillion (rolled up pieces of paper - see photo close ups) and blending stumps are very similar, and are liable to last many years. I used the tortillion for the clouds, and the blending stump for water and foliage. The grey tipped ends shown in the photographs are where the graphite has accumulated. If I want to clean them, I usually give them a light rub on a piece of fine sandpaper, though typically they function better with the graphite traces left as is.
Before starting, it makes sense to ascertain the most logical structure for ordering the features in the drawing. If you are right handed it is often good practice to start in the top-left hand corner (top-right if you are left handed), and work down. This lessens the possibility of unwanted smudging. Take note of any overlapping features - in this instance, the dark silhouette of the foreground overlaps the water and a little of the sky, making it sensible to complete the sky and water before attempted the foliage in the foreground.
Keep your hands off the paper! Any oily residue where the hand contacts with the paper is liable to affect the surface, and cause problems when it comes to getting an even tone in your blending. Place a second, clean sheet of paper over your paper, and rest your hand on this. If any bits, such as dust or eraser particles land on your work, try to resist blowing them off as the moisture from your mouth may also affect the paper's surface. Instead use a soft brush to remove the offending article.
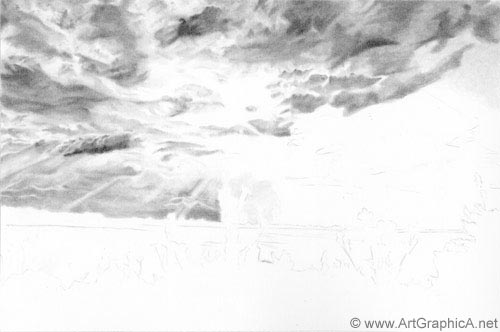
Everyone knows clouds are soft like cotton-wool; there are relative hard edges at times, but even these remain quite soft. To achieve this quality the tortillion is relied upon very heavily.
Clouds have form and follow the rules of perspective, where the cloud is denser, the contrast is deeper. This does not stop the forms from being quite abstract, and in the early stages it can be hard for the brain to interpret what is happening, as it only has a partial picture. This is when conceptualisation and the notion of 'it should look this' starts to creep in. If it happens ignore these doubts and continue to draw what you see, no matter how wrong it may initially appear.
I layer all my clouds, starting with a very light initial layer to kill the white off the paper. You must hold your pencil with a very gentle touch if it is a mechanical one (not so much a problem with a 6H or 7H pencil), to create the lightest of tones, often using only the weight of the pencil itself to draw the hatchings. In the top right of the drawing you can see some light cross-hatching. There is a blown up version below. By rubbing the tortillion in little circular motions, this cross-hatching disappears into a unified blended tone. Try to keep the same pressure throughout. For these lighter tones you will not need to press too hard.
The process I am using throughout is a layered one. Once the lightest tones are in place, I will add another light layer of cross-hatching over the top, and blend this, all the while darkening the tones in the areas of deeper contrast. Working in this carefully, controlled fashion, the very light gaps inbetween the clouds simply fall into place, although there is no harm in using a putty eraser to reclaim areas if need be.
In this stage, a little of the cross-hatching has been blended, and as you can see, the blending process does darken the value. If I require an even lighter value, I might apply the tortillion directly to the white of the paper and because there will be traces of graphite left on this blending tool, this can be used to add graphite to the paper without the need of a pencil. When I spoke of relatively hard edges in clouds, an example can be seen on the single cloud to the left of the page, closest to the horizon. Notice that there are some very light areas adjacent to the rounded darker tones on this little cloud - this adds to the drama and hardens the edge a little (though it will still need some blending), and draws the eye, at least during this stage of progression. Sometimes it pays to artificially exaggerate the interplay of light and dark, deliberately placing a light area beside a dark area, even if this means deviating from yours source of reference.
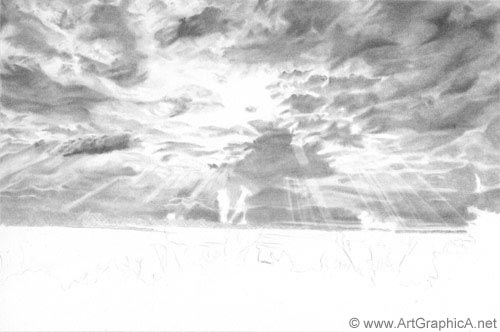
One of the problems that all artists are faced with is one of light. We cannot draw with light, and the brightest of white drawing pads is never going to come anywhere close to the brightness of the sun. The best we can hope for is an illusion of light, and to do this all shading must be relative. The darker clouds on the right, draw the eye in towards the lightest area where our sun is positioned. The trick to adding the drama of light, and a sense of placement where the sun shines brightest, is to use the full whiteness of the paper in this area alone and nowhere else on the paper. The areas of light between the clouds in other areas of the scene may appear white, but they are not, they are shaded, albeit quite subtly, and it is because of this that the eye will be drawn to the lightest area of the page and people will wonder how you managed to capture a sense of glare. Of course at this stage, the effect is not so apparent, and will not be so until the rest of the paper is toned and completed.
The drama is a little more apparent when our area of light is sealed off, by surrounding cloud. The strange white protrusions along the horizon are those of the thistles and other foliage that will grow out from the foreground towards the sky.
The rays of light can be added very easily with a putty eraser. Simply move the eraser very lightly across your clouds ensuring the angling is correct. If you have not removed enough graphite, repeat the procedure, if you removed too much, reshade the area with your tortillion or blending stump and try again. Note, I didn't use a straight-edge, which was a mistake on my part, though I corrected it a little in a later stage by using the edge of my resting paper, and running the putty along this edge to keep the rays of light from bending.
You will also notice that I have started to lay down graphite for the opposing bank across the water - at this stage the tone is similar to the clouds, but will ultimately end up quite dark, acting as a divider between land and sky.
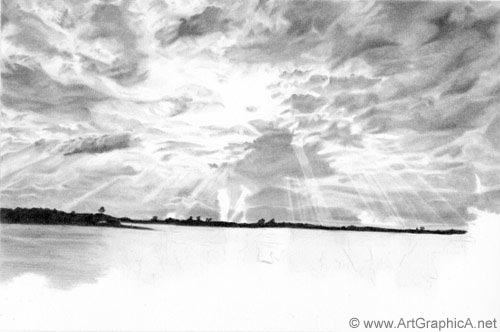
With the sky complete we can work on the dark horizon. When those darks go down you will soon know if the contrast of your sky is too light, in which case you may have to reconsider more hatching and blending until the balance is correct.
There is a video below that shows how you can achieve a dark contrast, even with an HB pencil. Some of this is down to the quality of the paper - cheap paper can be notoriously bad for layering and achieving darker tones.
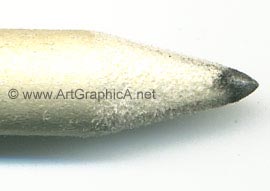
The tiny suggestion of trees in the background requires a sharp edge. If you have been using your pencil for laying down tone, the chances are it will have a chiseled edge (if it doesn't you could always rub it very quickly and lightly on a piece of sandpaper). By turning the pencil in your hand, you can make use of this sharp edge, to produce, fine, dark , hard edges.
The water reflects a little of the drama in the sky, and it too requires the softness of the clouds, and therefore the use of a blending instrument. I used the larger blending stump and drag it horizontally across the stretch of water, following the direction of the water. The initial outlines of the foliage in the foreground, from the first stage of our drawing, do end up somewhat obliterated by the blending process, but still serve a purpose as a basic template as to where the elements are arranged.
To create the sun and glare in our sky, it was necessary to keep this one part of the paper without any toning. The same is true of the water, and where the sun reflects brightest, this area is left without tone.
The water is finished before the foreground is added for commonsense reasons. The foliage must remain crisp and sharp, and if we need to return to blending our water, it would be extremely difficult not to blend away the hard edges of the foliage in the process.
Toning - Making the Darks, Dark
Much like the sky and other areas of the drawing, the dark tones are built up with layers of cross-hatching. The hatching does not need to be quite so tightly controlled, but close enough so that when it comes time to blend it covers the areas of paper and leaves no obvious traces of the hatching having existed.
Although it may seem my hand is touching the paper when I come to hatch in the opposite direction, I am only resting it lightly on the outer perimeter of the pad, and not in the area of the drawing.
When it comes time to blend, do not worry if you have to exert a reasonable amount of force. If you are using heavy-weight paper there should be no issues.
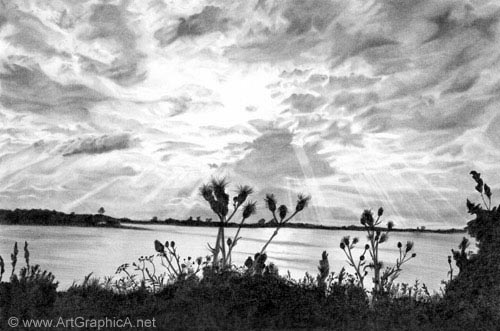
Foliage and Foreground
In this video, I add another blended layer of cross-hatching, and then proceed to go dark. I favour little tiny circular motions of the pencil, asserting a reasonable amount of pressure, though not enough to cause the graphite to snap. The result is near-black, and the tone I was after. If I had wanted it as dark as possible, the HB refills could have been replaced with a 4B and the process repeated. You could probably get the same darkness with a 2B, though as you can see, even an HB is quite effective.
Much of the reason I filmed little of this demonstration is because it is extremely slow and laborious, with the dark areas almost taking up the majority of the drawing time.
As with the sky and clouds, following the foliage to an absolute tee would be tedious. I pick out the main features such as the cow parsley and thistles, and the rest can be invented. As with the adjacent bank along the horizon it is important to turn your pencil so that the sharp chiseled edge is used for such small details. Try to picture the foliage in your mind, and allow the strokes of the pencil to mimic this (I believe this is where the lessons in blind contour drawing can play their part, though I don't suggest you avert your gaze). For example: the flowery tops of the thistles spread out in all directions and are softer than the base from which they grow - mimic this with the pencil, perhaps using short and rapid flicking motions to capture the dynamics, and although dark, do not press quite so hard. This ability to visualise and hold an object in your head, to feel it, to see its form, and dissect its structure, is the at the crux of learning to see, and hence draw. Remember to leave little areas between the foliage where the light shines through and connect any floating flowers or buds with stalks. It can be tempting to draw all the foliage in the same direction, due to the natural and comfortable slant of the hand as it draws across the page. Periodically check that you are not making this mistake, and if you are, compensate and rebalance the picture by drawing foliage in other directions.


 My advice is to use them wherever you want smooth tones, because they will make light work of everything you do, dramatically reducing the time it takes to complete a drawing. No point cutting off your nose to spite your face.
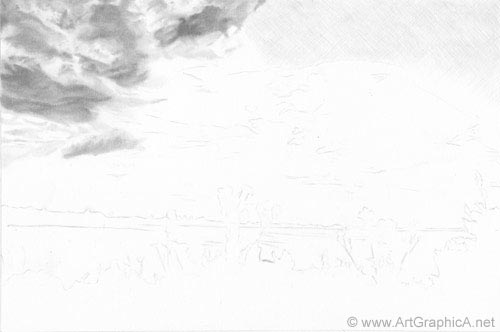
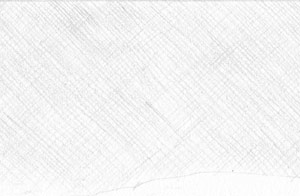 In the top right of the drawing you can see some light cross-hatching. There is a blown up version below. By rubbing the tortillion in little circular motions, this cross-hatching disappears into a unified blended tone. Try to keep the same pressure throughout. For these lighter tones you will not need to press too hard.