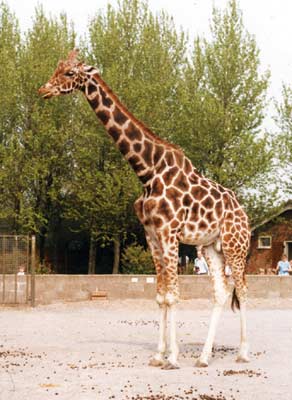
The most difficult problem involved with drawing/sketching is not so much drawing itself, but learning how to see. Simplification is always the key. Take this giraffe for example. If we race in and just start trying to put down the lines that we think we see, you could quite easily find yourself with a distorted abomination, badly disproportionate.
You must bare in mind the things discussed in this section. i.e. negative space for accurately relating the position of the giraffe's legs to one another and form, for the suggestion of shading and bringing a slight element of three dimensionality to the sketch. Now I must confess that when this sketch was filmed, I hurried a little without properly checking myself and so stunted the dimensions of the neck, and widened the body, but if anyone were to ask, I will just tell them it is a junior giraffe!
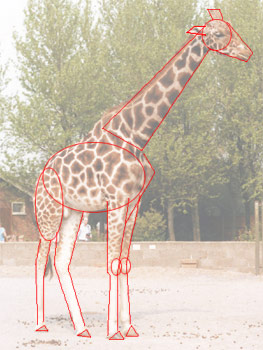
The best means to simplify a scene, animal or object is through the use of geometric shapes. Perhaps the most obvious is the oval that constitutes the body, though some areas may constitute more than one shape such as the head. These shapes are so much easier to draw, and to relate to one another in trying to better your sense of proportion and placement. Once they are drawn it is that much easier to reshape them to fit the more accurate contours that deviate from the basic geometric blocks you've used.
This method of deconstructing what is seen can be applied to anything - animals, portraits, trees. Although I may not always draw the basic building blocks, I certainly mentally envision them before I attempt to put a pencil to paper.
Unfortunately our friend is prisoner to the ambivalence of a zoo, but you could always draw the African plains and find its freedom in imagination.
Laying in the Geometric Shapes
I used a 2B to mark in the shapes that might represent a basic giraffe. Ordinarily I might use a 2H to draw these shapes much more lightly, but I wanted them to show up in the video.
It's always easier to work and correct something that is down on a page than to stare at a blank sheet of paper hoping it might draw itself.
The Head
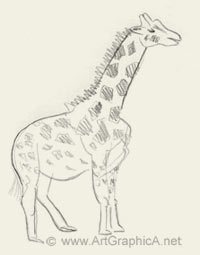
I use a mechanical pencil for the head, and refine the shape of the head before marking out the general features, i.e. mouth, eye, and the patterned fur.
Using a blending stump, I quickly rub a little tone into the head to give a better sense of form.
The Neck
Much like the head, I shape the neck a little, add the mane with lots of little flicks of the mechanical pencil and then mark the outlines of the patterns along the length of the neck.
My conventional 2B pencil is quicker at shading, and so I fill in the areas with this, and go over it one more time with the mechanical pencil as the cheap paper does not take the graphite easily. Again a light and quick scrubbing motion of the blending stump adds form to the neck. You could achieve the same effect with your finger, but it is usually good practice to avoid finger-tip blending as it deposits oils onto the paper. This is not so much a problem with sketching, but I recommend you avoid it when working on a more time consuming drawing. You could always use a piece of tissue instead.
Body, Legs and Finishing
This time I decide to very swiftly tone in the form of the body with the blending stump before marking in the patterns in the same manner as was used for the neck.
Once done we could take a pencil and just outline the entire contour of the giraffe so it stands out a little more against our white page, but this can look rather bland and cartoon like. Instead darken certain edges, and stay light with others, but with enough dark and light contours to suggest the overall form. If the principle seems confusing, do not worry yourself with it as this time, as it is something you will pick up in later sections.
To finish, I add a simple shadow with the blending stump to give our giraffe a sense of place in an otherwise two dimensional environment.
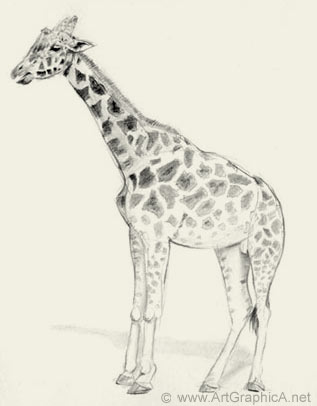
Although this goes beyond the boundaries of beginner, I wanted to very briefly show how the same procedures can be applied to make our sketch into a drawing.
The same method for defining a faint line drawing are used as were used for the sketch, except I am lighter with the pencil and erased any guide lines I might have used to get the giraffe shape. I also ensured the neck was a little longer than in our sketch.
Much the same shading procedures are used, except rather than rapidly filling in areas with a slightly care free back and forth motion of the pencil, I keep my shading tighter and more controlled, building up a light layer, blending it with the blending stump and then adding another layer of graphite over top. Some areas receive up to three or four layers which help achieve the tones. The shadow however is a little poor and is something that could do with future amendment.
 Simplification is always the key. Take this giraffe for example. If we race in and just start trying to put down the lines that we think we see, you could quite easily find yourself with a distorted abomination, badly disproportionate.