Watercolours can be a slow and highly detailed medium, but conversely they really come into their element for loose and fairly rapid sketchwork. The use of good colour in watercolours is difficult to master as what may look fine as it goes down onto the paper, will end up drying significantly lighter. Fortunately we are not concerning ourselves with such colour issues, instead focusing on the drawing aspect, but if you are new to watercolour it may take some adjusting to adapt to having your values lighten as the paint dries. Usually, it is easier to build up darker areas with a few layers of paint.
If you have never used a brush before, the transition from pencil may seem strange and alienating; only practice will resolve this, but if you have the patience to persist in trying it I guarantee you'll grow to love it. A brush can make light work out of toning, and can be used much the same way as a pencil when it comes to details.
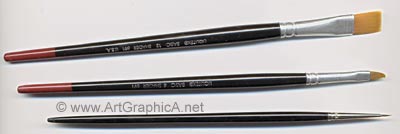
Brushes
Liquitex Basic 12 Shader
Liquitex Basic 4 Shader
Daler Rowney Kolinskey Sable 00
I use three basic brushes: a flat for toning larger areas (1cm width), a smaller flat which is slightly disfigured (don't leave your brushes in a jar of water with the hairs pointing downward!), which I use for drawing and toning, and a small, pointed brush for fine details. If you're on a budget, you need only purchase a couple of cheap brushes - a small one for finer details, and a medium sized one for drawing and shading.
Materials
Brushes - Described above. Quality isn't an issue where sketching is involved, though if you are serious about getting into watercolours it might be the right time to invest in some quality brushes.
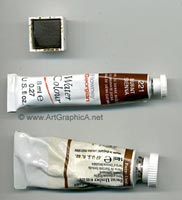
Paint - I have used Windsor and Newton's Sepia, but be free to choose any manufacturer; student quality (as opposed to artist quality) is absolutely fine here - many a skilled artist uses student paints, the main difference being that they contain less pigment, and so in some respects the more expensive artist paints last longer and the price difference in real terms is not so different. We only need one colour, but choose something dark - a yellow hue on white paper would be a bad choice!
Paper - Any cheap watercolour pad will do the trick.
Tray - Plastic palettes are cheap and useful as they have multiple wells that you could place different mixes of tone in. Alternatively a plate or saucer will work just as well, but don't use your best tableware!
Jar - A glass jar filled with tap water.
Getting Started
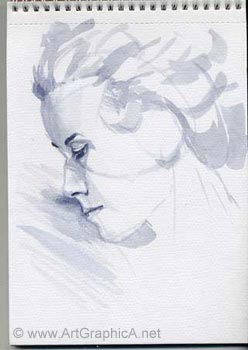
The goal here isn't to strive for an exact likeness, but to illustrate that a brush can achieve tones and block in areas, in ways a pencil can not, and that although a brush is a different instrument to a pencil, it can be used in similar ways and the transition need not be overly painful.
Begin with a watery mix of your chosen pigment, that way any mistakes can be corrected later without being too blatant.
With a light mix, start to mark in some of the general shapes and lines that appear in your source - they need only be guidelines that will at least serve as a template from which you can re-evaluate and manipulate in later stages.
When sketching portraits, I prefer to mark in where the features lie on the face at an early stage. Near the start of the video you will see I make a few small horizontal marks - these roughly represent eye line, bottom of the nose, mouth and chin, much the same way as the portrait sketch in the beginner's section.
Refining the Drawing
When it comes to refining the initial guidelines it is advisable to add a little less water to your mix so any modifications are more easily seen by the eye. By the time we come to shade and block in areas of the face and hair, you will be hard pushed to see these lines.
You may be thinking my watercolour tray needs a good clean, which it probably does, but I do like to keep little bits of leftover pigment to mix with other pigments so I can avoid painting with too pure a colour.
Toning
If you lay down a stroke and leave it to dry, you may notice the edges dry with an unwanted crispness (hard edge) that will destroy the soft graduation that we need in the skin tones. This is one of the problems that make watercolour one of the more difficult mediums. To prevent these hard edges from forming, use a clean brush and clean water and run a damp brush along the edge of the darker tone that you have freshly laid on the paper to ensure the edges remain soft. If I feel the paint is getting away from me, I might sometimes dab at it with a tissue, however do not forget that what you see when the paint first goes down, will become lighter when that paint dries. With this being a sketch I simply dip my brush into the same jar of water and use this to dampen the edges, though if I were working in colour on something more detailed, I would probably use a second jar of clean water and a brush dedicated to softening edges.
Hair is usually a straight forward affair providing you keep your strokes moving in the same direction in which you see the it growing, from root to tip. I decided to add some of the darkest areas of the hair first, which will looking a little strange in the earlier stages, but provide a reference of dark and light from which I can use to gauge intermediate values. As no area in the hair shows any white, I use my largest flat brush and very quickly kill any white paper with a light wash.
Details and Finishing
Toning with watercolour can be a bravery test. When you start adding darker values you have to possess a little confidence that when it dries it will not be as stark as it appears when wet.
In the finishing stages the smallest brush comes in useful for refining the features such as the eyes, mouth and nose. I also use this brush very briefly at the end of the sketch to add a few suggestions of finer hairs on her head.
Finally, the hair is darkened again in tone to ensure it remains darker in value than the face.
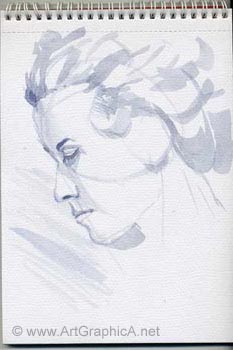
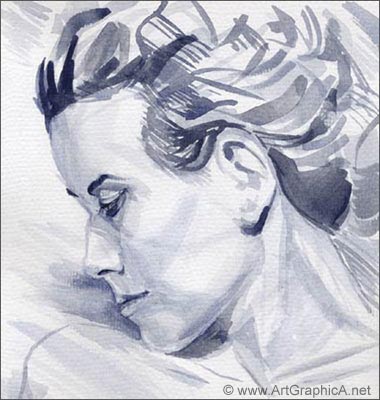
The same process was used for an even faster portrait sketch shown below. This one was made using French Ultramarine mixed with a little Sepia to kill some of the bright intensity of the Ultramarine in its pure state. In this sketch there is more suggestion to hair and shading, and the initial guidelines show through, but all this adds to the sketchy-look with something more appealing in its looser spontaneity.