ALYSSA'S PORTRAIT |
||||||||||||||||
Painting in Watercolor with Speedpainting VideoIntroduction: Many artists are intimidated by faces. In this demonstration, using an accurate light pencil drawing as a guide and the original photograph as reference, I will show how to paint a portrait of Alyssa. I used three brushes: Winsor Newton Series 7 sizes 5, 7, and 10 rounds. 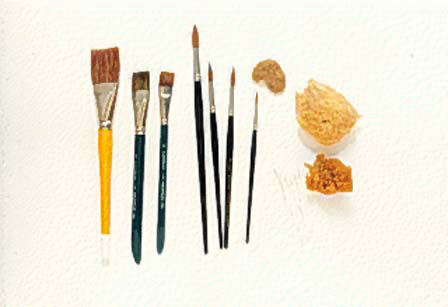
Equipment: The brushes I typically use for my paintings are as follows: "Jeanne Dobie Brush" Cheap Joe's Art Stuff, size 1 1/2", pure ox hair. This is great for large wash areas, it holds a ton of paint. Grumbacher Aquarelles, style 6142, sizes 1" and 3/4". These are great for smaller wash areas. Winsor Newton Series 7 Rounds, sizes 10, 8, 7, 4. I use these on the subject of the painting mostly. They are great for detail and because of their quality they hold a great deal of paint and yet are able to come to a very fine point, even in the larger sizes. They are very expensive, but are worth it because they are miles in front of the other brushes, in my opinion. An assortment of sponges - Elephant Ear, Silk Sponge, and Sea Sponge. I use these for everything from cleaning my palette to moistening areas of the paper. They are also useful to roll your brush on to get rid of excess water before applying paint. Q-Tips. These are a very useful tool when you are painting detail in a small area. They can take up small areas of paint, or smooth areas. I use a lot of these. 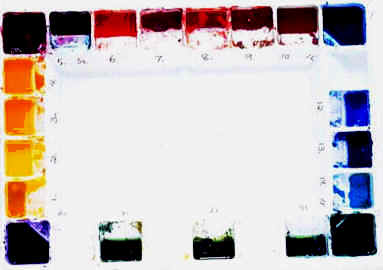
Palette: My palette consists of about 19 transparent, semi-opaque and opaque colors, no black. I mix all my colors - I rarely if ever use paint straight from the tube. I prefer Winsor Newton Artist Quality Watercolors and Da Vinci Artist Quality Watercolors. I pay attention to the permanence rating and try to keep only permanent colors on my palette - except for Winsor Newton's Rose Madder Genuine because I just love this color. In this painting, the colors I used for the wash and some detail in the face and hair were mixed from Aureolin, Rose Madder Genuine and Cobalt Blue, in varying amounts to make colors ranging from a peachy flesh tone to a brownish shadow tone. Some Cadmium Orange was used in the hair. The darker and darkest colors were mixed from Alizarin Crimson and Winsor Green. The lips were mixed from Cadmium Red Light and Alizarin Crimson, with a touch of Cobalt Blue towards the corners of the mouth. The background is Winsor Violet and French Ultramarine Blue. Click on any of the below images for more detail. 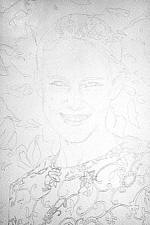
Step OneAfter stretching the watercolor paper (by soaking it in my bathtub, and than stapling it to gatorboard while it is still wet, and then letting it dry flat) I lightly sketch a pencil guideline - without erasing (easers are abrasive on the delicate tooth of the paper and can mess up the painting!) of my subject. 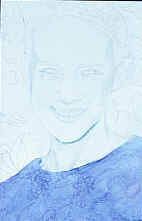
Step TwoI like to start with a large easy area first. I chose Alyssa's shirt - I mixed cobalt blue and french ultramarine together to get a nice blue that will later compliment the warm oranges in her skin tones. 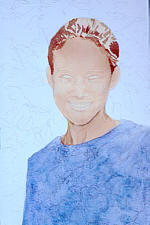
Step ThreeNext I mix a light wash for the face - leaning it heavily towards the overall skin tone - red, yellow, blueish or greenish. In Alyssa's case, she has warm tones to her skin. Working light to dark, I also mix some darker hair color and begin "shaping" the hair with my brush. 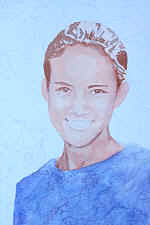
Step FourAt this point I am ready to paint some detail in the facial area. I mix a darker skin tone and shape the face. I pay very close attention to the eyes, because this is the area people most identify with so they have to be accurately rendered. 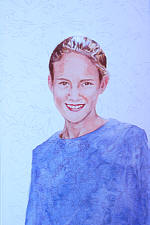
Step FiveI mix some cadmium red light and permanent rose and paint her lips. I continue to bring out her features with successive layers of skin tone color. I also add detail to her hair- thinking of it in terms of "chunks" of color- not individual strands. 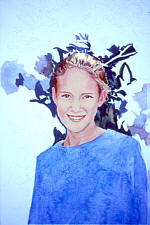
Step SixNow I begin to paint in the background so that I can use some of that deep color to draw around her, bringing her into the immediate foreground. 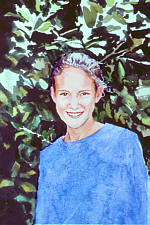
Step SevenI have painted in most of the background. The colors I used were sap green, viridian, aureolin, winsor green, hookers green, cadmium orange or red light. I mix all of the colors- using 2 different colors to get a variety of greens. The very dark green is winsor green mixed with alizarin crimson, which are both deep staining colors. 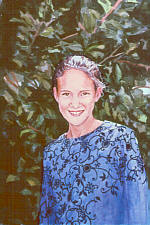
Step EightAfter completing the background and touching up areas in Alyssa's face and hair, I proceed to the design in Alyssa's very cool blue top. The dark navy blue is created by mixing a touch of cadmium red to ultramarine blue. 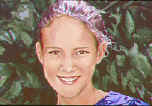
Step NineNext, I go back to Alyssa's facial features. I soften areas by using a damp Q-tip. I add deeper shadows if an area appears too flat. I like to add pure red in areas like the ears to give life to the portrait. 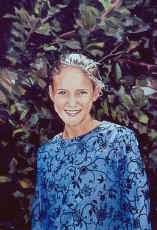
Step TenHere is the completed portrait. Tutorial is copyright of Margaret Crowley-Kiggins
|
||||||||||||||||