|
Watercolor art lesson
Palette, Brushes, and Paper
The following is a list of colors, brushes, and paper that I used and recommend for achieving equivalent results to that of the finished berries.
Palette
- Winsor Red (W&N)
- Permanent Alizarin Crimson (W&N)
- Winsor Blue - red shade (W&N)
- French Ultramarine Blue (W&N)
- Sap Green (H)
Brushes
- no. 5 round, for softening your edges
- no. 6 round, with a nice point
- no. 8 round, if you plan to enlarge the drawing and work on a larger scale
Paper
- 5" x 7" ( 12.7cm x 17.78cm) of Arches 300 lb. Cold Pressed watercolor paper
- Scrap piece of Arches 140 lb for testing your colors and values
Color Key

[ 1 ] Winsor Red (med./dk.)
[ 2 ] Sap Green (lt./med.)
[ 3 ] Permanent Alizarin Crimson (med./dk.)
[ 4 ] Permanent Alizarin Crimson + Winsor Blue (med./dk.)
[ 5 ] French Ultramarine Blue + Permanent Alizarin Crimson (dk.)
[ 6 ] Sap Green + Permanent Alizarin Crimson (tad) (lt./med.)
Line Drawing
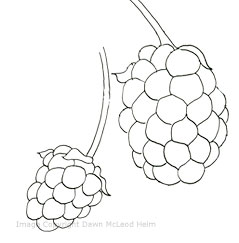
Transfer this line drawing onto your watercolor paper, enlarging or reducing it as needed.
How to Paint the Berry Segments
| |
|
|
Some segments have a white highlight. |
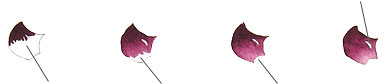 |
| Step 1. Apply small brush strokes of color, and keep moist. |
Step 2. Quickly soften the edge, and keep new edge moist. |
Step 3. Quickly rinse your brush and blot well. Finish softening the edge. Let dry. |
|
The Underpainting - Step 1
 When you are finished with Step 1, your berries will look like this. 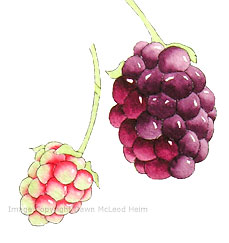
Mix colors [ 1 ], [ 2 ], [ 4 ], [ 5 ].
With your kneaded eraser, remove enough graphite from the berries to make the lines barely visible.
Berries
You will need two brushes: one for pigment, another for clean water.
Small berry
Load your pigment brush with [ 1 ], and paint a short distance. Rinse your brush and blot well. Load your brush with [ 2 ] and charge [ 2 ] into [ 1 ]. Finish painting the segment with [ 2 ]. Paint all the segments in the same manner, carefully leaving white highlights on certain berries as shown in the illustration. Rinse your brush and blot well. Remember to let each segment dry completely before painting the one next to it.
Large berry
Load your pigment brush with [ 4 ], and paint all the segments on the left side of the berry following the directions on "How to paint the berry segments" as explained above. Rinse your brush and blot well. Load your brush with [ 5 ] and paint all the segments with on the right side in the same manner, carefully leaving white highlights as shown in the illustration.
Stems
Load your brush with [ 2 ], and paint the long narrow stems, as well as the tiny leaves on top of each berry. Be sure to let each area dry before painting the one next to it.
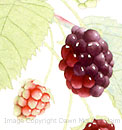
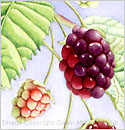
Adding the Details - Step 2
 When you are finished with Step 2, your berries will look like this. 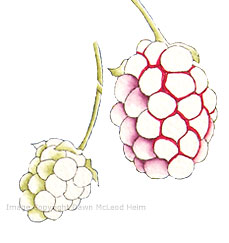
Mix colors [ 3 ], [ 5 ], [ 6 ].
Berries
Small berry
Load your brush with [ 6 ] and paint all the segments on the left side as shown in the illustration. Start each segment with a few brush strokes of color, then soften the inside edge with a clean moist brush. Paint each segment separately, and let each one dry completely before painting the one next to it. Rinse your brush and blot well.
Large berry
Load your brush with [ 5 ], and paint the segments on the left side as shown in the illustration. Start each segment with a few brush strokes of color, finishing by softening that edge with a clean moist brush. Let each segment dry before painting the one next to it. Rinse your brush and blot well. Load your brush with [ 3 ], and paint the two segments on the right side as shown in the illustration, softening the inside edges with a clean moist brush. While those two segments are drying, and with [ 3 ]still in your brush, paint in between all the segments as shown. Rinse your brush and blot well.
Stems
Load your brush with [ 6 ], and paint down the left side of one of the stems. Quickly take your clean moist brush and soften along the right edge. Repeat the same on the other berry. Let dry. With [ 6 ] still in your brush, paint the small leaves on the top of the berries as shown in the illustration, softening the inside edges with a clean moist brush. Let each one dry before painting the one next to it.
The Finishing Touches - Step 3
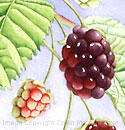
 When you are finished with Step 3,
your berries will look like this. Take a clean, moist brush and lightly go over some of the highlights on the segments on the left side of the berries to slightly tone them down.
By Dawn McLeod Heim
|