The Golf ClubsCarbon, Charcoal and Pencil Art |
|||||||||||||||||||||
 MATERIALS
Strathmore 400 Series 80 lb. Fine Art Paper Preliminary Drawing
My initial line drawing is worked out on a separate piece of paper using a graphite pencil. Computer paper works nicely for this step. It isn't unusual for me to spend a day or two working on the line drawing. I like to set it aside for a time. When I go back for a second and third look, many times I will see small changes that need to be made...these will matter in the end. Carbon Pencil is an unforgiving medium to work with. When you place it on the paper, especially in a drawing as dark as The Clubs, it's very difficult if not impossible to remove. My line drawing must be absolutely accurate and complete as possible. You'll notice that I've even included some of the more important shadow shapes and the smaller shadows within these shapes. Transferring the preliminary drawing: When I'm completely satisfied I turn the line drawing over and cover the back side with graphite. I then place the drawing 'face up' on my good art paper and trace over my line drawing being careful not to press so hard that I indent the paper. This indented place will show up later as a white line when the carbon is blended over that area. This transfer step eliminates the necessity of erasing on the good art paper...which alters the surface and makes the carbon grab unevenly when blenders are used. 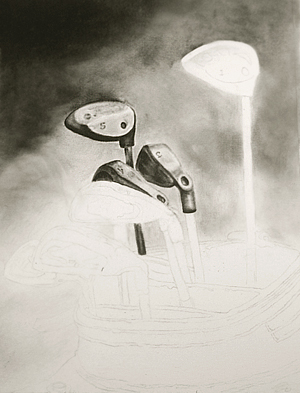
Step 1Being right-handed, I began in the upper left corner of the drawing being careful to cover the lower portion with a clean sheet of sketching paper. I first applied 6B carbon pencil directly to the paper, then blended with a stump toward the first club head letting it get lighter as I came down the paper. I then applied more carbon from the "carbon farm" (see below) using a piece of felt to achieve the smoky shadowed look. I did this just to get a feel for the finished background. The club heads were next. I used #4 and #6B carbon pencils applying them to the paper in the darkest areas, then blending with a stump into the lighter areas of the club head. I used a #2H graphite pencil for the reflective portion of the club head, using a piece of folded chamois skin to blend and smooth the graphite. My Carbon Farm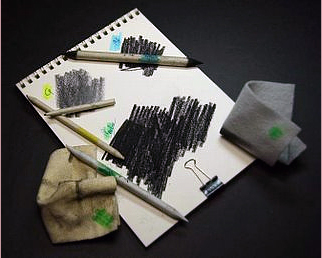
What's a carbon farm? It's quite simple. Because I use blenders to also apply color, on a small pad of drawing paper (6" x 8") I build up a solid area of 6B carbon and 9B graphite. If I'm going to be using charcoal I'll also build up an area of 6B charcoal. I then use my blender to harvest or pick up color and apply it to my drawing. You'll notice each plot or area is color-coded for ease of use and I always use a separate blender for each medium and label them in the same manner (yellow for graphite, green for carbon, and blue for charcoal). The color coding is important because each medium has very different handling and visual characteristics and will be reflected in the finished drawing. 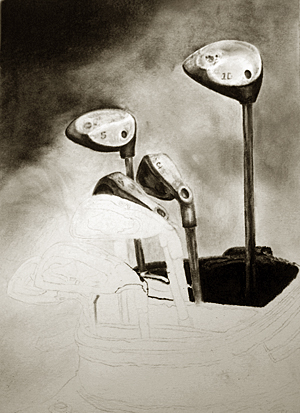
Step 2I continued to work on the taller clubs in the back using some of the same techniques as mentioned above. I used a #2B carbon pencil for the smaller details on the club heads and metal shaft. I began to fill in the dark interior of the golf bag, using a softer 6B carbon pencil close to the upper rim and charcoal for the deeper portion of the bag to better show the club handles. Also, the cool tone of the charcoal will better indicate the depth of the golf bag especially when placed next to the warm tone of the carbon pencil. I also worked a little more on the background. I keep going back to the club heads and adding small shadowed areas within the larger shadow shapes with an artist's brush. I spend a lot of time analyzing the shadow shapes in my reference photo. A shadow isn't just one shade but many shades and shapes inside each other. It is important that you convey this in your drawing. 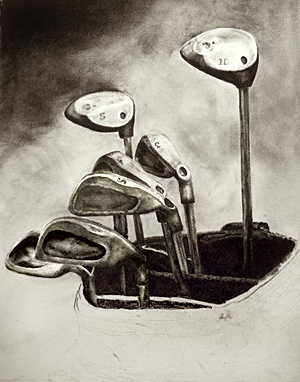
Step 3I continued to work down the paper using many of the same techniques mentioned above. The shadows and highlights on the club heads are pretty well completed. I lifted highlights with a kneaded erasure and folded piece of chamois skin, then went back and added more color from "the farm" in some places with a stump, blended this again with a stump and repeated. It is the many layers and repetitions of this process that give the club a realistic "well used" appearance. As I look closer at the step 3 photo here, I see that I got a little sloppy with my carbon. I always keep the lower portion of the drawing covered when working so I'm not sure what happened. Perhaps I wasn't as concerned as the area was going to be dark anyway. Just keep this in mind and keep the area you're not working clean at least cleaner than you see here! Remember, I said carbon was "unforgiving." The smudges you see on the lower portion of the golf bag could NEVER have been removed completely! 
Step 4 - FinishUsing a piece of felt I added more shadows to the background and lifted out a few more "smoky" highlights with the chamois square. I worked a little more on the golf bag, using a kneaded eraser to lift subtle highlights on the rolled edge to bring out the weathered texture of the leather. I also restated the bolts that hold the strap on that had been lost in the drawing process. Lastly I deepened some of the subtle shadows on the club heads using an artist brush and added a few more highlights with a kneaded eraser...Ah, to know when to quit! Visit Marsha Robinett
|
|||||||||||||||||||||