Drawing For Beginners
CHAPTER IV
How to draw hands
HANDS are excellent things on which to practise drawing. Firstly, because they are difficult ; secondly,
because having two we can always spare one and draw that. And we can draw hands early and late. We shall never draw hands too often nor study them too much. It is often said that we can judge an artist's work by the drawing of the hands. If the hands are good the rest of the work is good, and if bad, then so is the rest.
It is not wise to make hard-and-fast rules ; still, there is a good deal of truth in the saying, as we shall very soon discover.
When first drawing hands we must apply the same broad rules--of simplicity. We must choose simple positions.
For instance, that hand with finger pointing, with which we are so painfully familiar ; that ugly, ill-drawn hand" This way to the Menagerie," " This way to the Performing Bears," " This way to the Cricket Pavilion," " This way to the best Teashop in the Town." " This way," we might add, " to our first drawing of a Hand."
Having the offer of our left hand, we can begin without delay. Let us sit squarely at a table, resting our left elbow on a book and pointing the index finger straight in front of us.
Observe the whole shape carefully ; block in the strong square angles and proceed from the beginning of the wrist to the upper knuckle--then along the forefinger to the more or less square block of the inner finger, and on to the sweeping curve of the thumb.
Now open your hand, spreading out your fingers. As you move each finger up the knuckles loosen and dimple the skin ; as you clench them once more together the knuckles curve into clean sharp forms. Each finger is based in a good strong knuckle, remember that. Young artists are too fond of crowding knuckles together, and if hands grew as their drawings indicate they would have a poor chance of gripping an oar, a handle-bar, or even the useful knife and fork.
Having noted that the biggest mass is composed of the doubled fist, and that the angles of thumb and forefinger bear away from each other, we see that the line of the wrist forms yet another angle.
Of course it is quite probable that your hand may not resemble mine, but the general principles hold good. My thumb is large, my fingers are long ; yours probably will be shorter and the thumb more slender.
Look at the sweeping line as it proceeds from the back of the wrist to the knuckles, and notice the swelling curve of the thumb beneath and the manner in which it bends back. We will now give our attention to the forefinger. How straight and determined it is, pointing and almost speaking its command, how thick it is at the root, and how it tapers to the tip !
We now begin to search for more details. We draw the finger more carefully, marking the wrinkles on the upper part, and the corresponding curves on the lower ; then we notice the way in which the loose flesh folds in springy curves, joining thumb to forefinger in a useful hinge.
We mark the clean sweep of the thumb and the wrinkles on the back-curving knuckle, also the shape of the nail, a square-cut, important-looking nail, curving on the outer edge and following the curve of the thumb-tip. Then back we trace the thumb and note the wrinkles on the largest swelling curve ; back to the wrist we go until we meet its firm tendons.
From thence we might jump to the knuckles once more, noting the deeply cleft wrinkles in the bend. We should then be ready to draw in the dark shadow of the doubled fingers, the upper nail (like a portion of a tiny pink shell), and the square shadowing of the thumbnail.
Before we leave the drawings of our own left hand there are other poses to consider.
For instance, your own left hand holding a small object such as a coin, a flower-stem, or a reel of cotton. The latter, being a light object, you would hold lightly between your first finger and your thumb, supported by the second and third fingers.
Sketch first the upright shape of the hand and wrist, then the first finger and the knuckle from which it springs, the upright thumb, and the angle of the reel of cotton.
Here, by the by, let me say once more that you need not feel bound to pose your left hand in exactly this position. If you should prefer another pose, with the palm more exposed (or less), by all means adopt yours in preference to mine. These hints may then be used as a general guide. My positions are chosen because they present simple problems.
And now let us return to the hand with the reel of cotton.
Having roughly sketched the forefinger, the thumb, and the general proportions of the wrist and hand, we should then pay a little more attention to the hand itself, the back of which lies like a flat upright line breaking into small indications of the second or third knuckle. The first knuckle is slightly indented, and the root of the first finger descends in a firm swelling curve to the folded muscle of the thumb.
The thumb presses inward against the reel, and, marking the angle of its nail, we sketch the firm long line of the knuckle down the swelling curve to the root of the thumb, behind which we have the lower swelling curve of the palm.
The first finger and the shape of it must be carefully noted. My fingers, though long, are plump, and yours may present sharp . bone and knuckle. I trust that they may, for bony substances are easier to draw. Their shape is clean and definite, their angles more acute and therefore more quickly noted.
We note here the tip of this first finger and the apex coming at the front of the nail. Next we draw the folds of each finger-joint.
From the second knuckle we can trace the second finger, hidden behind the first finger, but seen in a tiny space between the reel and first finger, and the tip of it obtrudes on the far side of the reel.
The third finger rises from the third knuckle, and is seen in the space between the first finger and thumb, and again beyond the thumb, behind which we know it supports the reel.
The little finger merely waves a graceful tip, like the clown in the circus, doing nothing in particular. This hand, though simple, can be carried to almost any length of study. Note the shadows of the thumb, the shadows of the knuckles, of the first finger-tip, and those cast by the reel. The reel itself, being of black silky thread, is (in my study) the darkest tone of all.
The left hand holding a fan suggests another variation-- this time with the palm broadside on, and the finger-tips coming forward.
First note the pear shape of the pointed fingers, bent fingers, and flattened palm, meeting at a slender wrist.
Observe the angle of the object that is held correctly, because from that position the fingers curl.
The fan is a fairly stout object composed of thin slats folded together, and so nicely adjusted that the touch of the tip of a finger displaces them.
The thumb holds and supports the fan in a firm upright position. The thumb rises from a long swelling base, flatly on one side--despite the faint indication of the bones--and in two long swelling curves on the others, meeting in a firmly rounded tip.
Beyond, and curled round the fan, we have the first finger, then the second, third, and fourth fingers tightly grasping the end of the fan. These we block in as one mass, marking the angles of the outer joints, the inner joints, and the finger-tips ; the palm flattens and bulges to the wrist.
Then we again revert to the thumb and the finer details, the pointed finger and the shadows, the first, second, third, and little finger (we have already sketched this in mass and therefore shall have no great difficulty with details), the knuckles bending inward, and the tips of the fingers closely holding the fan. Mark all the darkest shadows. Under the first finger is the curve of the thumb, and under the fan (the lower part of the palm indented by the ring of the fan) the sharp firm shadows between the fingers.
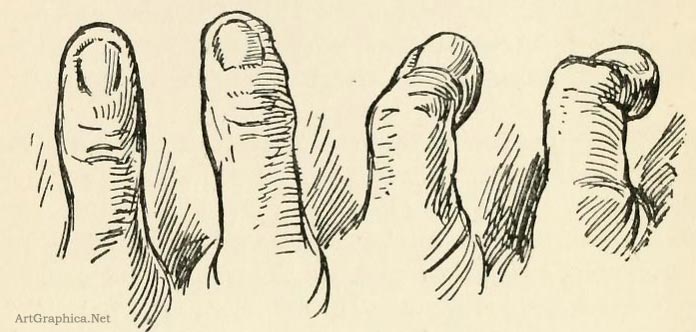
Fig. 13. THUMBS UPRIGHT AND FORESHORTENED
More poses for the left hand might include :
Left hand beckoning, or palm extended and back presented ; hand clenched ; hand lying flat on the table palm downward, or palm uppermost. Both are rather difficult studies.
Rest your elbow on the table, clench your fingers, and extend your thumb. Draw only the thumb.
Turn your hand toward yourself with the palm uncovered and draw your thumb--bent.
You should become well acquainted with all your various fingers by drawing each one separately--and many times.
Suzanne Lenglen, the great tennis-player, said that it took her six months to learn a certain stroke. It will take us certainly longer to learn how to draw all the fingers of our left hand.
Little children are very clever at painting and drawing gloves. Sometimes I have pinned a shabby old leather and fur gauntlet to a board, and the painting has been surprisingly good. And yet had I suggested the drawing of a hand, a wail of despair would have gone up. A glove is a step toward the drawing of a hand.
Have you drawn a hand, gloved ?
If not, I advise a trial. Take for choice a glove of a firm substance, leather instead of wool, and thick leather in preference to thin ; if it has a gauntlet of fur, so much the better.
Ask some kind friend to put his gloved hand on the top of a stick or an umbrella, and make a careful study of it. It will be simpler than the hand unclothed. The palm will be more of a mass, the seams will give the direction of the fingers, the wrinkles of the leather will give--more or less--the base of the thumb, the knuckles, and the wrist.
Having made a study of the gloved hand, ask your friend to remove his glove and resume the position with the bare hand.
If you can make the two drawings on the same sheet of paper you will find that your previous effort has helped you considerably to draw the ungloved hand.
Tight gloves distort and contract the hands, loose gloves disguise the shape. Do not let this worry you. Try to draw what you see--as you see it.
Another time you might persuade some one to hold up a hand, palm toward you and fingers together. (See No. I, Fig. 16.)
Do not begin with sprawled fingers spreading apart, it is bewildering for a start.
Block all the fingers together and draw an imaginary line from the tip of the thumb to the fingers to check your proportions. Close up your own thumb and note that it reaches to the first joint of your forefinger. Thumbs, because of the deceptive nature of a curve, are often deprived of strength, length, and muscle. Note the large surfaces of muscle, the almost square shape of the palm. Once you have the larger proportions of fingers and thumbs well fixed in your mind it will not be difficult to observe each finger, each knuckle, each finger-tip separately.
The rather listless fingers (No. II, Fig. 16) can be indicated on the same lines ; the fingers, though they are separated, can be first blocked in together.
When drawing a hand holding a ball be sure that the hand does hold the ball. I would emphasize the point that often, very often, young artists draw a hand holding a ball, or a pen, or a hockey-stick, and so absorbed do they become in drawing the fingers that they neglect the object the fingers are clasping, with the result that it reappears in a distorted form.
And the excuse offered generally is : " I had to draw it in such and such a way or the fingers would not have come right."
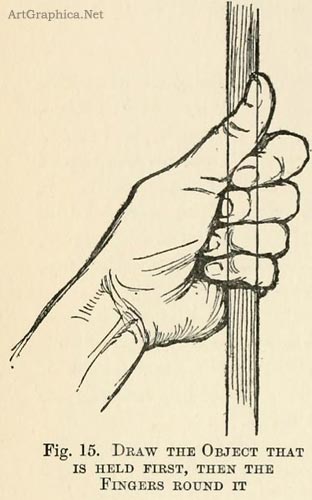
When drawing a hand grasping fit the fingers round it, rubbing out later the part which is hidden. If the thing held is straight or round, obviously it must be drawn straight or round.
Have you seen an X-ray photograph of a hand, or held your fingers up to a bright light and seen through the film of pink flesh the dim shape of the bones ? Muscles, tendons, veins, flesh, and dimples attract our attention. The bones we are inclined to neglect.
Indeed, it is curious how fond we are of looking for things that matter not at all.
For instance, how often do we see a hand pleasantly but feebly drawn ! We wonder vaguely what can be wrong. Ten chances to one the artist has paid too much attention to minor things. He has tried so hard to give the nails the right shape ; but what attention has been paid to the knuckles, to the base of the fingers, and firm shapes between each joint, to the joints themselves, all of which are a great deal more important ?
The ring on the finger, the watch on the wrist, is eagerly depicted, for it is ' jolly interesting.' So it is. But if the metal is beautifully and intelligently drawn, and the finger, or the wrist, looks feeble and patchy, what then? And the wrist is often neglected. It is the link between the arm and the hand, as the ankle is the link between the leg and the foot, and both shapes are fascinating studies for the artist.
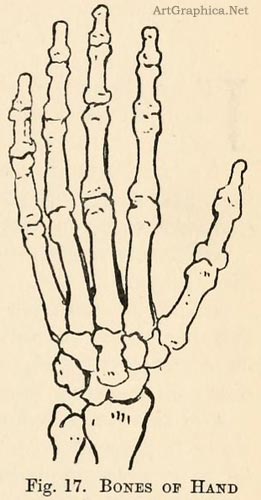
We must try to ' get at ' the framework. Once we have the bony structure in our minds we shall find the outside shapes less baffling.
Not that I would advise you to begin by drawing the skeleton.
Start drawing freely.
Only, when you feel yourself becoming confused, give a thought to the bones ; they are a wholesome check. Seek out shapes. Don't be satisfied with pretty curves and dimples, cushioned palms and tallow-candle fingers. Move the fingers to and fro. Twist and turn the wrist. Never be afraid of losing a position. You will gain something of far more value than that which you may lose.
The bones of the hand arc small but fairly easy to understand. They have no cup and ball or rotary movements like those of shoulder and forearm ; neither are they shrouded in huge muscles like those of the ribs and back. Moreover, they are plainly seen in the hands of the very old, crisscrossed with big blue veins.
Prev Page
Drawing Yourself
|


