Foot Drawing
CHAPTER V
Drawing for Beginners
IF we all walked about in sandals instead of boots and shoes, the human foot would be much less difficult to draw.
If centuries of cramping leather, of high heels and pointed toes, had not spoilt the shape of modern feet, we should be more interested in drawing the ' human foot divine.'
Artists often declare that a pretty foot is the rarest of all rare things.
But all start in life fairly well equipped in that respect, and therefore we may consider ourselves fortunate if we have the opportunity of drawing Jack's bare foot or Baby's queer little curling toes.
And this presents an idea. Feet - that is, bare feet - often being impossible to procure as models, why should we not begin by drawing shoes and boots ?
Baby's ' bootikin,' absurd little shape though it is, gives a rough idea of the foot, as Baby's small fingerless glove presents a rough impression of the shape of a hand.
There is plenty to observe in a shoe or a boot, and it is rather a fascinating study if we choose one with a highly polished surface. Then, again, a bedroom-slipper of quilted satin and fur is a joy to paint.
Examine the bootikin. Do we not get a crude shape of a foot ? Stuff it with paper and perch it on a table before you. Make a sketch of it, and then sketch Baby's foot in the same position, and on the same broad outline as the bootikin, treating it first as two simple angles--the sloping angle of the leg, and the forward thrust of the small plump foot. The baby's ankle is so cushioned with fat that it is difficult to discover the bone, but that we must try to find, because from the ankle-bone we get the triangular shape of the heel and the flat tread of the sole. The fold of fat above the ankle marks the deepest part of the foot and the highest line of the instep. This line descends steeply to the root of the toes, and expands in the bold curves of the five toes.
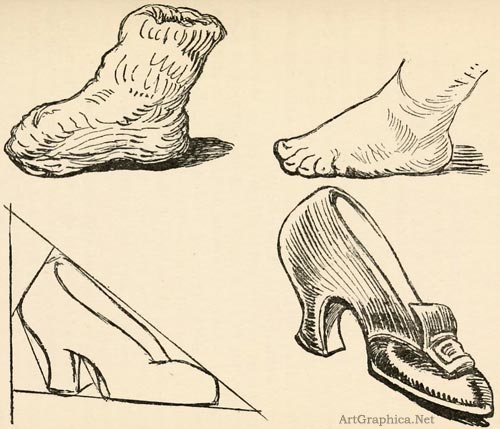
FIG 18. BABY’S BOOTKIN AND FOOT. A SHOE
Now borrow your mother's shoe. Place that before you and on a level with your eye. (If you begin by trying to draw the shoe very much beneath you, or, for the matter of that, very much above you, you will have a more complicated problem.)
Try first to draw it in a simple position--a side view.
At first sight one is apt to think a high-heeled shoe a rather complicated shape, but if you try to analyse it as a rough block, it is no more nor less than a wedge. The high heel gives the greatest depth, the toe gives the narrowing point, the tread of the foot--heel and sole of the shoe--a flat line. Having marked this simple triangular shape we note the large oval opening, the stumpy and rounded toe, the beautiful ' slick ' curve of the heel. Of course we know that no part of the foot enters the high heel, which is merely compressed leather or wood ; and we should, therefore, trace the foot within the shoe, in our thoughts if not with our pencil.
Then perhaps we shall catch Jack in a specially charitable frame of mind, ready to sit bare-footed.
Quick ! let us get pencil and paper, and plant Jack on a stool with his foot resting on the floor, and to give more action--and consequently more interest--to our study we will raise his heel by propping it up on a fairly thick book.
Next we sit down on a low seat or cushion on the floor, as near as possible to the level of Jack's foot.
Again we are all for simplicity. A profile of Jack's foot, presenting an angle with the ankle and leg, would be an interesting study.
Having roughly drawn the triangular shape of the bending foot, we next proceed to note important facts. The mass of the heel, the shape of the ankle, the broad fine sweeping line of the instep (Jack has a particularly well-shaped instep), and the ball of the foot--the springy cushion upon which the tread of the foot presses.
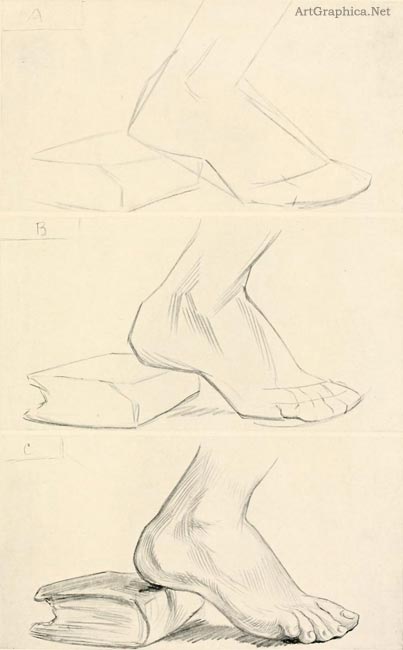
Fig. 19. JACK'S FOOT
Afterward observe the masses of light and shade, and see how the light picks out the strong tendons about the ankle. I find it helpful to shade as if I were chiselling out shapes --a method that may not appeal to you. So long as you shade intelligently, not beginning a shadow and leaving it off without reason, but using the shadow to emphasize a shape, a swelling, a curve, a bone, or a tendon, that is all I ask.
Another time we might try a full-face ' or three-quarter view of a foot. And as this presents us with the problem of foreshortening, let me advise you to begin by drawing the foot in shoe and stocking ; afterward draw the foot in the same position without the shoe and stocking, for the very same reason that we first drew the hand gloved, and later ungloved. The covering simplifies matters. Instead of the angle of the toes and toe-nails we have the broad sweep of leather covering it all in a three-cornered form.
You may prefer to draw the foot with the heel on the ground. I have chosen to represent the heel lifted. For one reason it gives action and life to the position, and for another presents a more acute and more interesting angle.
We have the leg representing one angle, and the foot yet another angle, and the apex of this angle lies in the ankle, which we know to be the end of two bones. The ankles are the ends of the leg-bones, the wrists are the ends of the arm-bones.
When we are very small we usually draw the feet as two little spoon-shaped objects, something like a couple of feeble golf-clubs, which is not so very wrong in effect.
Therefore, when we draw a foot, no matter what the position may be, the two simple angles of foot and leg are most important. Once they are settled we can devote ourselves to noting the tread of the foot and the heel, the curve under the foot, and the curve of the toes.
Margery has not a very big ankle ; the outside bone is higher and clearly defined ; the inner one is barely seen.
Partly by observing the folds of the stocking, and partly by deduction (for we know the ankle-bones are opposite each other), and also because of a shallow depression, we mark the position of the bones. That, you see, is a valuable fact. Ankle-bones settled, we next mark the curve of the heel, which is slightly exaggerated by the thickness of leather ; then we note the curve of the foot as it treads on the ground, and compare the two sides of the foot, one a long sweeping line, the other shorter (shorter because of the fullness of the rising instep), meeting at the toe with an abrupt and slightly indenting curve.
The sharp shadow under the toe lifts the foot from the ground, and a shadow defines the top of the instep. The curve of the strap of the shoe provides another shadow, and also emphasizes the depth of the foot from instep to arch. Margery's stocking, being of lighter material than the shoe, adds to the variety of the surface of our drawing. As the folds in a stocking indicate the position of the ankle, so will the bend of the leather in a boot or shoe mark the tread of the foot and the bending joints of the toes.
A highly polished leather is easier to draw than a soft dull glace or suede, for it accentuates light and shade. The bright light on the toe, the half-moon of light on the side of the foot, the dull disc of light that indicates the ankle, are of great value ; they show the position of the bones. Keep these bright ; do not dim their surfaces.
Having now drawn Margery's foot in shoe and stocking, perhaps we shall persuade Margery to pose in the same position without her shoes and stockings, as if she were on her way to paddle in the sea.
Now you see the bones more easily, and having marked the two large and simple angles of leg and foot, as in the previous drawing, we continue with the rest of the foot. The heel looks a trifle smaller ; the toes, being unhampered with leather, spread, and the big toe asserts itself. Block first the toes as a large shape, noting their tips and roots, arid working from the tendons (seen between the ankles) and the arching muscles of the upper part of the instep, and then divide and sketch the toes and their various angles.
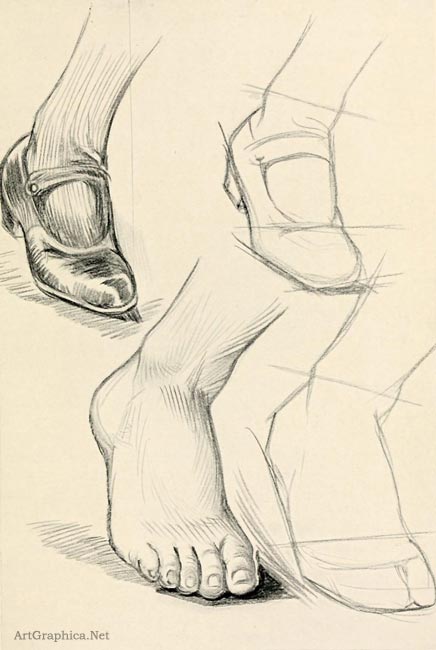
Fig. 20. -MARGERY'S FOOT
The drawing of the foot clothed has, I am sure, helped you with the drawing of the naked foot.
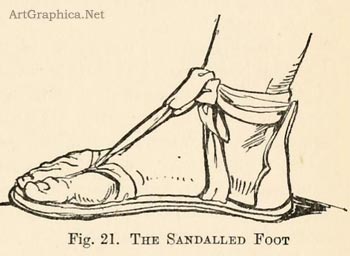
The sandal worn by the Romans, with its half-covering of the toes, and its straps and ribbons across the instep, and its thick sole--and one can roughly contrive a sandal with cardboard and ribbons at home--makes a most interesting subject to draw.
Sandals, by the interweaving of their straps, draw our attention to the variety of shapes of the toes, which we too often overlook. The big toe is an important member of the foot ; indeed, of the whole body. When the foot is raised it is the big toe that spreads and separates from the other toes, and helps to balance the foot. The big toe is as characteristic as the thumb. (Indeed, the monkeys, the tree- climbing animals, use the big toe as we use our thumbs, to grasp and hold the branches.) It is usually square-tipped, thick, and muscular. The next toe is slender and long, the second and third toes graduate, and the little toe is curved or doubled up, and is almost more negligible in size and appearance than the little finger.
It is interesting to learn that by the use of the feet and the manipulation of the toes, artists, or, at all events, craftsmen, have been helped in their work. A famous craftsman of Cairo, who works in wood and produces beautiful lattices for windows and doorways, uses his left foot as a third hand ; because of his skill in the use of this foot he is known to the city as ' the three-handed man.'
When the foot is seen from the back the heel is naturally the most prominent feature. Also the ankles are more easily observed.
Having marked the angles of the leg and foot, we should next notice the straight tendon that runs down between the ankles and spreads into the firm swelling apex of the heel. On either side of the foot the ankles are clearly seen. Note the shapes well, and note also the height of the upper part of the foot (this is always the widest section), and its sharp descent to the toes. Seen from the rear these toes present a blunted and rather flattened curve. Trace the flat under- surface of the foot, the tread and balance first, afterward the curves of the heel, and the space between the instep and the ground, remembering, always, the foot within the shoe.
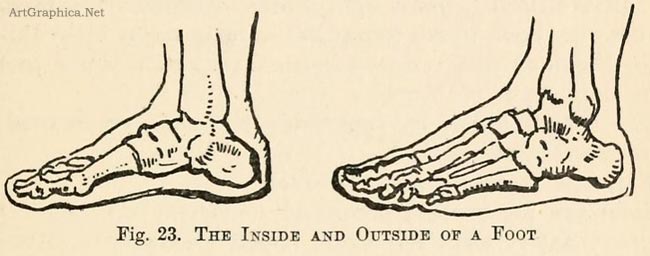
The sole of the foot is a flattened surface on the outside edge. This you can sec for yourself in the two sketches which show both the inside and the outside of the foot. Moreover, if you take off your shoe, you can pass your finger under the inner side of the foot, but on the outer edge there is no space at all.
Walking, kicking, dancing, stamping, swimming--here we have an immense variety of poses. Dancing, the foot rises at a steep angle, the heel clear of the ground, the ball of the foot and the toes resting lightly. (I do not refer to ballet-dancing, which is more or less of a gymnastic feat ; the shoes are heavily padded at the toes, and on these pads the ballet-girl rests.)
Stamping, the foot comes down with an all-over flat action, heel and toe held level. Kicking, the foot thrusts out, toes upraised. The kicking position shows us the sole of the foot, and the sole is a curious shape--one that we should not neglect. Should we draw one of our brothers sitting by the fire leaning back in a chair, it is highly probable that he will cross his legs and put up his feet to warm. Shorn of heel and thick leather soles, the sole of a foot is a flat elongated shape. The human foot has the padded soft flesh beneath the tread, with wrinkles on the inner side, and a small firm smooth heel, something like the outline of an elongated pear.
The shape of the modern shoe worn by the small child gives us, as it claims to do, the natural shape of the sole.
Turn it over and observe it well.
The general shape of the five toes resembles the general shape of the four fingers. When you doff your shoe and stocking look at your toes. Then put up your hand and observe the back and tips of the fingers. Fan-shaped--are they not ? So are your toes.
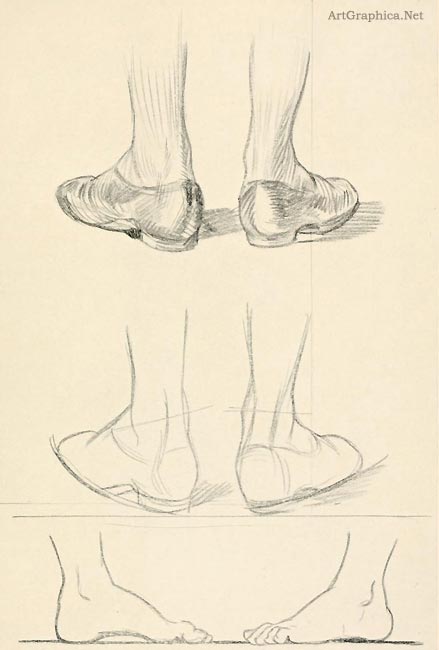
Fig. 22. BACK AND SIDE VIEW OF FEET
There is as much character in the foot as in the hand. The tall, slim, long-limbed person has invariably a long slim hand, and a slim and narrow foot. The plump short girl or boy has the plump hand and foot. The long-fingered hand usually goes with the long thin toes.
Fashion inflicts queer shapes on the foot. At one time it insists that all our shoes shall be narrow and peaked, another time squat and round-toed ; then heels must be worn like stilts, or shaved down to the thinnest substance.
In China we all know what a fetish was once made of the tiny foot. When swaddled and compressed, the poor little foot has no chance at all. And there was a time in English history when the toes of the shoes were so long that they had to be buckled back to the knees.
All of which indicates the absolute necessity of knowing the shape of the foot. Fashion may deceive the many, but the artist must know that it only tries to disguise the true form.
If we want to see the foot unspoiled then we must go to the countries where fashion and manners have not affected it, where generation after generation has walked the earth on the bare foot, or with only the slight protection of a sandalled sole. Then we see how finely it supports the body, what a thing of strength and beauty it can be !--firm heel, arched instep, springing muscles of the sole imprinting the ground with its firm tread!
Prev Page
Drawing Hands
|


