Study of Anatomy |
||||||||||||||||
|
Page 02 / 09
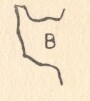
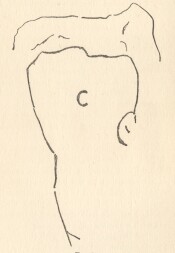
Oil Painting BookCHAPTER I A METHOD BY WHICH THE ROUND OBJECT CAN BE REDUCED TO THE FLAT-THE NEED OF A STUDY OF ANATOMYLET me say at once that I thoroughly disapprove of what is understood by the " blocking in " of the whole figure or object that is commonly practised. The followers of this method begin by putting a series of hurried lines on the paper, with the object of seizing the pose and suggesting the proportions of the model. Nothing could be more unsound, especially in the case of the beginner. The moral influence of our first stated impressions, hurried and ill-considered as they thus must be, is so great that we never entirely free ourselves from it, and the student who begins his work without due deliberation spends most of his time at the subsequent sittings in correcting the faults of his first hurried sketch. Practise your hand to reproduce what your eye sees without any deviation from the facts. Do not attempt any idealising in your studies, whatever you may do independently, either in form,light and shade, or colour. In proportion as you [22] deviate from your model, you court a weakening of the results. The question of pure aesthetics is another story, which does not enter into our present programme. Now we are concerned with the learning of the elements of our craft. I do not mean to infer that you must reproduce every hair or wrinkle, but that every factor in your work should have its counterpart in fact. Let me tell you how I should go about, and how I really did set about, the drawing from the cast of the Rosa Bonheur anatomised horse. I foreshortened it expressly. Foreshortening is difficult, but most of the real difficulties are removed by the system I want you to use. I placed behind the cast of the horse a flat square object, indicated by the toned passages in Plate II. I remembered that this cast, like every other object, covers a definite space on its background from any one given point of view. I had to settle, as you will always have to, before starting, the scale of the drawing. I looked at the cast, my eyes almost closed, and then drew the space, under A, lying between the neck and the jaw, a little island of black, treating the shape of it as I would a freehand drawing. I had by this created my Standard of Measurement. Proceeding upon this basis, I did not ask myself yet whether I was drawing a head or legs or body, because I knew that if I drew the patterns left by [23] the white cast on the background, in proportion with the passage already indicated, my subject would be evolved. My eyes remained always nearly closed. I was reducing the round object to. the flat-that is to say, to the spaces occupied by its parts on the background. I had to be careful, when I came to that particular point, to keep the raised knee in its exact relative position under the nostrils, and to imitate the bay (B) left between the nostrils, the chest, and forearm. Then as I came to it, I had to consider that the raised hoof should be latitudinally opposite the point of the knee of the standing leg, and to imitate the harbour-like form at C enclosed between these legs. And in the same way I had to fix the shape between the off hind and standing leg, in its proportion and relative position to the harbour (C). I looked up and down the cast continually to make each "point" fall into its place under or over another already indicated, and then laterally across it with a similar object. I compared the slanting lines with the set square of the book behind, and so on, and saw by the aid of a hand-glass-which is absolutely indispensable to the draughtsman-that the proportion of my black masses, the direction of my lines, and in fact the whole drawing, tallied fairly with the cast.
[24] These are just a few of the things upon which I had to fix my attention, but at the same time, and almost unconsciously, my eye was taking in all the internal drawing. I knew that every part must fit and, by indicating the various masses contained within the outline of the horse, prove the accuracy of the whole.
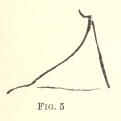
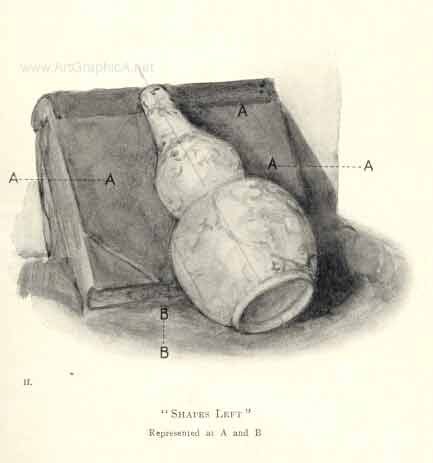
[25]Herein lies the true secret of draughtsmanship. When we would do serious drawing we must concentrate our attention not upon the outlines only, but upon the mass contained within these outlines. This advice may sound like a commonplace. In theory perhaps it is so ; but the student will have learnt an invaluable lesson when he [26] has thoroughly realised this commonplace and knows how to put it into practice. It embodies the meaning of the phrase which he is always hearing from the master, but which he rarely seems to grasp-Draw by the masses ! When he has grasped this piece of instruction, and can at a glance realise the shapes in their just proportions made by the shadow, half-tone, and light masses-that is to say, all the main incidents of the internal drawing of his subject- he may take a holiday. Now let us place a vase against a book so that it appears slightly foreshortened. The subtle curves of the vase will be more easily realised if the shapes left by the outline of the vase and that of the book are first drawn. First the masses A, on either side of the object, should be drawn in relation to each other. Then note down the shape B contained within the lower edge of the book and the lower left side of the vase, and the mass of the cast shadow on the lower right side. This will remove the initial difficulties. A line drawn through the centre will help us to secure a proper balance. Every possible aid, either imaginary, such as this ruled centre line, or real, such as existing uprights, or angular spaces around the object, must be pressed into service ; and no point should be neglected that can possibly serve our purpose, or help us in the extremely difficult task of drawing [27] with accuracy, exacting, as it does, the cultivation of abundant resourcefulness and unflagging attention.
" SHAPES LEFT "
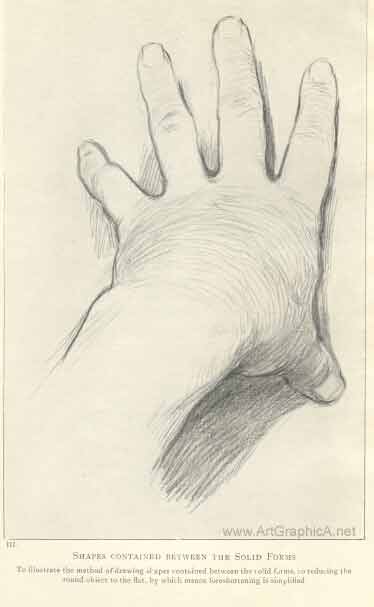
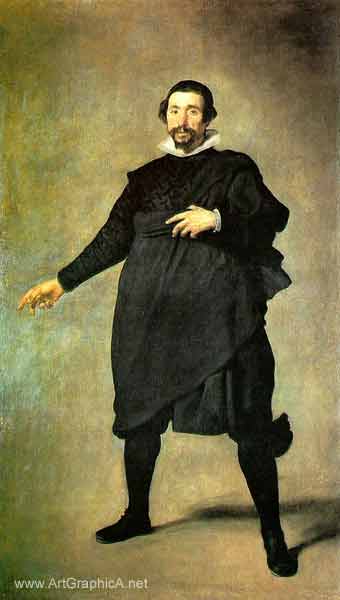
SHAPES CONTAINED BETWEEN THE SOLID FORMS Nearly close the eyes, and draw the "shapes left " between the fingers ; the wrist and thumb ; the left side of the wrist and little finger, taking care to suggest the curve made by the base of the fingers, and noting under which point of the fingers the angle formed by the meeting of the wrist with the ball of the thumb plumbs ; the relative lateral positions of the finger-tips, the knuckles, and every other salient feature. This exercise should demonstrate most clearly the use of " left spaces " in enabling you to realise all the subtleties of form and characterisation. If done well, in the way I have pointed out, your hand, not a hand, will be evolved. You will be materially assisted by subdividing the back of the hand in accordance with the shapes of the shadows, half-tones, &c., &c., so that they fit into their respective places. I have a firm belief in the subdivision of large spaces. Without such aid the eye is unable to grasp the proportion of the bigger masses. As shown in the drawing, shading lines as they occur in the hand, curving with the modelling, [28] are roughly indicated. They assist the sense of foreshortening. Brushwork in painting around the foreshortened curved surfaces is equally effective. Some of my readers will no doubt see their way to adopting in a measure, if not at first absolutely, the method I have so far been advocating. Prejudice may possibly exist against an unwonted system with others. But the art student is a reasonable being-let me essay to convince him that the principle here advanced is logically sound. He will, I am sure, follow me when I ask him if, having drawn the south coast of England and the north coast of France, he cannot readily prove the correctness of the relative positions of these coasts by assuring himself that the shape of the English Channel lying between them is correct? And if not correct, whether he has not here a means of at once discovering where his fault lies? Similarly, when he has drawn from his model an arm akimbo, and finds that the shape of the passage left between the inner lines of the arm and the body is at any point dissimilar to that passage in nature, can he not equally well by this means diagnose either an error in the outline or the relative position of the parts ? It is clear that if the one be wrong the other is necessarily wrong also. I contend that this is a reliable way of proving [29] the correctness or faultiness of the work, and I can add to this, by way of advice, that should the student draw at the outset in a way to which he is accustomed, he would do well, at least, to refer to the spaces left, as he proceeds, for confirmation of the justness of his observations. The use of this method has other and important advantages. It will enable the student to reduce his outline to its greatest simplicity. A common fault is to exaggerate depressions and convexities, and to mistake the shaded parts of the outline for concavities which a careful examination, with his eyes nearly closed, of the background shapes, will prove to be non- or hardly existent. The ever-present source of confusion to the inexperienced eye is, that lines, particularly when they are foreshortened, appear to take a direction contrary to that towards which in reality they lean. It is a fault to which I constantly have to refer in teaching whole classes of students, few of whom are inexperienced. If the student will only take the trouble to reduce, by the means I hare suggested, the round object to the "flat," comparing the direction of his line at the same time with the upright or horizontal lines which are nearly always to be found within his range of vision, that difficulty, at least, will be dispelled. Foreshortening can hardly be done scientifically by any other means. I have reserved, as a bonne-bouche, the accompanying Plate, reproduced from one of Velazquez's [30] portraits, which demonstrates pretty clearly that the greatest of draughtsmen did not disdain to keep his eye well fixed on the general silhouette of his subject, thus securing its inimitable action, characterisation, and breadth. I have purposely refrained from giving you any advice about the kind of drawing that is to be done for its own sake. Much as one appreciates the expression and grace of chalk or pencil line, the lessons in draughtsmanship which I desire to give you are of a kind that will, I hope, make your drawing a means to a definite end, and that end is an ability to paint ; in which case knowledge and accuracy will be of more real service to you than the stylish use of the crayon or pencil. THE NEED OF A STUDY OF ANATOMYThere is a class of advisers who try to flatter the student by maintaining that the study of anatomy is of little use to him. They tell him that pedantry lies that way, that the Greeks knew nothing of this science, and so on. If the Greeks ignored the science of anatomy as cultivated by the moderns, they had opportunities of studying the nude, both quiescent and active, which we are certainly denied. And as to becoming pedantic about anatomy, ill-advised teachers and the student should be reminded that the really strong man does not abuse his strength. [31]
The better we understand the skeleton, and what is generally understood as " artists' anatomy," the greater will be our power of constructing the human figure, and realising the subtleties of form. In our initial sketches for compositions, when memory has to take the place of the living model, we rely to a great extent on our anatomical knowledge for the suggestion of action and form generally. And again it adds materially to our faculties for self-criticism, which, like a sense of humour, is often, nearly always, our salvation. There are good books and good lecturers to which, and to whom, the student must look for advice and knowledge in that very necessary branch of science. The bones are your architectural beams. Study the skull, and look for the bone forms in every head you draw. You will feel that the skin is more tightly drawn, and therefore of a different texture, over bone foundations, and more "fleshy" where free. Equally, the muscles over the framework of the ribs follow the inclination of that practically fixed " cage," leaving the abdominal muscles freer play. Note the shape and movements of the collarbones and of the scapulæ. Compare always the inclination of the ilium with the cage of ribs, and study the knee-bones, which are so near the surface. Note that the [32] outer ankle-bone is placed lower than the inner, and so forth. To most of these points I shall have to direct your attention in the subsequent lessons on the construction of the human figure. [33]CHAPTER II CONSTRUCTION OF THE FIGURE.
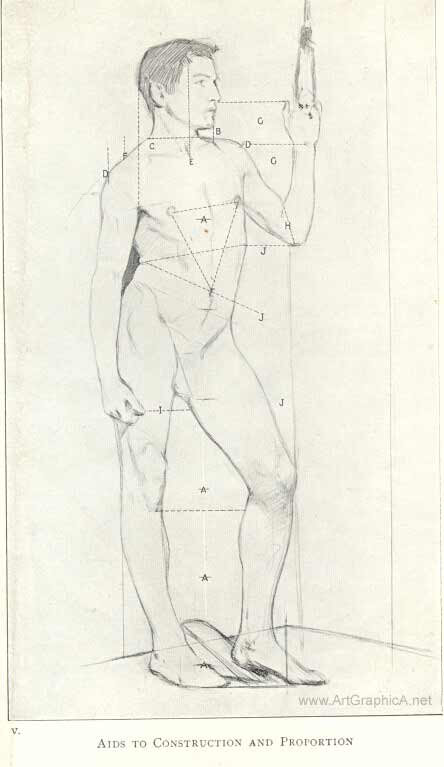
THIS Plate is reproduced from a study made with the object of demonstrating to a class of students the main principles of construction, and I hope it will serve a similar purpose here. The original drawing is about twenty-four inches in length, which is about the size generally advisable for drawings from the nude. It is a good discipline to make your study come within an inch of the top and bottom of your paper, so that you do not find when you are about to draw the feet that there is no room for them. All that you draw or paint should fill a definitely fixed space. Neglect of this precaution is a frequent source of trouble. Proportion is the first thing to consider, and, by the way, always the most difficult to preserve. We must therefore begin by creating a standard of measurement. In most instances the head from the top of the hair to the chin will best serve as a standard. After having measured the number of head lengths contained in the entire length of the figure, [34]proceed to mark off the given number of equal lengths on the paper (A on the plate). This measuring is done by fully extending the arm in a direct line between one eye (the other closed) and the subject, marking off between the tip of the thumb-nail and the top of the charcoal the length of the head thus seen, and proceeding downwards till you have ascertained with the greatest care the number of head lengths on the figure. If the number proves to be seven and a quarter as in the Plate, you will decide after a little experimenting how large in the drawing the head is to be, so that seven and a quarter head lengths will make up twenty-four inches. Once the head length has been decided upon, it will and must remain your standard of measurement for the figure in every part. The head and features must now be not only indicated, but fairly carefully drawn, for many reasons. Firstly, because any serious subsequent changes in the head might result in an increasing or reducing of its size, and in the loss of the set standard of proportion. A good likeness of your model is one of the best tests of the correctness of the proportions of the features, and until these features have their definite position on your drawing, it is not possible to place the ears. It is from the ears that the lines of the neck begin. Refer constantly to your hand-glass, holding it so that your drawing and the model's head can [35] be seen in it at the same time ; for it is well-nigh impossible to get the character of your subject without almost constant reference to the glass. It is the best of masters, and will solve many a knotty problem throughout your artistic life. When the head is satisfactory, and not till then, begin to draw the neck and shoulders, referring to the " background spaces " on either side, and calling to your aid any lines or markings in the background, wherewith to compare the direction of those of your drawing.
Note at which points under the chin the line of the neck starts ; and be particularly careful that the little bay made by the outline of the chin, the neck, and the shoulder at B should be the counterpart of that space in Nature.
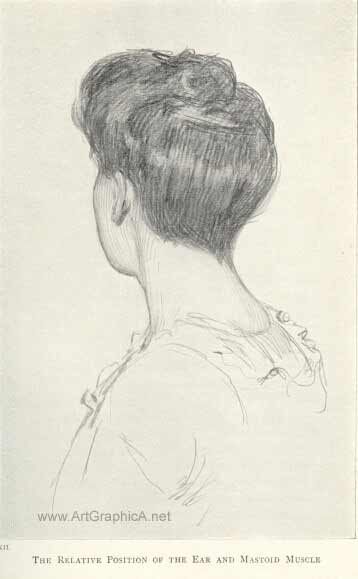
Then observe the sweep of the back line of the neck and its relation to the ear and jaw. Find under which point of the jaw the centre-point of the neck falls (E). Draw the collar-bones, and see that the nature of the triangle contained between the collar-bone, the mastoid muscle (which always falls from behind the ear to the centre of the body), and the shoulder line is like the model's (that is, the trapezius muscles at C), and that the whole mass [36] of the neck is just in its proportion to the head ; and when you are satisfied that it is right in every respect, proceed to the rounding of the shoulders (D). The success of your whole figure will depend upon the care you bestow on these parts. They are the real key to its action and proportion. If these points of the shoulders (D) are too far from or too near to the centre line of the body, necessarily the whole figure will be either too wide or too narrow across. To make sure of these points, divide up the line of the shoulder. On the right we have the end of the collarbone plumbing under the chin to settle for us the length of the line from the neck. Now with it compare the length from B to D, and to make doubly sure see that the shape left on the background is satisfactory.
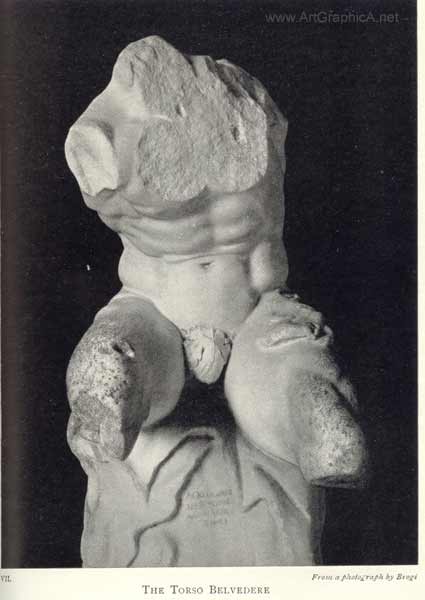
On the left compare the length of the sweep of the outline of the trapezius (C), from the point where it converges and meets the collar-bone (F), with the length of the line that curves from that point to D ; then with the comparative height and relative positions and slope of the shoulders indicated by the horizontal line across the neck. Make sure, too, that the shape left is correct in form, and in proportion with the head and with the neck. These detailed instructions may seem to you [37] tedious, but I assure you, you will not regret getting them at your finger-ends. When you have thoroughly grasped this part of the lesson and know how to apply it, you will have mastered what is considered one of the most difficult problems to contend with-the placing of the head on the shoulders. In a subsequent lesson reference is made to this problem. I advise you to make a special study of it, not only when you are actually drawing, but at all times. Whenever you find a convenient opportunity of observing people, make a mental note of the setting of their heads on their shoulders, and accustom yourself to looking at the background shapes left between their face, neck, and shoulders ; it will aid your memory, and increase your power of observation and your knowledge. Let us now return to our drawing. Find under which points of the shoulders the armpits fall, and compare the depth of the passages between the collar-bones and the armpits. Then indicate the pectoral markings in their places relative to the armpits. A line connecting them should run fairly parallel to the collar-bones. Ascertain and mark the position of the centre line of the body between the pectoral markings. Then measure the length of the space to the navel, taking the head and neck as your standard. The three markings, the two pectoral and the navel, make a triangle which varies in its nature according to the character and action of the torso, and is [38] always the key to its movement. Sometimes acute when the body is upright or thrown back, it is more obtuse when the body is seated or bent forward, as in the torso Belvedere. Follow the central abdominal marking to its base, and take care that the curve of the whole central line from the neck to the base of the torso is closely followed. Draw the inner line of the left arm; compare the length of the part of that line between the armpit and the highest point of the passage lying between the arm and the body. Compare the length of that background space and draw it in freehand; and it will leave for you the exact direction and form of the upper arm and the side of the torso, and will clearly indicate the position of the left hip. Then pass on to the right side, making careful use of the shape of the background lying between the outline of the torso and the raised arm, and refer to the upright line on the background in seeking the exact direction of the outline. Before going further, indicate all the internal markings. Note that, the body being contracted on the left side and extended on the right, the lines radiate from the crease and the hip on the left, so that the pectoral marking and the edge of the fixed ribs on the right are higher than their counterparts on the left, but that the hip on the right is considerably lower than that on the left.[39] The extended line of the torso on the right is the answering shape to the contracted side (on the left) in this position of the model. Now the left arm. The tip of the thumb, which is in a line with the nose, and the wrist, which is opposite the point of the shoulder D, determine for us the length of the hand. The background shape lying between the face, shoulder, and arm will leave for us its relative position. The pit of this background shape is on a horizontal line with the right pectoral marking. Then we find that the elbow is in a line with the angle of the ribs. That gives us the thickness of the arm, between those two points at H, and the correct proportion of the whole arm to the body. We now draw the right arm, and with it the upper right leg, for the arm rests on the leg, and the outline of the one reacts on the other. We must see that the mass of the hip contained within the inner line of the arm and right base of the torso is of the shape and proportion of the model, and that the point of the thumb falls where indicated by the line I. We thus have the length of that arm. The width of the deltoid is now easily found. The outer line will follow quite naturally, depending, of course, on your knowledge of its anatomy, and your grasp of the character of the model ; for anatomy gives you the generalised form only. Your personal observations will help you to [40] realise its specific character, and that again will be materially aided by a careful reference to the silhouette. Draw the shape of the whole passage of background left between the legs, as a freehand drawing, in proportion to the parts already done. You need not hesitate to measure and plumb. This will help you to find that the left knee plumbs under the elbow. And in drawing the outer line of the left leg, be careful that the whole of the shape J on the background is realised. The indications on the Plate will point out how to proceed with the legs. Of the vertical lines on the Plate, only the one on the extreme right was actually to be seen in the background. The others are imaginary plumbed lines, the use of which you will always find of great help in establishing the exact relative positions of each part of the body. Now the feet. The perspective lines of the stage on which the model was posed are, and should always be, drawn, as well as the block on which the left heel is raised. These are rigid lines, and will indicate for you the relative positions of the feet. Wherever such lines or similar features occur on the ground or the background, make them an essential part of your drawing, and it will help you to get the feet planted. It will be of some assistance to you while constructing your figure, and particularly in going over the ground a second time, to indicate all decided shadows, marked half-tones, and internal drawing, the better to judge your proportion and prove the correctness of your outline.
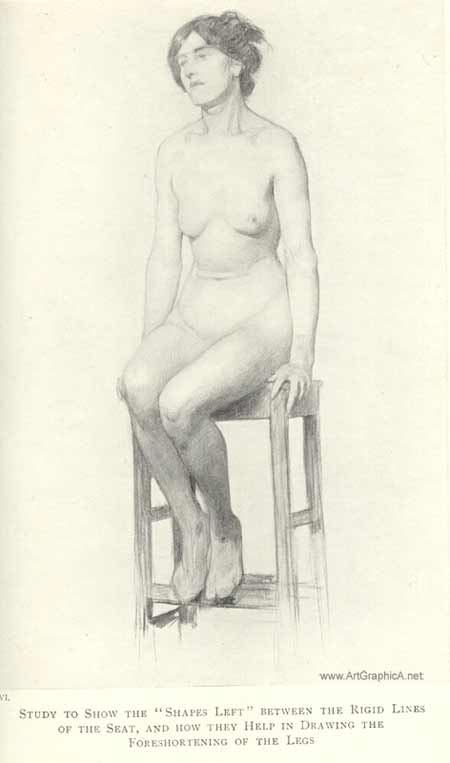
VI. [41] If you were drawing a map of England with all the counties, and found, when you had nearly completed it, that there was no room left for Rutlandshire, or that too great a space had been left over for Leicestershire, you would begin to look about for a fault in some other part of the map. So in your drawings everything must dovetail and fit. In subsequent lessons detailed consideration will be given to the drawing of arms and legs, so that I need not go further with instructions on these points for the present, my main object being to indicate a method of construction on something like a scientific basis, a synthetic method reasoned carefully from beginning to end, where the element of chance is not allowed a place. And although I am aware that the system followed in this figure and its position cannot be rigidly applied in the case of figures differing totally in action, still on some such lines construction can, and should always be, synthetically considered; and if at first, and for a time, the method may seem tedious, it will repay you in the long run, and the mental process involved will become by degrees less and less fatiguing. By way of practice, refer to the two other Plates of nude figures that are drawn without indicating [42] lines ; and try mentally to supply these lines and all the instructions given above. The sketch of a female nude model was done more particularly to show how, by the use of the " spaces left," the figure can be firmly seated and the legs foreshortened in a drawing ; and I should advise you when doing a seated figure always to draw the chair as though it were part of the figure. It will then sit at ease, and the rigid outlines of the seat will help you to overcome some of the difficulties of proportion. You will find the cast of an antique statue an excellent subject on which to practise the foregoing hints on construction.
VII. 43]CHAPTER III CONSTRUCTION OF THE HEAD
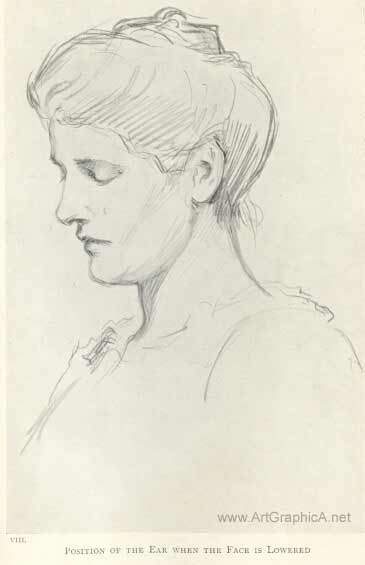
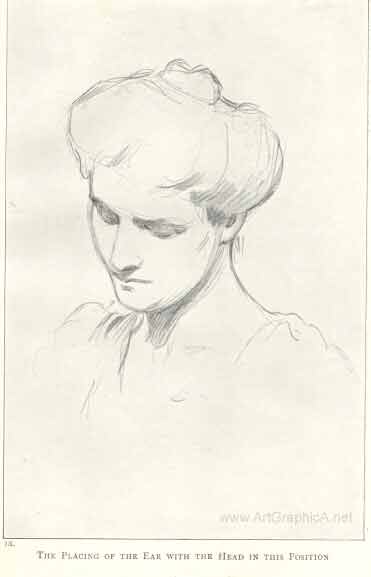
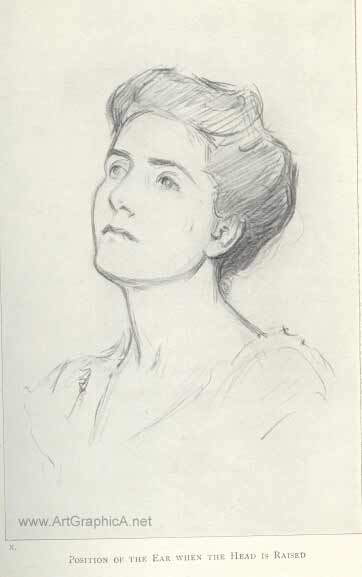
Now let us consider some points to which sufficient attention is rarely paid. One of the most important of these is the placing of the ear. The accompanying drawings were made with this object mainly in view :- Remember that the ear is the axis of the head. In proportion it is about the length of the nose, the top in a line with the brows and the end of the lobe opposite the nostrils. Since the ears, like all the other features, have their fixed place in the skull, they and these other [44] features must be considered in relation to the movement of the head and to each other. When the face is lowered, the ear is relatively raised and inclined with the direction of the face forward. Its base will be seen opposite the bridge of the nose, or in a line with the eyes, according to the inclination of the face. See Plates VIII. and IX. When the face is upturned the ear is lowered, and will be seen in a line with the chin (Plate X.) and inclined backwards.
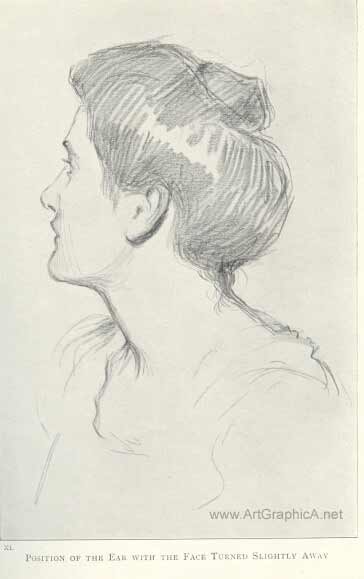
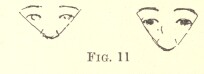
VIII. When the face is turned slightly from you the width of the neck and head behind it is increased, and the space from the ear to the cheek-bone proportionately decreased (Plate XI.), and of course still more so, with the head turned away (XII.). The placing of the ear determines most clearly for us the actions of raising and lowering the face. The study of the skull will have taught you that (with slight variations only, due to marked personal characteristics to which I shall refer later) one side of the face must answer to the other. These answering shapes require attention. If, for instance, in the three-quarter face the modelling of the near cheek is rounded by a smile, see that your outline of the further cheek responds. When, again, for example, the head is inclined to the right, the left ear is higher up on the head than the other, and so on.
IX.
X.
XI.
XII. When the face is lowered, as in Plate IX., the space between the brow and the eye is shortened, [45] the tip of the nose is nearer the mouth, and the chin cuts well into the neck ; and as the ear is raised, the back line of the neck is thereby lengthened. The brows and mouth, overlaying somewhat convex surfaces, curve upwards, and a greater mass of hair is seen above the face.
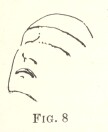
FIG.7 The converse of all this is seen in Plate X. when the face is upturned. The mass of hair is smaller above ; the eye is further from the brow ; the tip of the nose is nearer under the eye ; the brows and mouth curve downwards. The ear is lowered ; and consequently the neck is extended in front and contracted behind, and one sees somewhat below the chin.
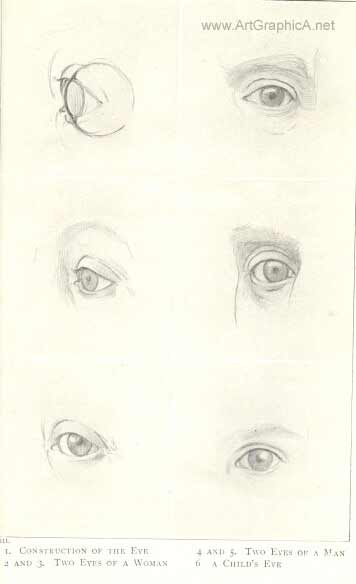
FIG.8 CONSTRUCTION AND PLACING OF THE EYEThe accompanying set will illustrate my points, but I would strongly advise you, after having considered this lesson, to copy whenever you can the beautiful drawings of heads by Holbein. Your knowledge of the drawing of the face and its features will be materially increased thereby. The first in the set is a rough diagram of the construction of the eye ; and I have made it because the student, judging by his average drawing and painting, seems to forget that the lids open and [46] shut over a globe. Still less does he appear to perceive that the pupil is a superposed swelling on the ball of the eye, and that therefore the lids are widest apart at the point where the pupil is seen, except of course where it is turned to either corner of its setting. But even in the corners of the eye its fullness makes itself felt. Be careful in drawing the eye in the full face that the inner corners are in a line with each other at their respective distances from the bridge of the nose, whatever inclination may be given to the head ; and that they run in a fairly parallel line with the other features. I say fairly because as I shall point out presently, few faces are symmetrical. But for the purpose of this part of the lesson we must imagine a certain regularity of the features we are considering.
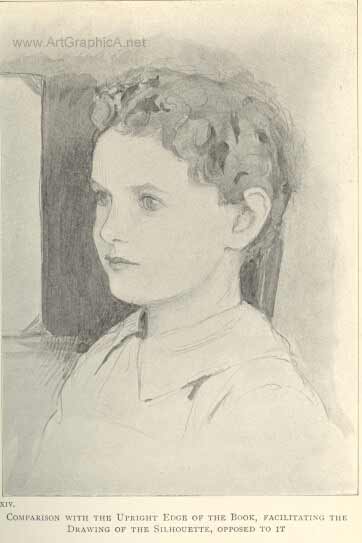
XIII. A very common failing, not only on the part of the beginner, is to show too much of the further eye in the nearly profile and less-than-three-quarter faces for foreshortened passages always appear wider than they actually are. Not enough is allowed for the setting back of the eyes behind the bridge of the nose. The way to correct this tendency is, first of all, to believe your own eyes (which is not so very easy when we think we know better) ; to remark the actual distance (if any) between the pupil and the part of the nose that cuts across the eye, the actual space between the nose and the outline of the cheek, [47] and similarly by the mouth, not forgetting to nearly close your eyes, and thus reducing the whole of the side of the face beyond the nose to the flat. But you will no doubt say the model moves, and this shifting of the face makes you uncertain. I can sympathise with you, but to make certain, let the space beyond the point of the nose be your guide. Plate XIV. may help you to realise this aspect ; but you should study this problem at first hand from nature. The upright edge of the book indicated assists one to fix the curves and tendency of the lines of the face.
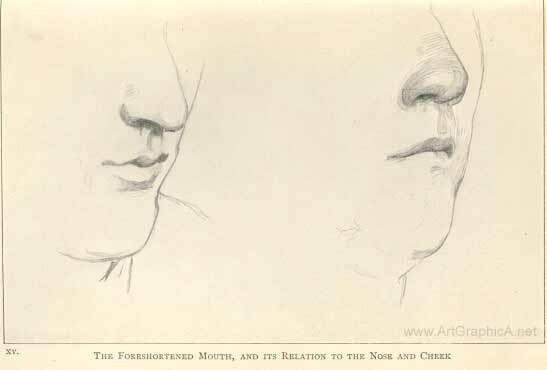
XIV. It is well-nigh impossible to generalise about the form of so varying a feature as the nose ; but after studying its anatomy it would be well to consider it in its relation to the mouth, noting particularly in the construction of that part of the face that the centre of thé upper lip falls, whichever way the head is turned, under the centre of the nose, and that the central marking between the two cushions of the lower lip lies under the central dip of the upper. Plate XV. shows two views of the mouth in what is usually a difficult foreshortened aspect of the feature to realise. The beginner should take care to avoid the all too frequent error of drawing on the three quarter face a nose seen too much in profile. All solid masses have their "beyond." The [48] power to make one realise that there are planes unseen is of the very essence of good draughtsmanship, and in this connection I would draw your attention to the need of care to trace the flow of all lines that are intercepted.
XV.
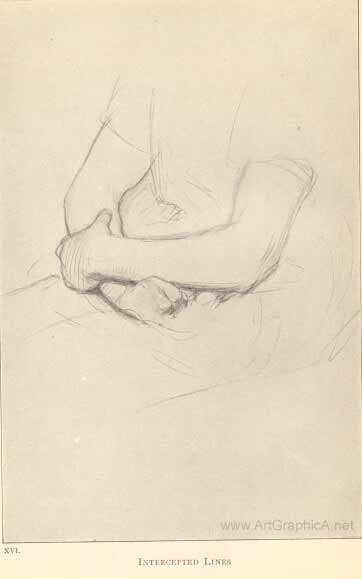
XVI. CHARACTERISATIONARTISTICALLY speaking, it may be said that the perfectly symmetrical head is lacking in "character." The oval face ; the dual features the counterpart of each other ; the measurement from the top of the head to the brows, from the brows to the base of the nose, from the base of the nose to the end of the chin, which are all fairly equal in length ; the bow-shaped mouth ; the eyes parted by the length of one eye, and so on, would constitute a symmetrical head. Although some such standard of measurement and regularity, both of the face and in a similar way of the body, might serve the ends of the painter and sculptor of cold classic figures and certain decorative schemes, they can only help the painter who is a student of nature as so many points of departure, for you will rarely find in real life anything approaching the regularity of the classic figures. Still, underlying all our personal observations, there is a consciousness more or less developed of the " perfect," for when we talk of a man with a long nose, of a woman [50] with a short aristocratic upper lip, of a lean person or a short-limbed one, we are, perhaps unconsciously but no less certainly, comparing these features and characteristics with a set symmetrical standard of which we are conscious, and it is the variations from the standard-let it be of a leaf, of a hand, or of a face-that make for character. The characteristics here instanced are obvious to the least discerning, but it is not only with the obvious that the painter has to deal. There would be little need to draw attention to that which is observed without effort, even though it may be hard enough to reproduce ; but there are subtle variations that escape the untrained eye, and others with which the uninitiated have become so familiar as to let them pass unnoticed. It is a revelation to such, when looking in the glass at the same time as another person, to see how dreadfully distorted the apparently regular face of that other becomes in the reflection ; and by glass I don't mean a concave or convex looking-glass, but a perfectly level and true one. The fact is, we see that face in a new and unaccustomed aspect, reversed as it is in the mirror, which at the first blush makes it seem to be a caricature, but which in reality is not at all a caricature but the well-defined characteristics of that face. It is well-nigh impossible, unaided by the glass, to discern, or reproduce, with any pretence at [51] fidelity, the subtleties of a form which we wish to realise. Reference to the hand-glass through which the model and the drawing can be seen at the same glance cannot be made too frequently, and we must make certain that the characteristics of the one tally with those of the other. There are portrait-painters who flatter their sitters by endeavouring to regularise their irregular features. Are those painters sufficiently conscious of the existing characteristics ? For they certainly do not seem conscious of what might well be taken as an axiom, that in proportion as we depart from Nature we court a weakening of results. A serious artist is not affected by a demand for the pretty-pretty. Proportion is the chief factor in the making of individuality, and this is clearly seen in those large photographic groups of schools and crowded collections of people where the individual heads are sometimes not larger than a small pea and are still easily identified. Subtleties of drawing or light and shade can hardly affect the heads so reduced, so that obviously the individuality of each head is almost entirely due to the relative proportions of the features. The study of Lavater or later physiognomists has its uses ; but a short list of traits culled from personal observation may help you to recognise some of the signs that denote strength, weakness, &c., in a head or face. [52]The eyes set wide apart denote breadth of view. When close together they give a mean look to the face; and when deep set they are contemplative. The ear will be seen set well back in the head in nearly all really intellectually strong men. Great bulk of jaw, when matched with a well-developed forehead, implies imagination and constructive ability ; but when not balanced by these signs of mental development it may indicate brutality and animalism. Sweetness of character is to be discovered in the muscles running under the eye and over the cheek-bone ; and the mouth, perhaps more than any other part of the face, is indicative of refinement or the reverse. Personal observation will enable you to add to this short list of examples, for in these days of tube saloon carriages the student has endless opportunities of comparing types and adding to his store of the knowledge of human nature and the facial indices of character and expression. Sir Joshua Reynolds says so wisely " that the eye sees no more than it knows," and we take no more from the world than we take into it. Accordingly, to discern the finer characteristics, we must ourselves reach a degree of refinement, or we shall fail to recognise it in others. The expression of the intellectually strong or the sympathetically sweet will be, as it were, over our heads if we are unable to share with the [53] intellectual some of their strength, with the sympathetic some of their sympathy. I have not seen it advanced elsewhere, but personally I have noticed this peculiarity in almost all faces-and even slightly marked in the faces of children : that the eyes run down either on the right or the left and that the mouth runs up towards the lower eye. You will rarely see the eyes and mouth sloping the same way.
The converging of these features on one side seems somehow to restore the balance of the face. In the full face mark the nature of the triangle made of the ends of the brows and the tip of the nose, the distance between the eyes, the relative size of the chin and forehead to the nose ; and ascertain whether the face inclines to the long, the round, or the square.
Further than this I can only advise you, when drawing a face, after having examined its characteristics in the hand-glass, to place your drawing -if it be of large size-by the side, or preferably when possible in a line under, the face, and to [54] look at it with your eyes half closed. See that the masses-that is to say, the areas of light and shadow-tally with those of the sitter; and that the head is correctly placed on the shoulders, about which there need be no special difficulty, and no loss of the real character, if only the background spaces be your constant guide. To this it is necessary to give careful consideration, for the setting of the head on the shoulders is an important factor in the realisation of character. The rest must depend on your own powers of discernment and draughtsmanship. [55]
|
||||||||||||||||
 II.
II.