Architectural Drawing |
> | |||||||||||||||
|
Page 12 / 25
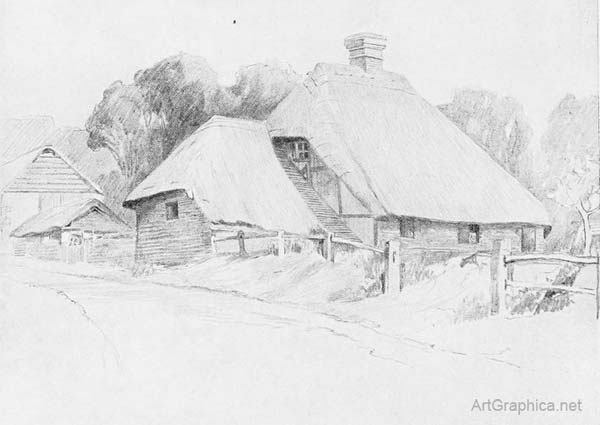
 CHAPTER XI ARCHITECTURE OF THE VILLAGEAs this book deals only with Perspective, a description of cottage architecture would be out of bounds. Some outstanding features of cottages may, however, without straying from our subject, be illustrated, as they afford instances for the practical application of Perspective rules. My drawings incidentally present buildings that are typical of some Surrey and Sussex villages. We cannot do better than take their construction piecemeal.
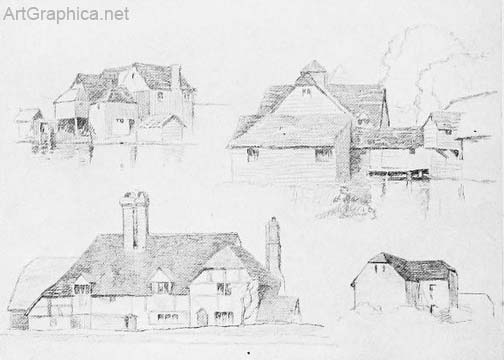
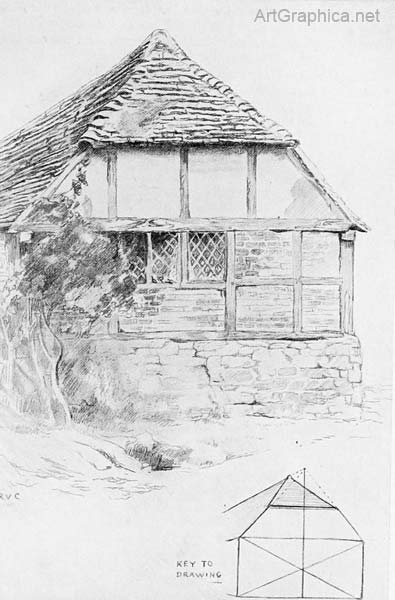
Roofs. — The recurrence and accidental grouping of a few prevailing shapes, themselves simple in form, bring about an infinite variety in the sky-line of a Sussex homestead. The farm or cottage is commonly a two-storied one ; half-timbered, and set on a low foundation wall of rough stone. It is oblong in plan, and covered lengthways by a high-pitched roof of tiles or stone slabs, or by a still steeper one of thatch. One or both ends of the main roof may be hipped, with the apex of the hip-roof surmounted by a little gable. In many buildings the hip-rcof is continued downwards from the height of the eaves by a lean-to forming the roof of the woodshed. At the back of the cottage the main roof may be continued to within four or five feet (sometimes less) of the ground. This arrangement is often beautiful in its proportions. The break in the outline caused by the hip-roof and the little gable that tops it, when seen from different points of view, present much variety in shape, suggestive of more elaborate design (Illus. XLI) The gable roof. — Nothing could be easier to draw than the gable, but one must be careful not to let its ends inadvertently lean forward or backwards. We have but to draw two gables and join them by a roof.
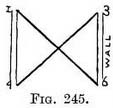
Building seen foreshortened. — When we look towards one corner of the building, the side and end walls become foreshortened, but we still build the gable over one end in the same way as over the end when seen full-face (in Fig. 234). To make this quite clear we will suppose the walls to be of glass (Fig. 235).
The hipped gable. — The end elevation of a gable (with the top line of the wall supporting it) forms a triangle (Fig. 234). The triangle and the wall stand in one plane. In a hipped gable the apex of the triangle is not fastened to the end of the ridge-pole, but to a point at a little distance from its end, so that the triangle slopes back from the end wall (Fig. 237). Practice. — Sketch lightly the gable as in the previous figure. Copy the direction of one slope on the hip (say 1-2). From the point (2) where the slope meets the ridge draw the other slope of the hip (2-3). If the roof projects beyond the wall to form eaves—then continue one of the slopes downwards (Fig. 238) as far as necessary (3-4) ; from its end carry a line to the V.P. The other slope is continued till it meets this line (at 5).
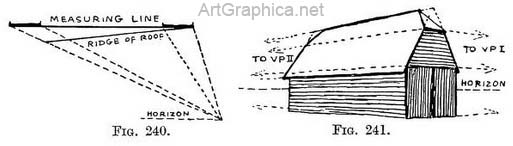
Practice. — Sketch lightly the roof as if it were a gable. For Fig. 239 copy the slope of the hip at whichever end it shows best (say A to B). Note the length of ridge-pole left from where the hip meets it, to its end where the apex of the gable came (B–C). From the other end of the ridge mai k off an equivalent length F–D to that already cut off. (The way to do this was explained in Chap. III, but Fig. 240 may refresh your memory.) Fit in the absent rafter D–E. The ridge may be so short between the hipped ends as to give the building the appearance of having a pyramid roof (Illus. XLVI).
Gable hipped at its apex. — Often it is only the upper part of the roof that is hipped so that for some height above the supporting wall it is a gable. The effect is charming in its quaintness, and is constantly met with (Illus. XLVI). Practice for Fig. 241. — Draw the gabled cottage as before, and a line (to V.P.) where the hip-roof joins the gable. From its near point (1) carry a line along the roof (to V.P.) to find where the other hip and gable join. Then build the hip-roof as before.
Note. — The real use of the diagrams in this chapter is to afford information on (1) how a building is put together ; (2) the direction its constructional lines take in perspective. If both of these points are in one's mind's-eye when sketching, one will grasp the essential features and be able to draw them freehand with sufficient accuracy, but one may test a debatable feature—for some lines are very deceptive—by applying bits of these diagrams when in doubt. 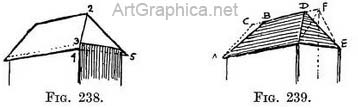
A curb or mansard roof. — This is a gabled roof that has the upper part of the slopes hipped, so that each side runs at two angles (instead of forming one continuous line from the ridge to the wall plate, Fig. 242). 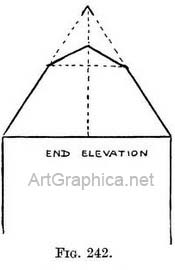
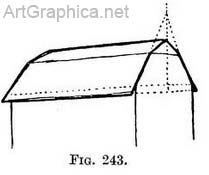
Practice for Fig. 243. — Copy the slope of the lower part of the roof and continue its direction until it forms one side of a gabled roof. Complete the gable roof as previously directed. Draw a line (receding to V.P.) across the next gable to mark where the roof takes a new inclination. On that line form a less steep gable. Carry a line (B) along the tiles (to V.P.) to find the corresponding point on the far gable. Complete the new gable and rub out the top of the perspective.
Pyramid roof. — This consists of four sloping sides meeting at a point above the centre of the building. Practice for Fig. 244. — Find by diagonals the centre of the building, either on the ground or on the top of the walls, whichever suits you best. Raise a vertical from the centre, copy the inclination of one side of the roof till it meets the vertical line. Make the other lines of the roof meet this vertical at the same point. 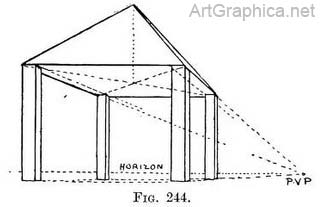
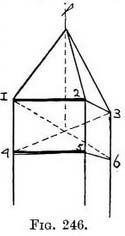
Another way of finding the centre. It is not always convenient to find the centre of a roof in the manner just described. Let us reason out another way. Suppose yourself in a rectangular room, and that an X was stood upright diagonally across it so that the ends of the upper arms touched two ceiling corners and the lower ones two floor 3 corners. Cross-lines placed thus would decide the centre of the floor (by dropping an upright from their intersection) quite as well as would diagonals laid on it. To apply this (Fig. 246) when drawing the outside of a building we first mark off the height between an imaginary floor (4, 6) and ceiling (1, 3) where they would touch the angles o; the walls (Fig. 246), and draw the diagonals as if we could see through to the walls.
DETAILS Gables. — On larger houses that afford more scope for architectural design, the gable becomes a prominent feature. A beautiful set of three gables is illustrated here (Illus. L). The brick courses projecting from the stone and the carved lines of the coping make up a simple but rich frontage. When drawing an elaborate design it may be an advantage to enclose it in a triangle. Some, if not all, the projecting forms will touch the triangle. A sketch plan, as advised in Chap. IV, might be used. Of course if the gables are of equal height a line from the apex of the near one receding to the V.P. will fix the height of any others, while similar lines will give the height and direction of stone courses, brick strings, etc. 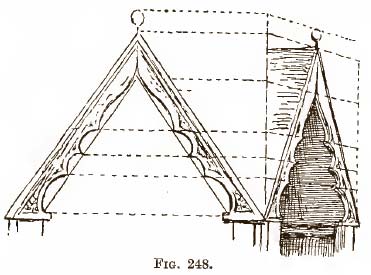
Barge-boards. — Our diagram (Fig. 248) will supply the key for drawing those beautiful barge-boards on the wooden porches and house gables which one sees in Herefordshire, Cheshire, and elsewhere. Remember that the projection of the tiles beyond the face of the barge-boards may partly hide one side of the board in a foreshortened view ; so it is best to sketch in the complete barge-board first, and then partly hide it by the projecting tiles.
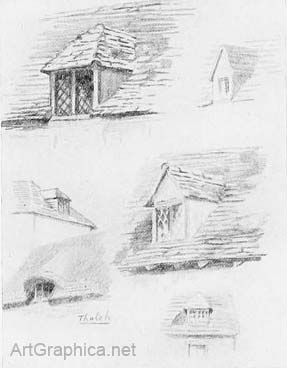
Dormer windows. — The dormer window, as regards its front and roof, repeats in miniature the structure of a gabled cottage end. The gable may be high-pitched or stunted, upright or hipped. The ridge will be long or short by consequence of the window's position in the roof or the inclination of the latter (Illus. LI).
Practice (Fig. 249). — Draw all the dormer except the meeting of its lines with those of the roof as you would a gable end. Copy the slope of the roof where it touches the side of the dormer (2-1). (If the slope of the roof has already been drawn, take a line from 1 to the " uphill " V.P. of the roof to find the slope of the line 1-2.) From the middle of the sill take another up the slope of the roof until it meets the dormer ridge (at 4) ; join 4 to 2.
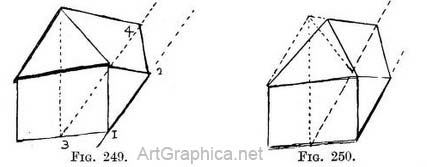
The hipped dormer can be explained by a diagram (Fig. 250) without wasting words. If the sides of the windows are weather- boarded, see that their lines run to the V.P. used for the bottom edge of the tiles on the dormer roof. The cart entrance to a barn must also be mentioned here, as the same recipe will without jugglery do for both.
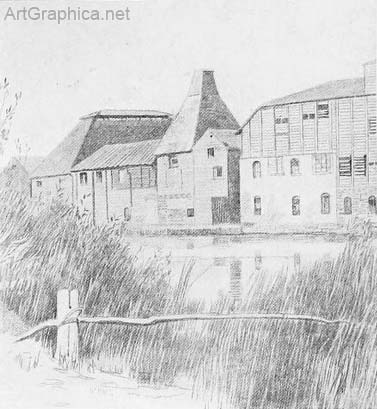
N.B. — It would be superfluous to detail the build of a barn ; it closely follows that of a farm-house. Chimneys. — The chimneys of a Surrey or Sussex cottage are so remarkable in their proportions and features that they cannot be overlooked. New rules need not be called into play, but the old ones must be observed, and some close observation must be brought to bear (Illus. LII). This applies equally well to the more pretentious chimney stacks on fine buildings throughout the country. These cannot be drawn in a convincing manner unless their ground plan or horizontal section is understood ; so I should advise their being studied from different points of view, and a sketch made of their plan before a drawing is begun. To return to our Sussex cottage. The most common form is an outside chimney with a base of huge dimensions to provide the " down " hearth and ingle nooks. The massive base is reduced in width at intervals ; the gradient between the base and the smaller one it gives rise to, being weather-proofed by tiles. The edge of the tiles are sometimes hidden by an ornamental parapet. Occasionally the depth of the base, as well as the width, shares this reduction after the fashion of a buttress. But more often the face of the base and the shaft are in one vertical plane.
In outside chimneys, the angles between the back of the shaft and the roof is often spanned by a little gabled roof to avoid a gutter where the roof would join the chimney.
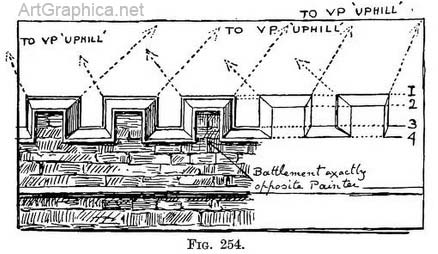
Battlements. — The character of the parapet or battlement may call up some exercise of craft, in particular when the battlement has a capping or moulding continuous with its outline. The spacing of a certain number of battlements with their intervals will be gauged by one of the methods explained in Chap. III. This will be worked out on the face of the wall, and then receding lines will be taken at each interval through the thickness of the wall (or up the slope of the cap moulding) to determine the back line of the battlements. In this way the upright width of each interval will be obtained (Figs. 254 and 255). 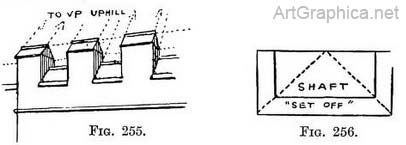
Buttresses. — For our purpose we may consider the ground plan of a buttress as a half-square (Fig. 256), or rather as two concentric half-squares, the inner being that of the shaft. The base diminishes to the shaft by a sloping " set-off." There may also be mouldings or strings from the main building carried round the buttress.
Practice. — Draw the base. Find the middle of its top line at the back and from it raise an upright. Copy the slope at one corner of the " set-off," continue its direction until it meets the upright at the back of the base. To this junction join each corner of the base (Fig. 257). Plant the shaft on the reduced top of the base now ready for it. Repeat the operation for any similar reduction in the girth of the shaft above. 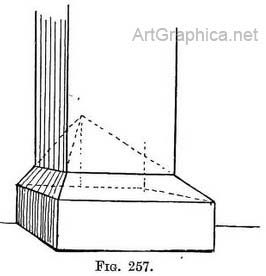
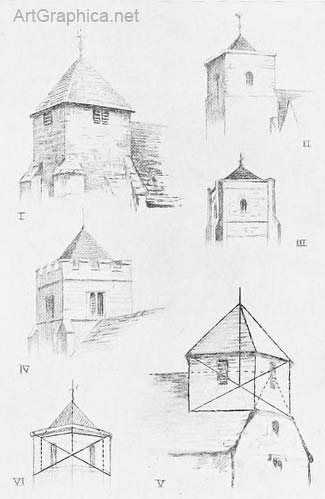
The steeple. — A pyramid steeple may be set directly on the tower walls with the lower course of tiles forming eaves, or it may rise from inside a parapet or battlements. In either case we find the centre of the tower (explained in Fig. 246), raise an upright there ; decide on the pitch of the steeple ; make its apex on the upright, and complete the spire (already explained in Fig. 244). 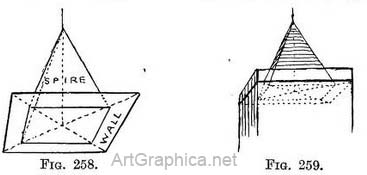
When the base of the steeple is hidden:by a parapet (Illus. LIV) we draw the underside of two foreshortened concentric squares (Fig. 258). The space between them will represent the width of the tower walls, and the steeple will stand on the inner square. These squares will be drawn at that height where the walls meet the parapet (Fig. 259).
Composite pyramid. — A pleasing variation of the pyramid steeple is shown in Fig. 260. It consists of a pyramid with a spreading base. This base is really the lower part of a more lowly-pitched steeple. Practice. — Copy the inclination of the tower pyramid till it meets the upright that we always draw in the middle of the tower. Over this pyramid fit, at the correct height, the higher-pitched steeple. 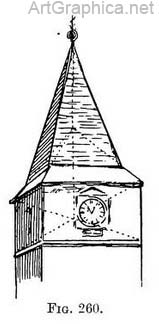
Next Page
Domes, Turrets and Steeples Prev Page How to Draw Curves
|
||||||||||||||||
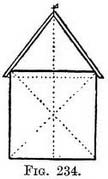 Practice for the end view (Fig. 234). — Draw the end of the building on which the roof is to rest, cross it by diagonals, and raise an upright where they meet. Decide on the pitch of the roof and mark it by a dot on the upright, join that dot to the top corners of the end wall, and continue the roof sufficiently to form the eaves (Fig. 234).
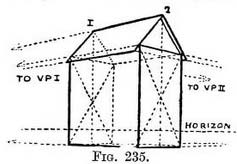 The walls built, we raise an up right through the middle of both the end walls. On the upright at the near end of the building we mark the height of the roof (2), and join that mark to that V P to which the sides of the building tend. The line joining the tops of two uprights (1 to 2) will now form the ridge-pole, and the skeleton of the roof will be completed by rafters leaning from the top corners of the walls to the ends of the ridge-pole respectively. This skeleton house explains the way we should make a drawing of it. If you now continue the lines of the near side of the roof in their upward direction, you will find they meet at a point immediately over the V.P. for the end walls of the building. Also if you continue the lines at the far side of the roof in their downward direction, they will meet at a point immediately below the V.P. for the end walls (this was explained in Chap. II, Fig. 40B). But the foregoing was only demonstrative.
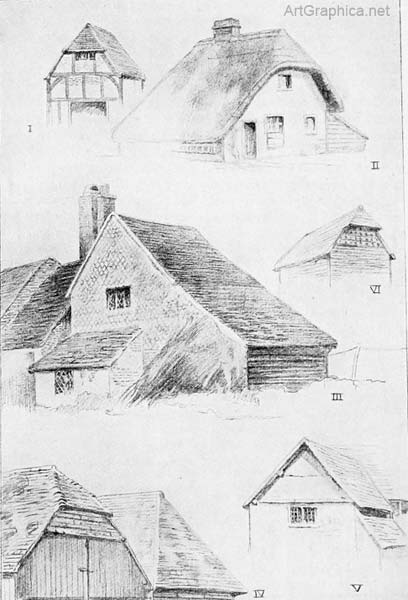
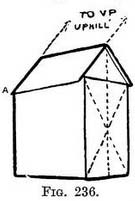 Practice for Fig. 236. — Draw the cottage walls. Cross the near end wall with diagonals, raise an upright at its middle. Decide on the slope of the roof, and join the top corners of the near end wall to a point on the upright to
complete the gable. Rule the line of the ridge to the V.P. Continue the near slope of the roof to find " uphill " V.P., and from it rule a line to the near corner of the far end wall (" uphill " V.P. to A). (With a little practice the direction of this last line can be guessed so long as we remember it runs to the same " uphill " V.P. as the other end of the roof.)
Practice for Fig. 236. — Draw the cottage walls. Cross the near end wall with diagonals, raise an upright at its middle. Decide on the slope of the roof, and join the top corners of the near end wall to a point on the upright to
complete the gable. Rule the line of the ridge to the V.P. Continue the near slope of the roof to find " uphill " V.P., and from it rule a line to the near corner of the far end wall (" uphill " V.P. to A). (With a little practice the direction of this last line can be guessed so long as we remember it runs to the same " uphill " V.P. as the other end of the roof.)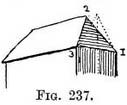 Roof hipped at both ends. — If both ends of the roof are formed by a hip, it will be necessary to apply the working of Fig. 237 at both ends of the building. This means that we first sketch a gable roof, and then find the points on the ridge to which the end roofs are hipped back to (Illus. XLVI).
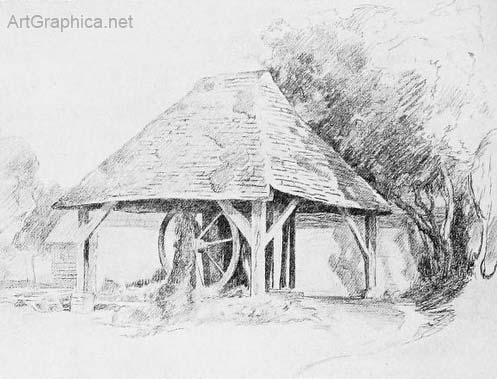
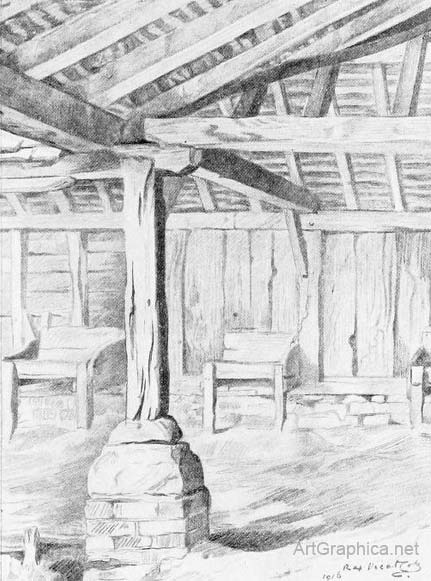
 In the drawing of a brick-kiln (Illus. XLVII) we see the underside of the roof ; this we should draw first and find its centre, then set up a central pole, and on it mark the apex of the roof (Fig. 244).
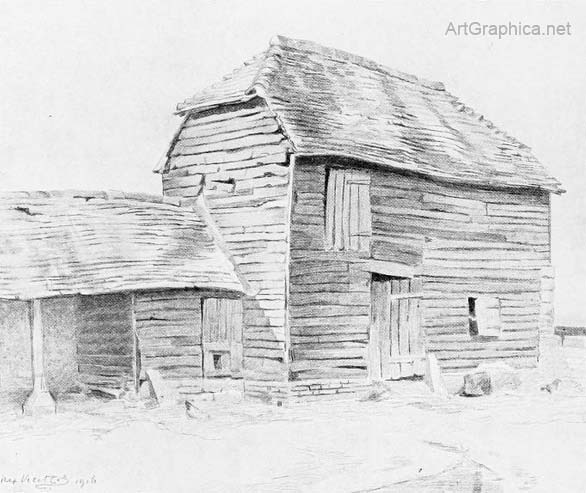
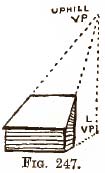 Lean-to roof - A plane sloping roof usually rectangular and UPHILL attached at the top to a wall. It would be an insult to the intelligence of the reader if I described how he should draw this, but he might without offence be reminded of Rule III, Chap. II, so I add Fig. 247.
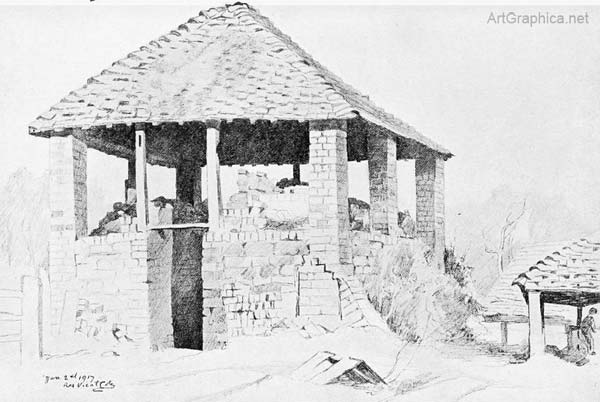


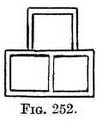 Chimneys carried through the roof, as well as these outside ones, are often given an appearance of slimness in their shafts by the cunning way they are set on the base. In some cases several shafts may be semi-detached ; others are set at an angle with the base (Fig. 251), starshaped ; or several, though square with the base, may not be in line (Fig. 252), Fro. 251. so that unusual rectangles are left between them. The shaft-heads widen out by successive courses of projection of bricks (Illus. LII).
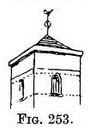 Towers. — A tower, square in plan, and crowned by a low-pitched pyramid spire, is a form commonly met with. The position of the windows, whether they are in pairs or centrally placed, will be found by diagonal lines, crossing each face of the tower. We have already acquired facilities in drawing the tower itself, with its groups of level receding lines meeting to right and left at V.P.'s on the horizon line, or at a single P.V.P., according to our point of view. Neither shall we neglect to carry guiding lines across one face of a wall, or to make these recede with others of its group in order to find the height of windows equivalently placed on another side (Fig. 253). We should also do this for the "long and short" work of the corner stones if they happen to be placed with symmetry ; or we may go to this trouble merely to judge their height on a far angle.
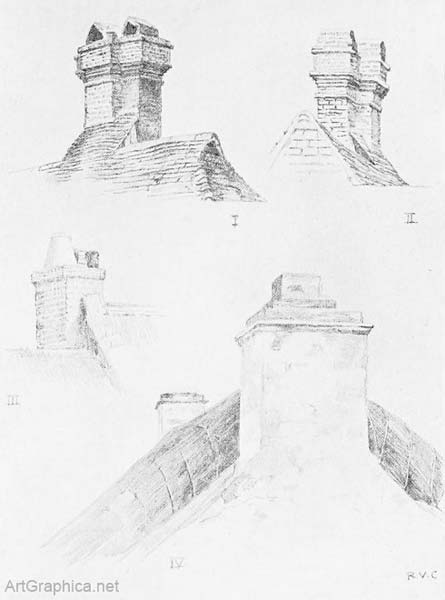


Online Art Books
Perspective for Artists Art Lessons Free Art Books Art Shop Art Links  
 |
