DRAWING AND PERSPECTIVE |
||||||||||||||||
|
Page 03 / 25
 CHAPTER II THE RULES OF PERSPECTIVE AND THEIR APPLICATION" Rules arc to be considered as fences placed only where trespass is expected. " — SIR JOSHUA REYNOLDS. RECEDING parallel lines. — We know that objects as they are seen closer at hand appear to be successively larger than others (of a similar size) that are further away. Test this statement by holding a flat ruler in front of you, with one end nearer to your face than the other, then the near end will r,vr seem to be wider than the far end, as Fig. 33A explains.
RULE I. — ALL RECEDING LINES THAT ARE IN NATURE PARALLEL TO ONE ANOTHER APPEAR (IF CONTINUED FAR ENOUGH) TO MEET AT ONE AND THE SAME POINT (Fig. 34).
Receding lines that are parallel and level. The gist of the matter is that because they (i.e. these particular receding lines) are in Nature parallel to one another (Rule I) they tend to the same spot, and if they happen to be level lines (Rule II) that spot must be on the horizon (Illus. IV, V, VI).
Receding parallel lines inclined upwards. — Now tip up the far end of the ruler, without turning it to one side or the other, and you notice that the receding FIG. 36. lines tend to a spot that is higher up than the former one, when the ruler was level (Fig. 37). This merely means that if the ruler is inclined upwards you see it less foreshortened, but your horizon remains the same height. It can be remembered by Rule III (see Figs. 37, 38 ; Illus. VII). 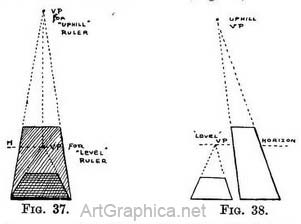
RULE III. - ALL RECEDING LINES THAT ARE IN NATURE PARALLEL TO ONE ANOTHER IF INCLINED UPWARDS APPEAR EVENTUALLY TO MEET AT A SPOT THAT IS IMMEDIATELY ABOVE THAT SPOT WHERE THEY WOULD HAVE MET IF THEY HAD BEEN LEVEL LINES. Receding parallel lines inclined downwards. — If you tip the far end of the ruler downwards instead of up, just the reverse happens, and the spot to which the side lines tend will be below the horizon instead of above it ; write Rule IV thus :
RULE IV.—ALL RECEDING LINES THAT ARE IN NATURE PARALLEL TO ONE ANOTHER IF INCLINED DOWNWARDS WOULD APPEAR (IF CONTINUED) TO MEET AT A SPOT IMMEDIATELY UNDER THAT SPOT WHERE THEY WOULD HAVE MET IF THEY HAD BEEN LEVEL LINES. Of course, if you tip the far end of the ruler only a little downward you will still see its top side but very foreshortened (Fig. 40A) ; if you tip it still further you will see the under side, and the spot that the sides tend to will be still lower down. 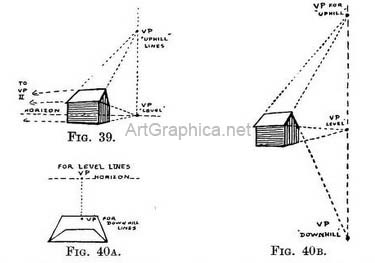
Level receding lines pointing to the right or left. — It is obvious that if you hold the ruler level but point it to the right—so that one corner of it is nearest to your face—the side lines of it will tend to a spot on the horizon on the right-hand side. You will, however, notice the two ends (because they recede) also tend to a spot on the left-hand side of the horizon (Fig. 41). 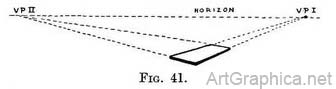
Note. — If the ruler points to the left side instead of the right, then exchange the words " left " and " right " in the above paragraph.
If we were drawing such a room we should first mark on the far wall itself a line showing the height of our eye (the horizon) as we stand or sit at our easel. Then we should sketch in the proportions of the room, including this horizon line. The next step would be to put a pin in our drawing where the P.V.P. would come on the horizon, and with one end of a ruler touching it, draw every line that in the room is parallel to the floorboard (Fig. 43).
The end wall is directly facing us, and consequently not a receding surface, so the lines, where the ceiling and floor touch it, are drawn parallel to the horizon line. 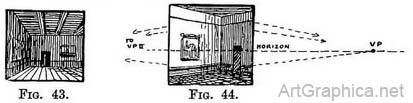
Suppose we sketch the same room from a new position so that we look diagonally across the floor to the left-hand wall. The lines of the floorboards will tend to a point on the right side of the horizon outside our picture. From this position the end wall becomes a receding surface (because one end is a bit nearer to us than the other), therefore the lines where the floor and ceiling meet it, will tend to a point far away on the left of the horizon[1]. We make our drawing by first sketching the proportions of the room, including the horizon line. That done the direction of one floorboard is copied, and its line continued till it meets the horizon line. To that point of junction (V.P.) draw all lines that are (in the room) parallel to the floorboard. Then copy one of the receding lines of the end wall and continue it till It meets the horizon. Make all lines that are parallel to it in the room meet at that point. Rectangular objects, such as boxes, tables, etc., would of course be drawn in the same way. USE OF RECEDING LINES TO FORM A SCALE
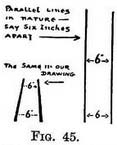
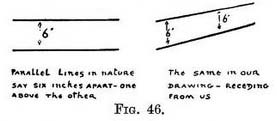
Therefore the converging lines we draw to represent them must also give us the apparent width between these lines at any point from the foreground to the far distance (Fig. 45). If the lines were on the side of a wall instead of lying on the floor, a corresponding height between them instead of - width would be represented as in Fig. 46.
The scale on level ground. — It does not matter how far to the right or left we place the V.P. for such a receding scale, we may use an existing V.P. or place a new one at a convenient spot (Fig. 47). If the receding scale is to run on level ground, its V.P. of course must be somewhere on the horizon. THE HEIGHT OF FIGURES AND THE RECEDING SCALEOn inclined planes. — If the scale is required on a plane running uphill or downhill, then the V.P. will either be the one we used for the lines on that plane, or a new one at the same level (Fig. 48) ; otherwise the scale would not be running on the ground. 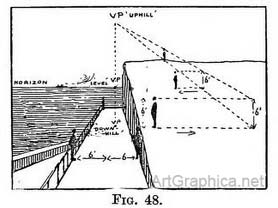
In practice we draw a figure the height it should be in our picture, then we take receding lines from his head and feet to the V.P. we used for the ground he is standing on. When introducing additional figures we place their feet where they are to stand, then walk them across (keeping parallel to the horizon) to the scale to see how tall they should be (Fig. 49A). The height of figures with a low horizon would be found by the receding scale, and since the lower line of the scale and the horizon line would run close together, some degree of precision in workmanship becomes a necessity.
When the feet of the figure are on the horizon the scale can be dispensed with, as the lower line would run on the horizon line (Figs. 49B and 49c). If the head of the " painter " is the same height as the head of the _figures he is painting, and they are on level ground, then the receding scale to find their height is unnecessary, since the top line of the scale would run along the horizon line (Fig. 49D). In such a case the height of figures is found by placing their feet where they are to stand and their heads on the horizon (Fig. 49E). 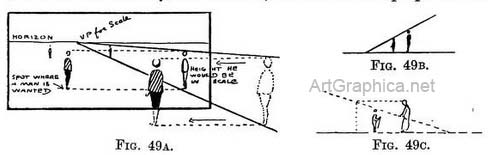
There is another way of finding the height of figures when looking down on them — thus, draw one figure the height it should be (compared with a doorway, for instance), then see what proportion of the space from his feet to the horizon is occupied by the man. To introduce another figure place his feet on the correct spot, and then allot to the man the same proportion of the space from his feet to the horizon as you gave to the first man (Figs. 49r and 49G). 
A scale representing 1 ft. if drawn along the base of a picture and up one side will be found a convenience in architectural subjects. Usually a 6-ft scale (upright) will suffice. If we know how tall a 6-ft. man would look at a certain spot, we can calculate the height of any other object, such as a child, a horse and cart, or a cottage at that spot. In like manner we can calculate the width of a road, pavement, etc., by making our phantom man lie down at that spot (Fig. 50). 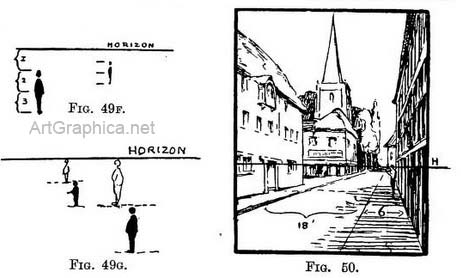
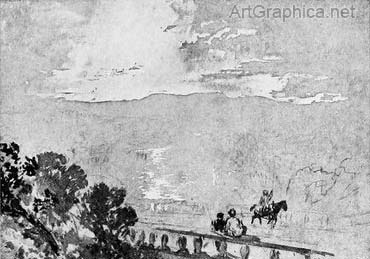
The " painter " was standing on ground about twelve feet above the terrace. We arrive at this conclusion by reasoning thus : If we stood on the terrace our head would be on the level of the horizon, and so would the head of the figure leaning against the balustrade. In this drawing the figure only occupies one-third of the space from his feet to the horizon, that is to say, another man could stand on this one's head, and yet another man on top of him; before the third man's head would be level with the horizon. If each man were six feet high the " painter's " head must have been eighteen feet above the terrace-level. 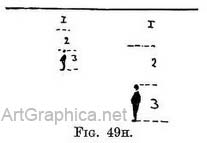
Next Page
Drawing Depth Prev Page Theory of Perspective
|
||||||||||||||||
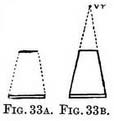 If you join the near and far end by straight lines, one on either side (Fig. 33B), you will complete your representation of the outline of the ruler, and you will have satisfied yourself that the width of the ruler at any particular point is determined by the receding side lines. Again, if you continue those side lines until they meet, you will appreciate the truth of Rule I.
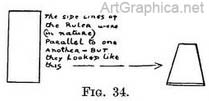
 Receding level lines. — Now hold the ruler with one end nearer to you but quite level (as the surface of water lies). Your drawing of it in this position will show that the point to which the sides tend is at the same height from the ground as your eye is ; in other words they would eventually meet on the horizon (Fig. 35). This makes Rule II easy to understand.
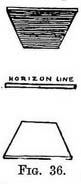 Level planes. — If you think of it, level planes must end at the horizon (not above or below it) ; because the horizon is at the height of your eye, and level surfaces are only visible so long as they are above or below your eye. At the exact height of your eye you could not see either their upper or under surface but only their
edge (Fig. 36).
Level planes. — If you think of it, level planes must end at the horizon (not above or below it) ; because the horizon is at the height of your eye, and level surfaces are only visible so long as they are above or below your eye. At the exact height of your eye you could not see either their upper or under surface but only their
edge (Fig. 36).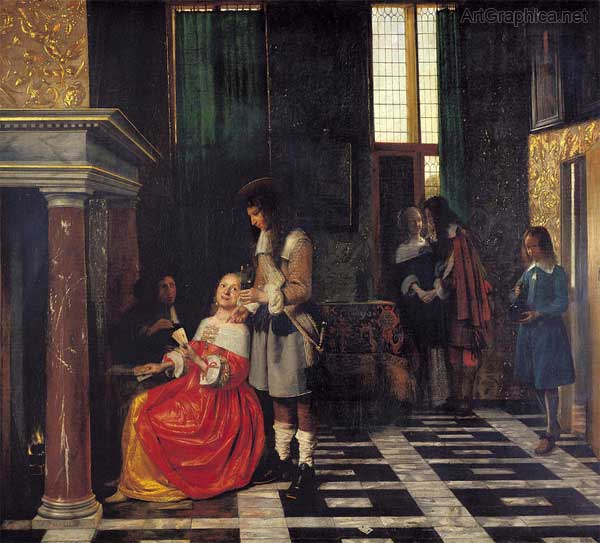
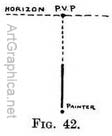 Level lines receding to the principal vanishing point. — We have learnt that all lines that are in Nature level, and receding, appear to end somewhere on the horizon. If we stand on a line that is running directly away from us, such as the crack between two floorboards, and look down its length we shall find it tends to the " principal vanishing point " on the horizon (Fig. 42). At this P.V.P. the floorboard and all other lines (in Nature) parallel to it—such as the sides of the room—meet (see Illus. VIII).
 Horizontal scale. — We have learnt (Rule I) that receding lines, if they are parallel in Nature, appear to meet at a distant point.
 1. The perspective method for fixing the exact position of the two vanishing points fora rectangular object is detailed in Chap. XXII When drawing from Nature we need no other aid than a hinged foot-rule. This is held at arm's length and the angle adjusted until one arm corresponds to the receding line we wish to draw, and the other to a vertical or level line on the object. The angle gauged in this way is traced on our drawing. The foot-rule must not he held so that it is itself foreshortened.
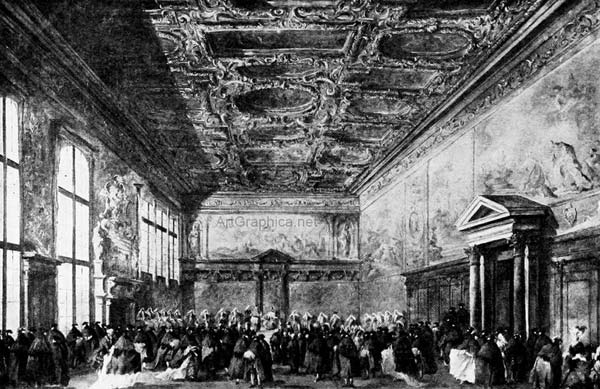
 Two such receding scales in our picture—one vertical the other horizontal will enable us to decide how tall or wide objects should be just at the very spot where we wish to introduce them.
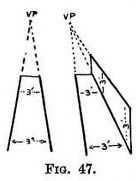 An easy way of remembering this vertical scale is, to think of it as a wall of a given height that stretches from us to the far distance. The horizontal scale might be a pavement or a railway line.


Online Art Books
Perspective for Artists Art Lessons Free Art Books Art Shop Art Links  
 |
