Drawing an Arch |
||||||||||||||||
|
Page 10 / 25
 CHAPTER IX Arches in PerspectiveWE have now got into the habit of enclosing circles in squares and semicircles in half-squares. This custom should become an involuntary one when sketching any form of arch from Nacure.
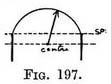
" A segmental arch has its centre lower than the spring " (Fig. 197). 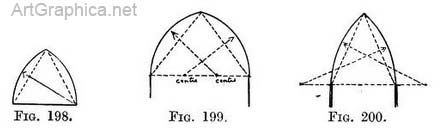
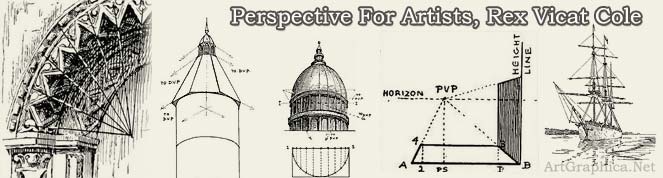
" Pointed arches are either equilateral, described from two centres, which are the whole breadth of the arch from each other, and form the arch about an equilateral triangle " (Fig. 199) ; or drop arches, which have a radius shorter than the breadth of the arch, and are described about an obtuse-angled triangle (Fig. 198) ; or lancet arches, which have a radius longer than the breadth of the arch, and are described about an acute-angled triangle " (Fig. 200). " All these pointed arches may be of the nature of segmental arches, and have their centres below their spring." " Mixed arches are of three centres, which look nearly like elliptical arches " (Fig. 201), or of four centres, commonly called the Tudor arch ; this is flat for its span, and has two of its centres in or near the spring and the other two far below it " (Fig. 202).
" The ogee or contrasted arch has four centres ; two in or near the spring and two above it and reversed " (Fig. 203). How to draw arches. — In accordance with our custom we will first examine the plan (in this case the front elevation) of some arches before we attempt the practice of drawing them foreshortened. 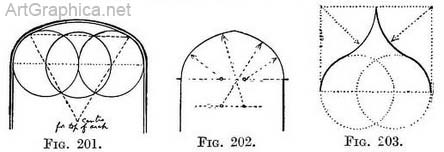
Fig. 204 gives the front elevation of a semicircular archway. 
In Fig. 205 it is enclosed in a rectangle with the addition of the centre of the circle, the diagonal lines, and a line where the arch springs from the column, and the guiding line that marks the points of contact between arch and diagonals. The arch is seen foreshortened in Fig. 206.
We must refer again to a front view (Fig. 208) to understand the course of stones that form the arch. We see their upper semicircle enclosed in a half-square, and recognise our old friends concentric squares and concentric circles. Practice. — Draw the arch as in Fig. 207, decide the height of the key-stone, carry a line from V.P. to it and beyond ; continue the diagonals upwards till they meet this line ; from their intersection with it drop upright lines. You now have the space in which to draw the upper semicircle of the stones.
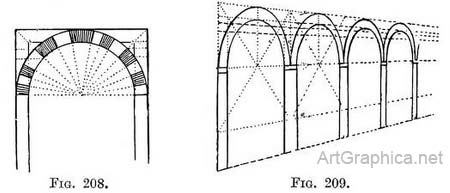
We took notice in a previous diagram of the extreme narrowness of space between the circles where the space is seen the most foreshortened. If the appearance of truth is to be given in a drawing of an arch, the height of the key-stone, compared with the width of the stones at the spring, must be carefully recorded. It appears troublesome when drawing from Nature to enclose each of many arched lines by rectangular lines, as shown in Fig. 209 ; but when a row of arches is in question it saves time to do so. A few lines will give us the width and height of many spaces in each arch, and each arch correct for its neighbours.
The position of each joint at the inside edge of the arch Fin. 211. having, been obtained, their lines on the underside of the arch will be carried to that V.P. to which a line from the front to the back of the archway would tend. Arches seen full - face (Fig. 212) retain their actual shape, but only appear smaller in the distance. This applies not only to a single arch with others seen beyond it, but also to those doorways that recede and are themselves composed of large and smaller arches (Illus. XXXII). This remark is necessary because if our point of view is slightly to one side of the centre of the larger arch, the smaller ones may become partly hidden and may deceive one into thinking them different in form. 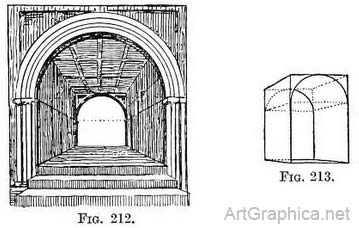
If there is any trouble about it, draw them as if enclosed in a crate ; Fig. 213 tells you all about it. Bridges can be drawn by applying the lessons of the former Fig. 209. 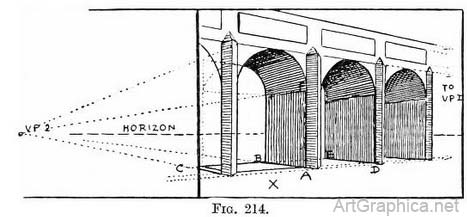
Practice for Fig. 214. — Sketch the height of the nearest pier of the bridge, mark off the spring of arch, the height of the balustrade, coping stone, or any courses of masonry (such as stone " strings " between brickwork), or the height of a buttress. Copy one of these receding lines and continue it to the horizon line to find the V.P. 1. Draw in one arch and its piers. Draw the width of other arches and piers (by rules learnt in Chap. III). Choose one archway where the width of the bridge is seen (x). Draw accurately a line along the width of the bridge where the pier touches the ground or water (A-B). Continue the line till it meets the horizon line and so find V.P. 2. From V.P. 1 draw a line to the bottom of the arch on the far side of the bridge (to B), and continue it (V.P. 1 to C). This line decides the width of the bridge. All lines running across the bridge will meet (at V.P. 2) on the horizon. The line from A running to V.P. 2 marks where it cuts the line C, V.P. 1. Thus a line from D to V.P. 2 cuts the line C to V.P. 1 at E, deciding how much of the pier under the arch will be seen ; again, a line from F where the arch springs, if taken to V.P. 2, will decide where the spring of the arch on the far side of the bridge is to be, and consequently how much of the underside of the bridge will be shown in our drawing.
If the piece of the arch on the far side of the bridge does not seem to be in drawing, it may be expedient to draw a rectangular framework for the arches on the far side, as if the bridge were transparent (Fig. 213) as we did on the near side. On guiding lines so formed, complete arches can be drawn, and any inaccuracy in the piece that is actually visible will be detected. Recourse can even be had to an elevation, but this would be an encumbrance rather than a help, except for some complex arch such as the ogee. Five guiding points for drawing the foreshortened view of the arch can, however, be easily ascertained by an elevation in the way we are familiar with (Fig. 207), or we can find still more guiding points by crossing subdivisions of the rectangular form with other diagonals (as in Fig. 215). This application of diagonals will be recognised if Chaps. III and IV were understood. 
The thickness of a bridge where it is seen on the underside of the archway—or to put it another way—the drawing of the arch on the far sid3 of the bridge can be gauged by means, of a receding scale (Fig. 216). The operation has this drawback that it can only be used with advantage when the lines of the bridge recede to the principal vanishing point ; even so it would require great neatness in execution to apply it to a drawing on a small scale. Practice for Fig. 216. — Draw the arch on the near side of the bridge as before. Decide the width of the bridge where the piers touch the ground, and draw the lines 1 and 2 to the V.P. ; they will form the scale. Draw a horizontal line to represent the inside bottom line of the pier (A to B), and another where the arch springs (C to D). From Any point on the arch drop a vertical line till it meets the scale, carry a horizontal line across the scale, find the width, then carry the line vertically as high as the starting-point and make a dot at its end. Now do this again from several points on the arch and you have a series of dots to draw the far arch on. Details of archways. — Opportunities for the use of perspective are almost in'3xhaustible. Rules cannot be laid down that shall cover each contingency ; they must, as they occur, be met by the exercise of some ingenuity. For example, the overlapping of projecting mouldings enriched with ornament, such as a number of fluted columns set with ball flowers, can more easily be placed in position if we draw their foreshortened ground plan where they take their rise[1]. Or again, the curves of arches following one another may become deceptive by the projection of the dripstone above (Illus. XXXI), and in this case a separate rectangular form may be drawn in perspective in front of the arch and on it guiding points found for the curves of the dripstone. Sometimes the joints of the stones themselves when visible can be brought to our assistance. 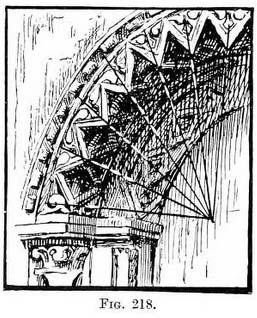
1. When harassed for time it is not with an actual ground plan which can each moulding. pattern is formed in diagonals amiss to supplement a quick sketch he rapidly made by measurement of The enrichment of a Norman doorway might puzzle the best draughtsmen, but each point of the zigzag ornament may perhaps coincide with the lie of the stones and so afford him solace (Fig. 218). It may be noticed that the rectangular guiding lines enclosing a pointed arch give us directly the construction of a doorway of the perpendicular period. A few lines in addition to the diagonals used for the arch will be serviceable in mapping out the ornament of the spandrels.
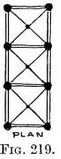
Groined roof (or vault). — Groined roofs exhibit so many intricacies that here we can only state the general principles that influence our method of drawing them. For this purpose we will consider that the roof is held up in a simple way by six arches ; two of them spanning the width ; two others the depth ; and two more that span the space diagonally, and so cross one another at the centre (Fig. 219) ; all these springing from four piers. This arrangement being repeated as often as necessary for the length of the space to be covered.
Next Page
How to Draw Curves Prev Page Circle in Perspective
|
||||||||||||||||
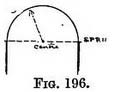
 We must understand, however, the build of some of the principal types of arch if we are to draw them with vigour. Rickman describes them thus : " Arches are round, pointed, or mixed A semicircular arch has its centre in the same line
with its spring" (Fig. 196).
We must understand, however, the build of some of the principal types of arch if we are to draw them with vigour. Rickman describes them thus : " Arches are round, pointed, or mixed A semicircular arch has its centre in the same line
with its spring" (Fig. 196).
 Practice. — Sketch in the arch lightly. Copy accurately the width between the columns and the height of the arch (from its apex to the ground). Draw a receding line from the base of the near column to the base of the further one, and continue the line till it meets the horizon line to find the V.P. Carry To a line from V.P. to apex of arch and beyond. Carry VP up lines of columns till they meet this line. You now have a foreshortened rectangular space. Correct your drawing of the arch inside it by means of additional lines, as shown in Fig. 207 (here shown as dotted lines).

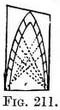 Referring again to Figs. 196-200 we see that a typical Norman arch has the centre of its semicircle half-way between the spring ; that pointed arches are formed on two circles ; each side of the arch being described from a centre situated at, or near (according to the type), the spring of the other side. The joints on the face of the stones of which the arch is built, will also radiate from these points, and will actually do so also in the foreshortened view, as in Figs. 208, 210, 211.
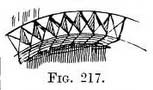 If each stone carries its ornament, a key to the spacing of the latter is provided by the foreshortening between each joint. We see this in the " axe " decoration (Fig. 217), when the crossing each stone of the arch.
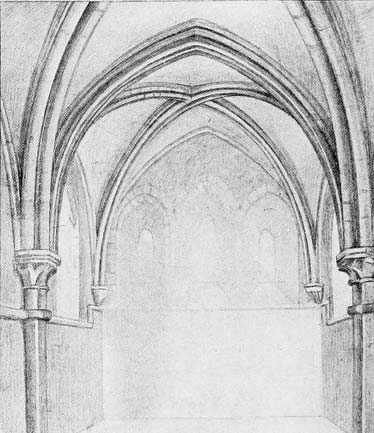
 Practice for Fig. 220. — Begin by placing the piers with their capitals (or the vaulting shafts and corbels if these are present) so as to obtain a footing for the ribs, cross-springers, and side arches. Draw all the arches except the diagonal ones, as previously explained, by means of A 2 rectangular shapes.
 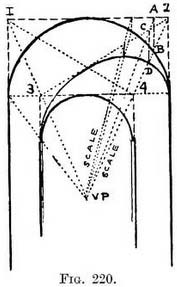 Think of the space 1, 2, 3, 4 in Fig. 220 as a PL'" flat ceiling held up by the arches, FIG. 219. now cross it with diagonals (1-4, 2-3), and let their intersection be also that of the arches you will build diagonally from the near left-hand pier to the next right-hand pier and vice versa. I think these diagonal arches are best drawn freehand with only the diagonal lines to guide one, but the authorities give additional points on which to draw the arch, so I will repeat their instruction. At a likely place on the full-face arch mark off the distance from the guiding line above it (A–B). Take lines from the top and bottom of that line (from A and B) to the V.P., and so form a receding scale. The upper line of the scale (from A) will pass through the top of the diagonal guiding line that starts from 2.
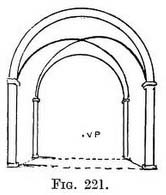 Where it does this (at C) drop a line (C–D), then the diagonal arch should touch the point D. An equivalent point for other diagonal arches on the same side can be found by this one scale. Make another scale on the other side of the full-face arch, and it will be the means of finding equivalent points on that side. Use as many scales as you like on both sides.


Online Art Books
Perspective for Artists Art Lessons Free Art Books Art Shop Art Links  
 |
