Inclined Planes |
||||||||||||||||
|
Page 06 / 25
 CHAPTER V Art and PerspectiveTHE application of Rule III to the drawing of steps. — A plank laid on a flight of steps would touch each step where the tread meets the upright. The plank in that position would be a plane inclined upwards ; its sides, therefore, when it is seen foreshortened from below, would tend towards a point immediately above that point, where they would have steered to, if the plank had been lying in a level position (i.e. the V.P. for the sides of the treads). If the plank was as wide as the stairs, its side lines would disclose not only the steepness of the stairway, but also the position of the corners of each step on which it rested. Bearing this in mind, we can represent the height and depth of all the steps in a flight, by using four such sloping lines—two at either end. The upper line on each side will mark the top corners of each step, the lower lines will give us those corners formed by the meeting of the back of the tread with the bottom of the rise. But we must draw one step first in its correct proportions or designed as we wish it to be.
Practice. — For Fig. 116 draw step A. Take line 1-2 through corners of step seen end-oil, and continue it to 3. Make line 4-5 touching edge of step and parallel to 1-3. Repeat these lines on the far side of the step, namely, 6-7 and 8-9. To form step B draw uprights one at each end between the sloping lines. These decide its height. Draw horizontal lines to fix the depth of the tread. Join the near and far corners to make the front edge and the back line of the tread. These complete step B. Other steps are made in the same way.
The use of these sloping lines as a scale, to fix not only the height but also the depth of each step, is better seen in .4 Fig. 118. The five upper steps are above the level of our eye. Their height and depth is obtained in the same way as shown by the dotted lines, so the scale also determines how much of each step is hidden by the step in front of it, and that is more than convenient (Illus. XVI, XVII). Depth of the steps found by rule. — There should be no difficulty in drawing the depth of the step in correct proportion with its height. A ruler held in a vertical position at arm's length will give the proportionate measurement; but you can draw it by perspective rules if you wish to.
"Uphill " V.P. found by handrail. — A staircase that is not built between walls will have its sides protected by a balustrade or hand-rail.
(3) Steps seen at an angle. — Where steps are in such a position that you face one corner, the front and sides both recede from us. We must use two " level " V.P.'s when drawing the first step. The rest of the flight can be built by using the sloping scales and only one " level " V.P. (Illus. XXXII and Figs. 121 and 125). 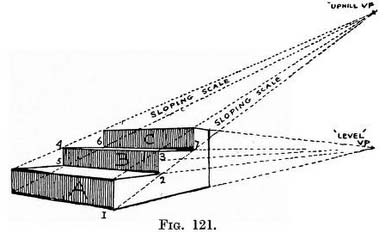
Practice. — (Fig. 121.) Draw the near end of step A, and continue the top and bottom lines till they meet on the horizon (V.P. "level"). Add front of step by measuring the angle (see note, p. 38 Chap. II), and continue one line to find V.P. 2. Find " uphill " V.P. by running a diagonal (1-2) across the side of step, and continuing it till it is immediately over V.P. " level." From " uphill " V.P. carry lines to the other three corners of the front of the step to form a scale —one at either end. Flush with the back of A step, raise the front of B step, its height at each end (2-3 and 5-4) will be found between the lines of the sloping scales. From front corners (4 or 3) of B step carry lines to " level " V.P. to form the tread. Where these lines cut the lower lines of the sloping scales raise uprights for C step. Join 7 to 6 to complete step B. Form other steps in similar fashion. (4) A flight of steps seen from the top. — Steps receding downhill can be drawn by the sloping scales whose use we are accustomed to, by drawing steps from below. The V.P. for the sloping scales will be at some point immediately under the " level " V.P. to which the side lines of the treads tend. Practice for Fig. 122.—Find horizon in Nature[1] and copy its position on picture. Draw corner of top step and the next one (1 and 2), being careful to get their relative positions exactly, and to record how much the top step overlaps the one below it. Continue line (1-3) of top step to horizon to find " level " V.P. 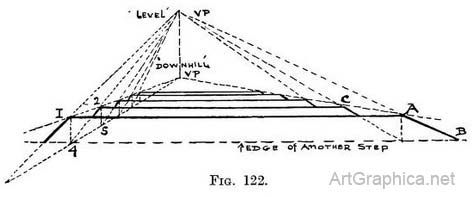
Join this with corner 2 and continue line till it is under corner 1. Line (2-4) so made will be the top of step 2 (as if you could see through the top step). Join 1 and 4 to find height of step. Draw a line touching corners (1 and 2) of both steps, continue it till it is under " level " V.P., in order to find " downhill " V.P. This line makes one of the sloping lines of the scale that the top corner of each step must touch. 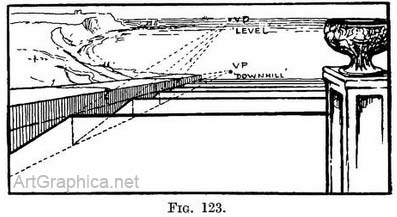
The other scale-line is made by joining the bottom corner (4) of the top step with the " downhill " V.P. Draw height of next step (line 2-5) between scale-lines. Join 5 to " level " V.P. to form top of third step. Draw 1—A the width of staircase. Join " level " V.P. with A and continue to B to complete top step. Join corner A with " downhill " V.P. Join 2 to C. Join " level " V.P. with C and continue to D. The rest of the flight can be quickly drawn in the same way with the scale on the left side to find the heights, and one scale-line on the right to find the corners. 1. As instructed in Chap. 1
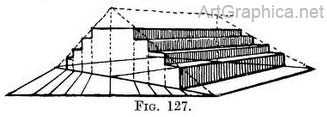
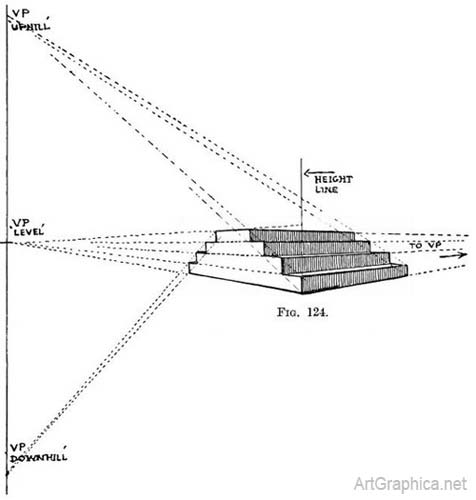
A stairway that is not set between walls will be provided with hand-rails or balustrades. It is a good plan to draw these first to find the " downhill " V.P. (Fig. 123). This will save time, but the operation described in Fig. 122 should be carried out. A tedious description will then be avoided in the ease of execution. (5) Steps on either side leading to a platform. — in important buildings the entrance is often flanked by flights of steps on either side of the terrace or portico that ornaments its front. In this case, if we were standing near one corner we should see the ascending flight ahead of us, and at the further end the corners only of the descending steps. We could apply the methods already explained (121-122) for drawing each flight. Fig. 124 speaks for itself, but note that the " downhill " V.P. for the far steps must be the same distance below the horizon as the " uphill " V.P. (for the near flight) is above it. Height of steps found by measuring-staff. — Also notice that the height of each step on the far and near end is regulated by the upright on the corner of the nearest step. The upright is divided into spaces equal to the height of the nearest step ; from these divisions lines are carried to the " level " V.P. and determine the height of each course of steps. The upright line acts in the same capacity as a number of steps would, if placed one on top of another. (This method could have been applied to any of the previous examples.) This way of measuring the height of each step will be better understood by reference to Fig. 125, though in this case we are directly facing the flight of steps.
 The height of the banisters and posts on the right-hand side is found by horizontal lines taken across at each junction of stairway with landing, from the left-hand banister and newel-posts. The stairs themselves are drawn as in previous examples. 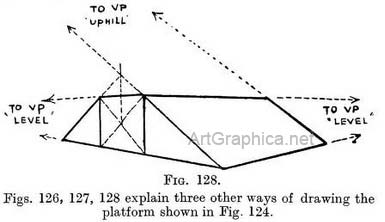
The height of figures on a flight of steps seen from below. — So long as the height of each step is visible and not partly hidden by the edge of a nearer one (as happens towards the top of the flight), we can estimate the height of a figure in relation to the height of the step he is to stand on, ten times as tall, and so on. Failing this we can use a receding scale thus, Fig. 131: This would be a cumbersome bit of work when dealing with a simple flight ; it would be better to use a scale running up the edge of the steps to the " uphill " V.P., but a use will be found for it where successive flights lead to intervening galleries. An alternative method, in the latter case, would be the one we used for finding the heights of the newel-posts in Fig. 130. The height of figures on a flight of steps seen from above. — The scale used in Fig. 122 for drawing the descending steps would serve equally well for fixing the height of a figure on any one of them. 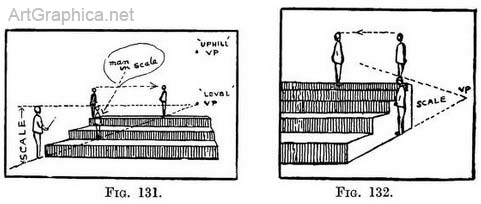
This would be done by marking the height of each step (as if those nearer to us were transparent), and drawing our figures their proper height in relation to the step they stand on. But it would save trouble in the end to make a scale representing the height of a man ; the bottom line of that scale would touch the end edge of each step (Fig. 134) at its centre (marked 1).
Having marked the position of the feet of our figure on the step where he is to be, we must move his feet along the step to the scale ; having there ascertained his height we are able to make the complete man walk back to where we indicated his feet. If the steps (Fig. 135) were so broad that we could not walk from one to another at a stride—let us call them platforms—then we should have to fix the height of a figure at the end edge of each platform (do this by a receding scale to the "downhill " V.P.). After that we must take a scale to the "level " V.P., in order to find the height of the figure on any particular platform on which we introduce him. On two of the platforms I have lined up a squad of phantom men, just to explain the idea more clearly. The operation is really the same as the preceding ones ; in those, however, we presumed that the man's feet would occupy the breadth of the step ; on these platforms we have added the scales to find the man's height as he walks from the front to the back of the platform. 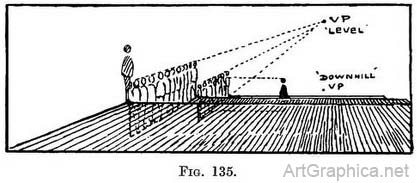
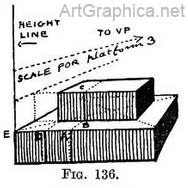
(7) Steps on four sides of a square.—The base of a cross or sundial is often built on platforms set on larger ones, these forming stages of concentric steps. These can be drawn, a platform at a time, by the method described for concentric squares (Chap. IV, Figs. 108, 109). The height of each step (Fig. 136) would be found by a receding scale attached to the side of the lowest platform. The width of each step could be ticked off on the near edge of the lowest platform, as at A, D, E. The line from D (carried to the V.P.) would, at the points where it meets the diagonal, determine the near and far corners of one side of the smaller platform. The line from A would also have to be carried to the V.P. Where it meets the base of the smaller (second) platform at B it would be carried up to the edge (to C). From C it acts for the third platform as the line at D acted for the second platform (the top surface of the second platform having been crossed with diagonals). Each succeeding platform would be raised in the same way as the previous one. The same steps (as Fig. 136) seen at an angle. — These present no other difficulties than those of obtaining the successive depths of the upper surface on each step and their height. Let us first draw the lowest platform with the base of the next one marked out on it.
To find the depths on the upper surface of each succeeding platform and their height. — Repeat the working of Fig. 137 to obtain Fig. 138. Continue the side line of the second platform (1 to 2) till it meets the edge of the lower platform (at 3). Continue it down the side (3 to 4). You can now use the side as a receding scale, marked off with divisions that appear proportionately smaller (method explained in Chap. II, Fig. 59). Each division represents the depth between one platform and the next, but before we can use it we must find the height of the second platform ; to do so take the height of the platform below the point 3 and raise it above 3, so that it stands on the edge (line 5-3). From the top and bottom of that height_take lines to V.P. 1 in order to find the height of the second platform at the corner 2. Draw the second platform like the first and draw diagonals To find the near corner of the third platform carry a line from point 6 (towards V.P. 1) across the top of the first platform, up the side of the second platform and across its top (towards V.P. 1) till it meets the diagonals. The height of the third platform would be found in the same way by raising the height of the second platform at 7-8. The depth between the third and fourth platforms would be found by a line starting from point 9 and behaving as the line from 6 which we have just detailed. Any number of platforms could be raised likewise. 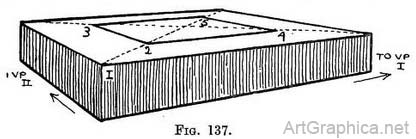
Next Page
Examples of Inclined Planese Prev Page Foreshortening Drawing
|
||||||||||||||||
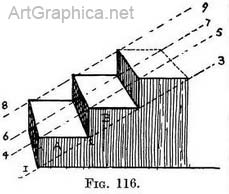 (1) Side view. — If it is a side view of the steps that we have to tackle, the sloping lines can still be used. They would not then be receding from us, but would 3 be parallel to one another (as in Fig. 116).
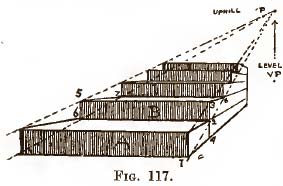 (2) Front view of steps.—Practice. — (Fig. 117.) Draw step A, being careful' to get the correct depth for the tread compared with the height of the step. Across the side of the step from corner to corner draw the line 1-2, and continue it until it is above the " level " V.P. in order to find the " uphill " V.P. Run lines from the "uphill " to the other three corners on the front of the step. Make the front of step B (2-3) the same height as the back of step A (4-2). You will then see that the height of each step can be obtained by upright lines (such as 2-3 and 6-5) drawn between the sloping lines.
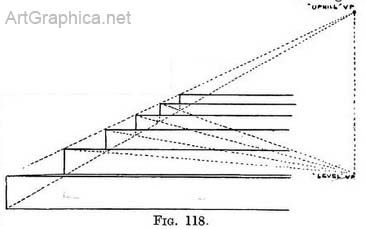 Join 3-5.. From the corners 5 and 3 take lines to the " level " V.P., where those cut the sloping lines (at 7 and 8) raise the uprights for the front of step. Join 7 to 8 to complete step B. Note that the depth of each step is also determined by the sloping lines that form a scale at each end. Make successive steps as you made step B.
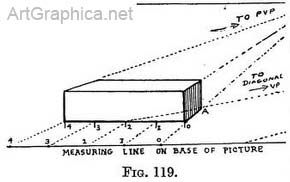 Problem. — (Fig. 119.) To draw a step whose front is parallel to the horizon line 4 ft. long, 1 ft. in height, and
2 ft. in depth. Draw the front of the step, making its height one-fourth of its length. From the four corners take lines to the P.V.P. to form the sides.
Problem. — (Fig. 119.) To draw a step whose front is parallel to the horizon line 4 ft. long, 1 ft. in height, and
2 ft. in depth. Draw the front of the step, making its height one-fourth of its length. From the four corners take lines to the P.V.P. to form the sides. 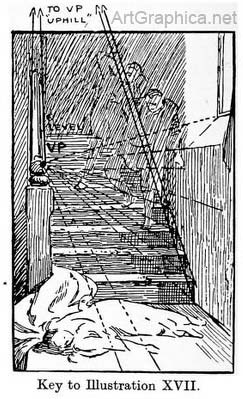 The length from 0 to 2 represents one-half of the length, or two feet ; therefore from the point 2 take a line to the V.P. to which the diagonals of squares run (as explained in Chap. III, Fig. 77). The depth 0 to A cut off by this line will be 2 ft., because it represents the length 0 to 2 seen foreshortened. Raise upright at A till it meets the line receding to the P.V.P. from the top corner of the step. Make the back of the step parallel to the front.
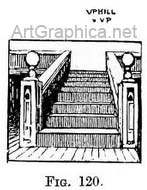 If we copy the direction of the hand-rails and continue their lines (as they recede)we shall find the " uphill " V.P. at the point where they meet (Fig. 120). We then drop a vertical line from the " uphill " V.P. until it touches the horizon line and so find the " level " V.P. This is an easy way of getting round a difficulty, but it is as well also to use the receding scale as previously explained, in order to save time and to ensure accuracy in obtaining the height of each step (see Illus. XVIII).
 " Downhill " V.P. found by skirting-board. — If there is a skirting-board running down the stairway, its direction can be continued until it comes under the " level " V.P. to which the receding lines of the treads tend. In this way we can find the " downhill " V.P.
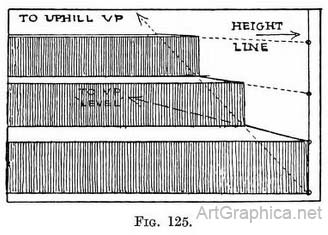 Practice for Fig. 125.—Draw front of bottom step. Draw upright and tick off divisions equal to height of bottom step. From these divisions draw lines to " level " V.P. (to form the top of each step). From bottom corner of step draw inclined line to the bottom corner of the next, taking care to make the top of the step the correct depth for its height. Continue the inclined line. It will be seen that the meeting point of the receding lines with the inclined line, determine not only the positions of the bottom corners, but also the depth of each step. This practice is only another application of the receding scale and inclined line which has been explained in Chap. II and used in Fig. 69.
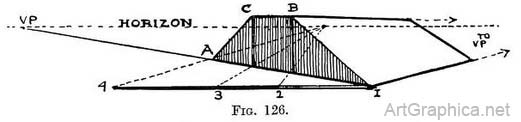 (6) Staircase with intervening landing leading to a gallery. — Begin by sketching its proportions ; then find the horizon, the " level " V.P., and the " uphill " V.P. (as in Fig. 130). Having found the height of the banister at the top of the first flight (by means of lines running to the " uphill " V.P.), you carry lines from the top and bottom of the newel-post and from the top of the handrail to the " level " V.P. in order to find the height of the banister along the landing, and the height of the next newel-post where the second staircase begins. Lines taken from the post (at the bottom of the 'second flight) to the " uphill " V.P. determines the height of the post at the top of the second flight.
 Along the ground on one side of the stairway carry a line to the " level " V.P. that you used for the sides of the steps ; determine the height of a figure at some near point (by comparison with the height of the step or the width of the stairs), stand him on the line and carry another from his
head to the V.P. to complete the scale. On other steps where figures are to be placed, drop a vertical line down the side of the stairway until it touches the ground ; there the required height will be shown by same height on the step
above, and walk him along that step to the place where he is to stand (Fig. 132).
Along the ground on one side of the stairway carry a line to the " level " V.P. that you used for the sides of the steps ; determine the height of a figure at some near point (by comparison with the height of the step or the width of the stairs), stand him on the line and carry another from his
head to the V.P. to complete the scale. On other steps where figures are to be placed, drop a vertical line down the side of the stairway until it touches the ground ; there the required height will be shown by same height on the step
above, and walk him along that step to the place where he is to stand (Fig. 132). 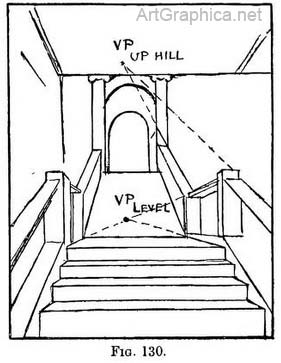 Remember that the measurements as just described must be taken at the side of the flight, because the scale is directly under the side of the flight, though it does not always look so in the drawing.
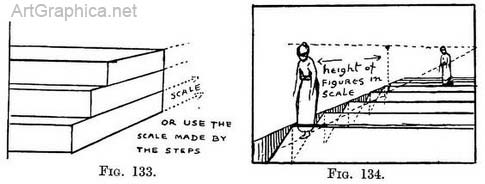
 Practice. — Draw the lowest platform (Fig. 137) with diagonals crossing its top surface ; judge the distance between its near corner and that of the base of the second platform (1 to 2). From the near corner of the second platform (2) carry lines to V.P. 1 and V.P. 2 ; where they cut the diagonals place two more corners ; from corner 3 take a line to V.P. 1 in order to find the fourth corner (5) ; join 5 to 4.


Online Art Books
Perspective for Artists Art Lessons Free Art Books Art Shop Art Links  
 |
