Circle in Perspective |
||||||||||||||||
|
Page 09 / 25
CHAPTER VIII THE CIRCLE — continued
This diagram will come in handy when a cart is to be introduced into your picture, because it is difficult to make one wheel the other without some method to work on.
If a wheel is furnished with many spokes the points of insertion on the rim can be found, as shown in Fig. 176.
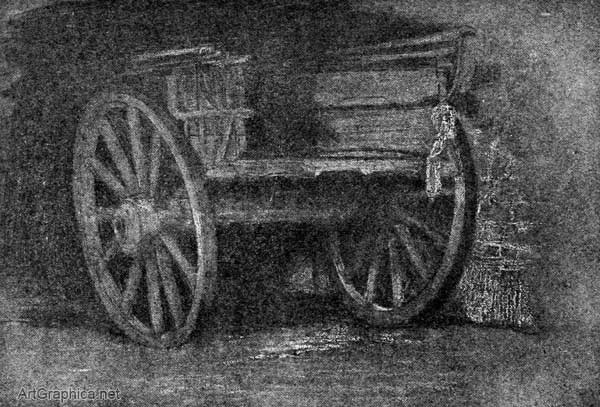
The diversity of build in different types of wheels will present less difficulty in their representation if we can sketch these skeleton wheels freehand with some degree of accuracy. Before you sketch even a cart, walk up to it and make yourself acquainted with its mechanism at close quarters (this is even more necessary with machinery). Dodges in perspective will occur with the occasion, but note how in some farm-carts the heavy spokes are set on the hub alternately instead of on one line encircling it. Neither must one miss the " rake " of the wheels when the rims of a pair of wheels come nearer together under the body of the cart than above it, owing to the wheels not being set at a right angle with the line of the axle (see Illus. XXVIII).
The wheel of a water-mill. — If we turn again to Fig. 174 we see we can use it to make a water-wheel if we connect the rims by solid paddles instead of supplying spokes. Circular steps. — We learnt how to draw a series of square platforms, each one standing on a larger, so that they formed steps (Figs. 136-138, Chap. V).
When I was drawing this I noticed how neatly the circles made a man's straw hat (Fig. 178), so I beg leave to introduce it. 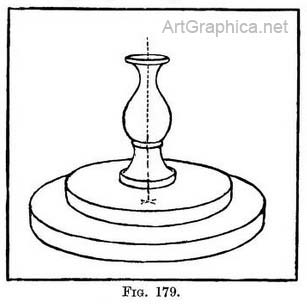
Before we learn to draw semicircular steps it would be advisable to study their plan. Fig. 181 shows concentric circles enclosed by squares. The dark lines show the semicircles and half-squares.
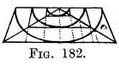
This same half-square seen foreshortened is shown in Fig. 182. A way of drawing a platform set on a larger one was described in Chap. V (Figs. 136-138). This will help us to understand the building up, platform by platform, of semicircular steps. The same seen from the front — Fig. 183 represents the bottom line of a semicircular step seen from the front. Fig. 183 Half a foreshortened square with the guiding points for the half-circle found in the same way as for a circle. 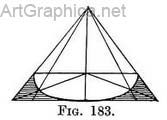
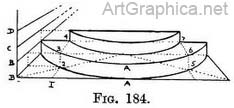
Practice (Fig. 184). — Sketch in lightly from Nature the line of the bottom step where it touches the ground. Correct this by drawing a foreshortened half-square (as in Fig. 183). Determine the height of step at the nearest point (A–A) ; carry that height to side of square and form a scale there (B-B). Above B-B form as many more scales as there are steps (such as B-C-C--D). Draw the upper edge of bottom step on guiding points found by reference to scale (B-B). Join far corners to make the back of step. Where receding line 1 cuts diagonal (at 2) raise vertical to top of step (at 3). That point will be the left-hand near corner for the next half-square, and a line from 3 to P.V.P. will fix the back left corner (at 4). Find equivalent points for the right-hand corners (5, 6, 7). Join the near corners (3 to 6). Complete this half-square like Fig. 183 with its guiding points. Then draw the bottom line of another step on them, find its height by reference to scale B-C. Carry on for this step as you did for the first one (two steps only are drawn to save confusion of lines).
Semicircular steps seen from the top step. — It is highly improbable that we should at any time draw a flight of steps showing their back in the way that Fig. 186 displays them ; but this is the view that makes us understand their mechanism, and it is easy not to include the unnecessary part. 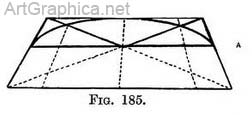
Practice (Fig. 186). — Sketch the semicircular edge of the upper step, and correct its line by enclosing it in the further half of a foreshortened square (similar to portion A, Fig. 185). This will be the top surface of a rectangular platform enclosing the step, so decide its height, and complete its sides and far end (as if it were transparent). Draw the diagonal on the bottom of the platform from the centre of the steps back through the far bottom corner, and continue it to the horizon. Decide on width of second step. 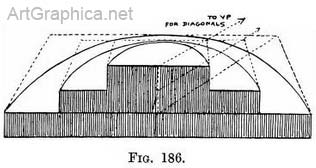
Complete its top surface and draw the semicircular edge of the second step in it, using the guiding points as in the first step. Repeat the method of drawing this platform (step) for others below it. Note that all the diagonals are here continued until they meet at a V.P. on the horizon. This is an extra precaution to ensure accuracy. You will remember that the depth of each platform is governed by the meeting of these diagonals with the receding lines of the platforms.
The inside of a circular room. — Any part of a room that is built on a circular ground plan can be drawn by using the far side of semicircles enclosed in the far side of half-squares (explained Fig. 185). Practice. — Copy first the semicircle of the floor at the base of the wall and enclose this in a foreshortened half-square (Fig. 190). If there are intricate details it will be advisable to make a plan of the circle or semicircle, and on it to mark the width and intervals between any pilasters, windows, or spaces that furnish the wall (Fig. 190). These intervals will be carried from the plan to the drawing as previously explained ; the foundations of the pilasters being laid, they can be raised now or later on. If verticals are now raised from each corner of the foreshortened half-square we obtain a framework. On it we can quickly make any number of half- squares (by drawing a horizontal line to connect the front uprights, and side lines from these to the P.V.P., with a horizontal for back). Wherever a circular line is seen—it may be by the top or bottom of a window, or the height of a capital—draw these half-squares and set half-circles in them. 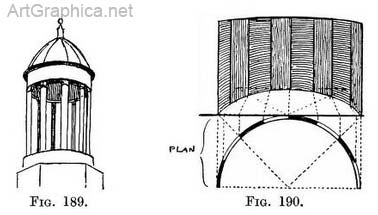
If there are regular spaces from the bottom to the top of the walls they can be measured off on the near upright (Fig. 190), or it may be more convenient to regulate them at the furthest part of the building ; then the back of the half-square can be drawn first instead of its front. The real difficulty is to accustom oneself to the appearance of the underside of the far half of the foreshortened circles that occur above the horizon line. A niche. — A three-quarter view of a niche best explains its shape ; merely that of a cylinder topped by a dome, the whole cut vertically in half (Fig. 191).
In this, as in most examples, we rely upon a certain proficiency in drawing. Our difficulty in drawing unfamiliar objects is caused by our want of knowledge of their build. Diagrams such as Fig. 193 explain the sort of lines we should expect to find, more complicated rules would numb our power of copying. Bow windows. — Bow windows give us an exercise in drawing curves that project from the face of the building. These need no further explanation, but note Fig. 194. Circular towers demonstrate the use of knowing how to draw parallel circles at varying heights (Fig. 195). 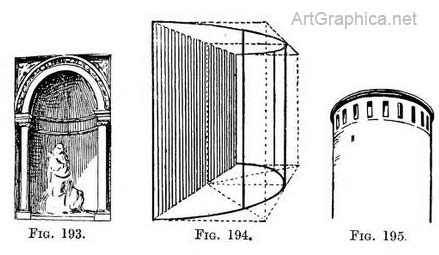
Next Page
Drawing an Arch Prev Page How to Draw Circles
|
||||||||||||||||
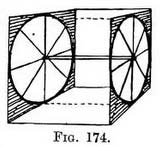 APPLICATION of the Perspective circle to wheels. — Fig. 174 is not drawn to represent tricycle wheels of an early pattern enclosed in a crate, but to explain a method of drawing two or more foreshortened circles that would in Nature be parallel to one another. Think of a box of any desired length, but with the two-ends made of square pieces of wood, on each of which is inscribed a circle, and their centres connected by a spindle. The circle in each case is drawn as in Fig. 162.
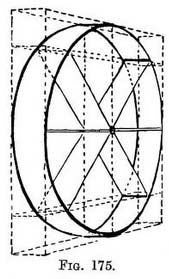 If we take the two ends on which the circles are drawn (I mean of Fig. 176) and put them close together, we have a diagram (Fig. 175) representing the rim of a wheel, but you must join together the top and bottom of the circles. It is the sort of wheel used on some agricultural implements. The solid spokes we have constructed out of the diagonals of the squares.
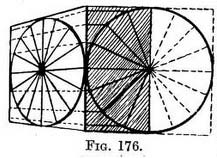 Practice. — First make a plan of half a wheel enclosed in the half of a square. Then from each point where a spoke touches the rim rule lines (parallel to the top or bottom line of the square in plan) until they meet the near edge of the foreshortened square, in which the foreshortened circle has been drawn. From each point on the edge carry lines down the foreshortened square, being careful that they shall eventually meet at the V.P. At each point where these lines touch the foreshortened circle, insert one, end of a spoke, and see that their other ends meet, so that all the spokes shall radiate from a common centre fixed in the perspective middle of the circle. If indisputable accuracy is necessary in forming the hub (as in drawings of machinery), you can draw another little square for its circle (using the existing diagonal lines for the purpose), and then form the dome of the hub upon it. By working in this way you will have the undoubted advantage of knowing that all the spokes are inserted correctly, both into the rim and the hub, despite certain parts being hidden from view by the projection of the hub.
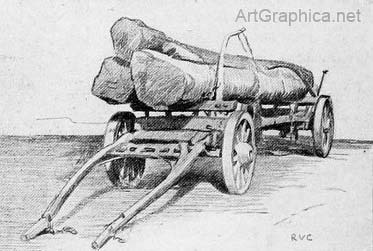
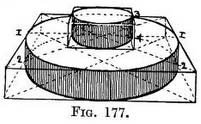
 We now want to draw circular ones such as might be represented by a small mill-stone set on a larger, and that on a still larger one, as in Figs. 177, 179. To do this we can draw a circle on the top and bottom surface of each square platform and connect them by uprights at the points 1 and 2, 3 and 4 (the middle of the corresponding sides of each square).
 Semicircular steps seen from the side. — If we cut Fig. 177 in half it gives us a view of two of a flight of semicircular steps (Fig. 180), and we can add more steps on to it " at pleasure," as Cassayne says. I think it might be quicker to make use of the whole square, and to draw circles instead of semicircles, and then to cut them in half, rather than to draw half squares. This we have done in the next example where the steps are seen from the front. Probably the use of this diagram, and some others, lies in the habit it encourages of using bits of perspective in our sketches as occasion demands.
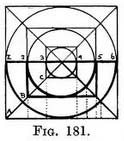
 Note that on the back line the diagonals of the half-squares meet at the middle, and that the back corners of each half-square also mark the back corners of each semicircle (1, 2, 3, 4, 5, 6), and that the depth of each semicircle is obtained by the meeting of the side lines of each half-square with the diagonals (A, B, C).
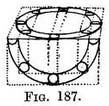
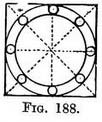 Columns supporting a rotunda. — In sketching a set of columns arranged in a circle one should begin by allotting to each its ground space. By the practice of previous exercises we could draw one circle within another.
We should make the distance between the circles equal to the diameter of a column. This is the ground plan of the arrangement, Fig. 187, and Fig. 188 give the foreshortened circles between which the columns would stand (as applied in Fig. 189).
Columns supporting a rotunda. — In sketching a set of columns arranged in a circle one should begin by allotting to each its ground space. By the practice of previous exercises we could draw one circle within another.
We should make the distance between the circles equal to the diameter of a column. This is the ground plan of the arrangement, Fig. 187, and Fig. 188 give the foreshortened circles between which the columns would stand (as applied in Fig. 189).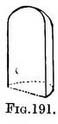
 Practice (Fig. 192. — Draw the cylindrical part as you would a semicircular room. The semi-circles in
the dome are obtained thus : tick off their distance apart on the rim (1-2). x Join each opposite point (I to 1, etc.) to make the front edges of foreshortened half-squares (seen from below). Carry their side lines towards V.P., and obtain the depth of each half-square by means of the D.V.P. Inscribe semicircles as before.
Practice (Fig. 192. — Draw the cylindrical part as you would a semicircular room. The semi-circles in
the dome are obtained thus : tick off their distance apart on the rim (1-2). x Join each opposite point (I to 1, etc.) to make the front edges of foreshortened half-squares (seen from below). Carry their side lines towards V.P., and obtain the depth of each half-square by means of the D.V.P. Inscribe semicircles as before.


Online Art Books
Perspective for Artists Art Lessons Free Art Books Art Shop Art Links  
 |
