How to Draw Circles |
||||||||||||||||
|
Page 08 / 25
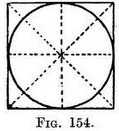
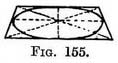
CHAPTER VII THE CIRCLEWE find it less difficult to draw a foreshortened circle on a large scale if we first draw a foreshortened square and then draw a circle inside it. The reason for this is apparent directly we look at the plan of a square enclosing a circle (Fig. 154). We see that the circle touches the square at the middle of each of its sides. This would also happen in the foreshortened view of the square, and so we should have four guiding points to shape our foreshortened circle on. Its form would be that of an ellipse (Fig. 155). (See Note X.)
Note X. — The greatest diameter of the ellipse so formed is slightly below the centre line of the square. If you cut out this circle (Fig. 160) and crease it along the " centre of ellipse " line the two halves will fit. 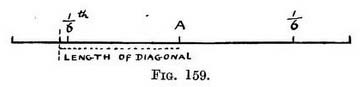
The circle seen from below. - A foreshortened circle above the height of our eye can be drawn by using similar guiding points on a foreshortened square. The near edge of the square will of course be the upper one, since it would be the underside of the square that we should be looking at (Fig. 161). 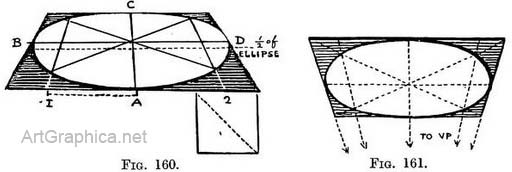
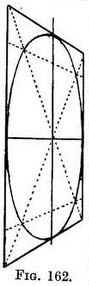
In a vertical position (Fig. 162) the circle presents no new difficulties, and further explanation is superfluous. In fact Fig. 158 would have stood for the drawing of a circle in four positions : (1) as seen from above ; (2) as seen from below—by rotating the book until the print came upside down ; (3) as a vertical circle on our left—by rotating the book (with the sun) until we cross the page ; (4) as a vertical circle on our right—by rotating the page in the opposite direction. The circle in a square seen at an angle. — It is only a little more troublesome to draw a circle enclosed by a square that is seen at an angle. The use of the exercise comes home to us when drawing a circular column set on a square base.
Practice (Fig. 163). — Draw the angled square either by employing two V.P.'s, or in the way shown in Fig. 94, p. 57. Draw a horizontal base line from the near corner, and on it tick off the Game divisions as in Fig. 158. Divide the near edge of the square (1-2) into these proportions (in the manner explained in Chap. III, Figs. 64 and 65). A brewing-tub tilted against the cottage wall, or the copper pans of the scullery lying at any angle may tempt one to a piece of still life painting. In each case think of the rim as if it had a square lid on it. The lid will describe the slope of the plane on which the circle has to be drawn. The old Dutchmen knew a thing or, two about drawing commonplace objects that might be incidentally noted by students to their great advantage when studying the technique of masters (Figs. 164, 165, 166).
Practice (Fig. 167). — Construct the opening of the well (or rim of the tub) as before ; then form a shallow tray ; use the upper square as the top and drop lines from the corners to the bottom, to form the sides ; then draw another circle on the bottom. 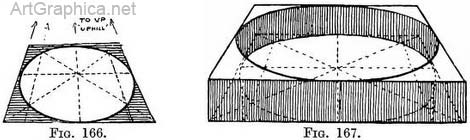
Concentric circles. — The plan of a square enclosing smaller ones is given in Chap. IV, Fig. 106. If we draw circles in each square we have the plan of concentric circles (Fig. 168). The foreshortened view of concentric squares is also given in Chap. IV (Figs. 106-109). If you draw a foreshortened circle in each foreshortened square you obtain Fig. 169, and that shows how much narrower the belt appears where we look across its width at the nearest and farthest points (A and B) than at the other points of contact (C and D) with the squares. 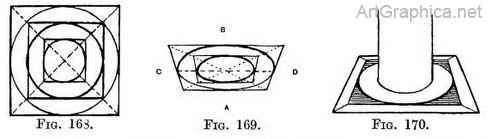
The observation of this fact is necessary in drawing the top of a well, a wheel, a font, or circular patterns on pavement (see Illus. L). It is also easier to draw such objects as a helmet, or a column standing on a larger one, if you first sketch such a foreshortened plan and then raise the superstructure (Fig. 170). 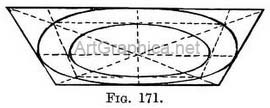
Fig. 171 is a view of it seen from below. There are objects - a plate for instance - where the surface cf the brim does not lie on one plane, but slopes inwards and downwards. Concentric squares might still be used as a framework for the outer rim and the smaller base, but it would be necessary to form another square below the inner one, to obtain the slope from the upper rim to the smaller circle of the base below (Fig. 172). This is another application of Fig. 168. 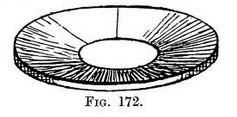
The building lines will be more clearly seen, however, if we drop this inner square still lower so as to form a basin. The diagram (Fig. 173) suggests a useful hint for drawing parts of machinery or architecture that should not be missed. 
Next Page
Circle in Perspective Prev Page Examples of Inclined Planes
|
||||||||||||||||
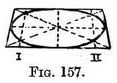
 The positions of these four guiding points (and others) are determined, both in the plan and in the perspective view of the square, by diagonal lines as already detailed in Chaps. III and IV. Four other guiding points can be found in the plan (Fig. 156) at those places where the diagonals are cut by the circle and transferred to the foreshortened square (Fig. 157) by using the lines marked 1 and 2 (in the manner described in Chap. IV, Fig. 96).
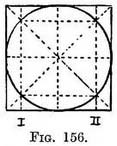
 In practice we do not draw the plan of either the square or the circle. We just draw a foreshortened square, and by diagonals and cross-lines fix the position of the points A, B, C, D (the centres each side line) (Fig. 158). We find the other four guiding points as follows :
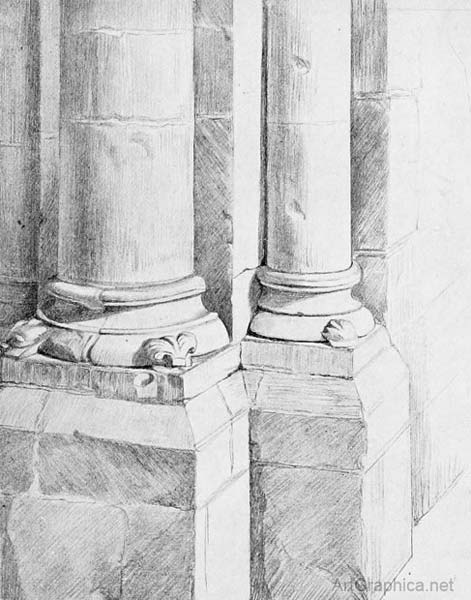
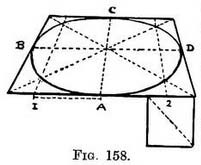 From 1 and 2 draw lines to V.P., in order to find those points where the circle is to cut the diagonal lines. Draw the foreshortened circle through these eight points. If you have not a book of reference handy and forget this measurement, you can still get these points (1 and 2) approximately, though they may not be quite correct, by making their distance from each end of the near edge equal to not quite one-sixth of its total length 158. (Fig. 159).
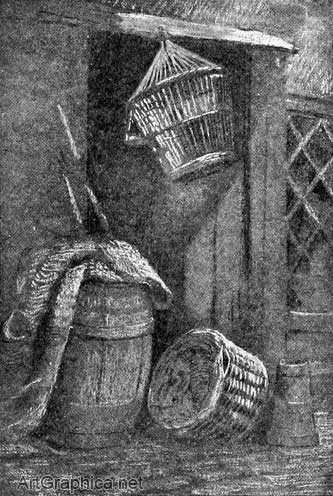
 From each division carry lines (to V.P. 1) down the square to fix those points where the circle is to cut the diagonal lines. Except for this way of dividing near edge of the square by means of the additional base line, the circle in an angled square is worked out just as the circle when enclosed by a square in the position of Fig. 158.
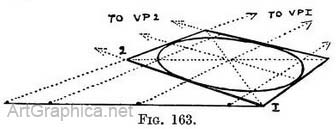 Parallel circles. — Parallel circles occur frequently, as in the opening of a well, a fountain, or a tub of water, where the surface of the water is visible as part of a circle.


Online Art Books
Perspective for Artists Art Lessons Free Art Books Art Shop Art Links  
 |
