Foreshortening Drawing |
||||||||||||||||
|
Page 05 /09
 CHAPTER IV THE USE OF PLANS IN SKETCHING FORESHORTENED SURFACESWHEN perspective is used in a purely mechanical way—that of constructing a pictorial view from the known dimensions of some object unseen—it is necessary to employ elevations and ground plans. On these the exact dimensions of each part are drawn to scale. This process is quite unsuitable to sketching, though we sometimes employ it in pictures, mainly when architectural features are important. This scientific method is dealt with in Part II. As an aid to drawing, even though mathematical exactness is not aimed at, a ground plan is still useful ; partly because it fixes in one's mind the proportions of the object that is to be drawn foreshortened, partly because it stimulates a mental survey of the ground surface on which we propose to place forms.
How to draw a square when one corner is nearest you without using the vanishing points (1) when the corners on either side are on a line parallel to the horizon.
When we see a square lying flat and foreshortened in such a position that a line parallel to the horizon would cut both its left and right corners (Fig. 88), we know by the above figures that we need not find its V.P.'s in order to draw it correctly, and we get to work thus :
Extra squares in the foreground could be added by lengthening each row, as at towards us the lines that recede to the P.V.P., and also a diagonal to obtain the intersections marking their depth. If we know how many squares there are across the floor we can apply the easier method of Fig. 80, by taking the whole floor-space first instead of one square. If the depth of the floor is greater than its width we can still apply the working of Fig. 80 by first making a square to represent the full width of the floor (of say twenty tiles), then we shall have twenty tiles also in depth, and we can add more, as we have seen in Fig. 90.[1] (2) How to draw a foreshortened square seen cornerways, whatever its position, without using vanishing points. It is sometimes a great convenience not to be obliged to use the vanishing points of a square or other rectangular form when one or both points are outside our picture, as in Fig. 91. 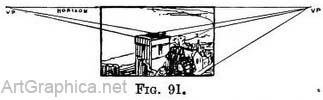
When a square is set at some other angle than that of Fig. 88 we can still, by varying our method, draw its sides that would meet at their respective V.P. without having to prolong them to it.
1. Pavements are worked out in detail in Chap. XVI.
Sometimes one has to sketch a square when there is not time to consider it as a perspective problem. It is well, then, to remember that its width must be longer than its depth ; that the angle formed by its near sides will be larger than a right angle ; and that this angle becomes flatter in proportion as the square is more distant.
In Fig. 96 1 is the top of a box, 2 is its side. The pattern on its side acts as a ground plan, helping us to draw the same pattern on the top.
If we understand the constructive lines of the plan we need not always draw it under the foreshortened view. In Fig. 96 we can see that the corners of the diamond touch the centre of each line that forms respectively the top, bottom, and sides of the black oblong. Also that the black oblong is formed on the diagonal lines which cross the outer oblong. Therefore we can dispense with the plan and get the same result thus. . . Practice — Tick off on a piece of paper the length of the inner and outer oblong and its centre . Transfer these to a line that will form the base of the foreshortened oblong. From the outside dots draw lines receding to V.P. for the sides of the outer oblong. Decide on its depth to complete it. From the remaining dots (they show the length of the inner oblong and its centre) take lines also receding to V.P. Cross the foreshortened oblong with diagonals. Where they cut the lines that recede to V.P. will be the four corners and the centre of the inner oblong ; draw it. The centre of its near and far sides is formed by a horizontal line through the crossing point of the diagonals. Draw the diamond with the corners touching the centre of each side of the small oblong. It is just a matter of first drawing the constructive lines on the plan and then repeating them as they would look foreshortened. The plan need not be the same length as the surface we have to draw foreshortened. If the base line of the latter is to be facing us the measurements ticked off the plan can be enlarged or reduced in the same proportion to make them the desired length.[1] If the foreshortened surface is to be seen at an angle, the measurements can be transferred, as explained in Fig. 65. 1 See Appendix. A roughly drawn plan, on which we draw a diagonal and a few upright lines, will often suffice as a guide for the spacing of objects on a receding surface. Take Fig. 97, A is the plan, B the foreshortened space. Where should the spot shown in A be placed in B ? 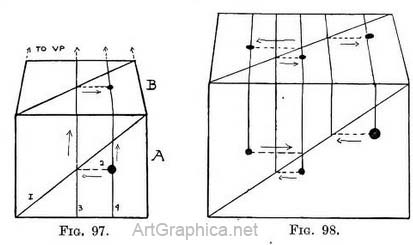
Practice. — On plan draw diagonal (1). From spot draw the horizontal line (2) till it meets diagonal. Through that point and also through spot draw lines 3 and 4. Continue these lines down B (towards V.P. because they recede) ; and draw diagonal. Where it crosses line 3 draw horizontal line till it meets line 4 ; there place spot. All we have to remember is that the lines we draw on A we repeat on B, but in the reverse order ; the reason being that in A where the position of spot is fixed we draw lines from it, but in B we draw the lines first to find the position of pot. Our exercise with spot is elaborated in Fig. 98 by the addition of the little spots, but the family removal can be effected in the same way. If we look upon these spots as figures we regard them with greater interest. The advantage of finding their position in this way needs no advertisement. There used to be a good old-fashioned way[1] of finding standing room for a crowd of figures. The floor-space was sectioned like a chess-board (Fig. 99) ; each square might represent 2 to 3 feet square, to allow for the shoulders. A diagonal line crossing the receding lines determines the depth of each square, as we explained in Figs. 78 to 81. 1. Since writing this I find that the custom was practised by Raphael.
You will not always be able to paint subjects just as you find them. Simple patterns can be sketched with sufficient accuracy freehand by this means (see sketches of Chap. XVI). 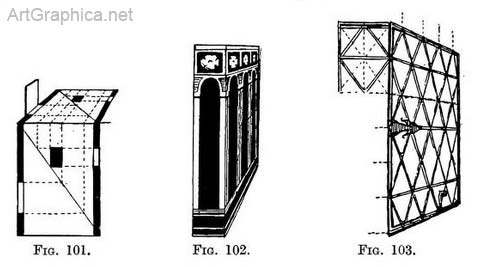
Applied to upright surfaces. — When drawing upright foreshortened surfaces we draw the plan on the near edge, just as if the pattern were on the front of a box, and we wished to draw it on one of the- sides (Fig. 102). The working is just the same, as will be seen by rotating page 58 until Fig. 96 is in an upright position. It would be hardly necessary to draw a plan of so simple an object as a diamond pane, yet one comes across inaccurate drawings of lead lights of diamond or lozenge pattern. The Jacobean panel sketched in Fig. 103 is much easier to draw if we use this method. It enables us with little effort to place the upper and lower mouldings in position and to give them their correct width ; and really this is not an easy thing to do without some guiding points. This might be put to a useful purpose in sketching the carved spaces on the front of a tomb, the panelling of a room, or the tracery of a cathedral window. Occasionally the lines of a plan interfere with those of the drawing if placed side by side, so it is better to separate them, as Fig. 105 explains.
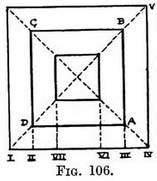
Concentric squares. - Rectangular forms enclosed by other rectangular forms will all be of similar proportions so long as the same diagonal lines pass through their corners. 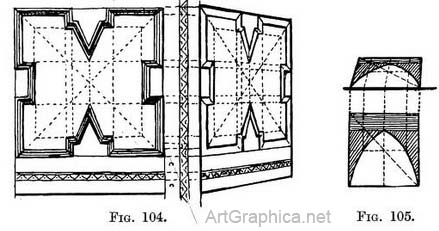
How to draw the plan of concentric squares. Draw the outer square (Fig. 106). Cross it with diagonals. Mark off from both ends of the base the width that is to separate the inner from the outer square, such as I—II, 11I—IV. From these draw lines parallel to (IV—V) the sides of the square. Where they cut the diagonals will be the corners ; join them. If more squares are desired repeat the operation as from points VI and VII. Or you can simply start a square from one of the diagonal lines (say at A) and run it parallel to the outer square A to B, B to C, C to D, D to A, since the diagonal lines will determine its corners (see Appendix). The foreshortened view of without recourse to its plan.
AN APPLICATION OF FIG. 107. Steps on four sides of a hollow square. — We sometimes have to draw a platform with a hollow centre ; in other words, steps which enclose four sides of a cavity, as in Fig. 108.
The four corners of the hollow must be on these diagonals, so fix the position of the near corner (4) and from this point carry a line to P.V.P. Where it cuts the other diagonal (at 5) will be another corner. Carry horizontal lines from these corners (4 and 5) till they meet the diagonals (at 6 and 7). Join 6 to 7.
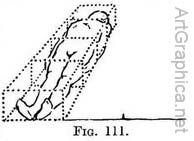
The use of a plan in figure drawing. — I once asked my old friend, the late Byam Shaw, if he found any use for perspective when drawing foreshortened figures. His reply was that he never) drew one without thinking of it, and he sketched Figs. 110 and 111 in explanation. You will notice that the horizontal lines over the figure represent divisions across the back of him, so that when he is laid down these are on the ground, while the upright lines from them give the height of the box he occupies.
Do not miss seeing that the last division on the chest overlaps and hides the neck. Shapes are often better explained by such contours than by the outline itself. Illus. XIV, of The Dead Warrior, of Velasquez, shows this admirably. (The study of Michelangelo's wonderful drawings will dispel any idea that drawing depends upon the representation of the outer rim alone.) 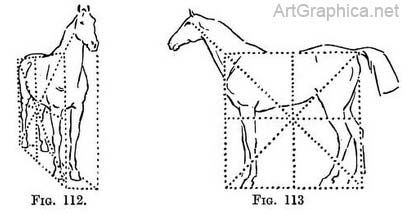
Use of a plan and diagonal line when drawing animals. — The use of a diagonal line is also shown by the sketches Byam Shaw also gave me of a horse (Figs. 112-113) and a dog (Figs. 114-115), each in his box. 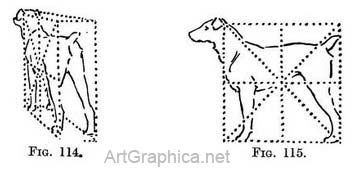
Next Page
Inclined Planes Prev Page Drawing Depth
|
||||||||||||||||
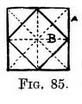 Fig. 85 is the plan of two squares, one inside the other. The drawing is only given to show how to draw the small square B, by means of the square A. Draw square A, cross it with diagonals in order to find the centre. Through the centre draw one line parallel to the side and another parallel to the front. These will determine the centre-point on each of the four sides. Join these four points consecutively to make the square B.
 If we draw (Fig. 86) the foreshortened square B in the same way by means of the square A, whose receding sides and
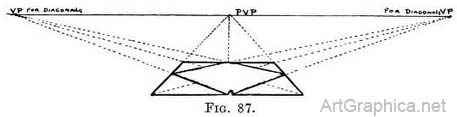
centre line will meet at the P.V.P., then the square B will be correctly foreshortened without the necessity of finding the V.P.'s for its sides ; but in Fig. 87 we have done so just to show we were right.
If we draw (Fig. 86) the foreshortened square B in the same way by means of the square A, whose receding sides and
centre line will meet at the P.V.P., then the square B will be correctly foreshortened without the necessity of finding the V.P.'s for its sides ; but in Fig. 87 we have done so just to show we were right.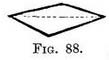
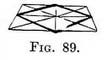 Practice. — Sketch. Tightly (they will probably be wrong) the sides of the square (Fig. 89), but take infinite
pains to mark its comparative length and depth. Enclose it in a square as before and correct the sketch of its sides by repeating the working of Fig. 86.
Practice. — Sketch. Tightly (they will probably be wrong) the sides of the square (Fig. 89), but take infinite
pains to mark its comparative length and depth. Enclose it in a square as before and correct the sketch of its sides by repeating the working of Fig. 86.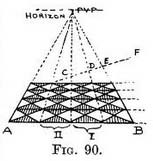 Application to a pavement. — Fig. 90 depicts a number of squares forming a pavement. If square I is first drawn, square II must be made of equal length on the line A-B. Their depth is obtained by continuing the back line of square 1 horizontally. A diagonal line continued from the front row will fix the depth of the back rows at those points where it cuts the lines that recede to the P.V.P., but this has already been explained in Fig. 80. If more distant pavement A has to be added one of the diagonal lines must be continued to fix again the depth of C, D, E, F.
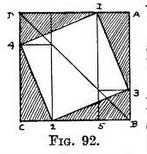 Fig. 92 is the plan of a square enclosing another. Whatever angle the inner square may be set at, the following procedure can be used :—
 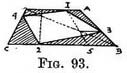 To make a foreshortened view of this — Draw the base of a foreshortened square (Fig. 93) with the points B, 5, 2, C, ticked off upon it from the plan. From these carry lines to P.V.P. ; draw diagonal (to D.V.P. for diagonals), and where it cuts the side add back of square. Now place each corner of the inner square, by reversing the order in which you drew lines from them on the plan : i.e. to find corner 3, carry a horizontal line from the intersection of the line 5 with the diagonal. To find corner 4, take a horizontal from the meeting of the diagonal and the line 2. Place corner 1 at the far-end of line 5, and corner 2 at the near-end of line 2 ; join corners.
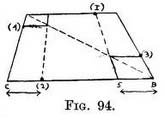 To draw the angled square without using a plan. —Practice.— Draw the enclosing foreshortened square as before (Fig. 94) with its diagonal. Mark on it the position of one of the corners of the inner square (say 2). Make B-5 equal to 2–C, and carry on as before. The reason for this is that corner 1 is on the plan (see Fig. 92) as far from A as corner 2 is from C, therefore the line 5 is made the same distance from B as 2 is from C. Also in the plan the corner 3 is as far removed from B as 4 is from D, and so horizontal lines from the intersection of the diagonal with the receding lines (5 and 2) will cut off a space 4–D equal to 3–B.
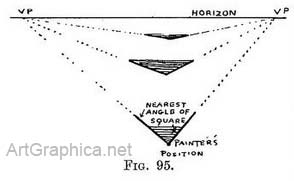 These rather obvious remarks are unnecessary if you will suppose yourself standing at the corner of a square, (" painter," Fig. 95). Since you would be right on top of the angle it would not be foreshortened, but would look like it is—a right angle —and its sides if continued would decide the position of the two vanishing points V.P. But the next angle, if still seen from the same point, would be flatter (i.e. set at more than a right angle the one side with the other), because its sides also meet at V.P. The next angle 3 looks still more flat as it is more distant.
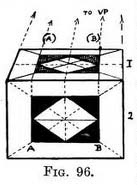 Practice — First find out on what constructive lines the pattern (on the plan) was formed (they are shown in Fig. 96 by dotted lines). Draw those same lines of construction on the foreshortened view. Remember that all receding parallel lines on the plan must, when depicted on the foreshortened top, be made to meet at the V.P. Then shape the pattern in the foreshortened surface on these lines just as the full-face pattern was made. On the plan the constructive
2 upright lines A and B only formed the sides of the inner oblong, they had to be carried up to the edge that divides the plan from the foreshortened top-surface before they could be carried across the latter.
Practice — First find out on what constructive lines the pattern (on the plan) was formed (they are shown in Fig. 96 by dotted lines). Draw those same lines of construction on the foreshortened view. Remember that all receding parallel lines on the plan must, when depicted on the foreshortened top, be made to meet at the V.P. Then shape the pattern in the foreshortened surface on these lines just as the full-face pattern was made. On the plan the constructive
2 upright lines A and B only formed the sides of the inner oblong, they had to be carried up to the edge that divides the plan from the foreshortened top-surface before they could be carried across the latter.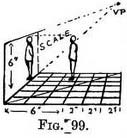
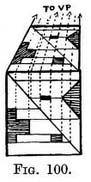 This method applies equally well for the placing of doorways, windows, or furniture, as we see in Figs. 100 and 101.
Application to a room and the placing of figures.—Why not make a plan of a room, let us now say of the one Hans Jordaens painted (Illus. XIII), placing the chairs, pictures, tables, and figures, each at its angle, and in its proportion on the floor, and make it foreshortened by applying Figs. 97-101 ?
This method applies equally well for the placing of doorways, windows, or furniture, as we see in Figs. 100 and 101.
Application to a room and the placing of figures.—Why not make a plan of a room, let us now say of the one Hans Jordaens painted (Illus. XIII), placing the chairs, pictures, tables, and figures, each at its angle, and in its proportion on the floor, and make it foreshortened by applying Figs. 97-101 ?
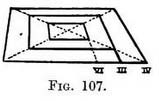 Practice. — (Fig. 107.) Draw the outer foreshortened square and add the diagonals. On base tick off desired width between squares. From these carry lines to V.P. Where these lines cut the diagonals will be the corners of inner squares. Join them by horizontal lines.
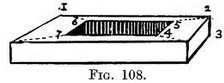 Practice. — Draw the front of the platform, carry its side lines to the P.V.P. Judge its depth in relation to its height and make the back line (1-2). Take a line from 2 till it meets the bottom receding line • (at 3) to obtain its height at the back. Draw diagonals across top.
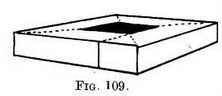 Fig. 109 explains how the same method . would apply if the base were seen at an angle instead of being parallel to the horizon, as in Fig. 108.
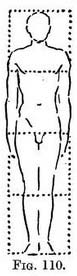
 The foreshortening of the division is obtained in the way explained in Chap. III.


Online Art Books
Perspective for Artists Art Lessons Free Art Books Art Shop Art Links  
 |
