Examples of Inclined Planes |
||||||||||||||||
|
Page 07 / 25
CHAPTER VI INCLINED PLANES — continuedRULE II applied to the drawing of roads. — The sides and cart-ruts of a receding road on level ground tend to a V.P. on the horizon (call it " level " V.P.). If the road runs in the same direction, but uphill, its lines tend to a V.P. immediately above the " level " V.P. (call this point " uphill " V.P.). The V.P. may be far above the horizon if the road is steep ; or only just over it if there is but a slight incline.
The road, if it has the same direction but runs downhill, will have its V P immediately below the " level " V.P. The steepness of the road running up or down hill determines the height above or below the horizon for the V.P. to which its sides tend. If the road turns so that it takes a new direction, its V.P. will be more to the right or left accordingly, but it will not be higher up or lower down, unless the inclination of the road changes as well as its direction. So it comes about that a road, unless it is perfectly straight and lies in one plane, may have many vanishing points. Each section of it that takes a new direction or inclination has its own V.P. On hilly land a road may be seen in the foreground and again in the distance, but the intermediate stretch, where it runs downhill, may be hidden owing to the steepness of the ground. Suppose we have not Nature in front of us, we can still find the width of this distant road by drawing the foreground length and adding the connecting link just as if we could see through the hill down which it runs (Fig. 139).
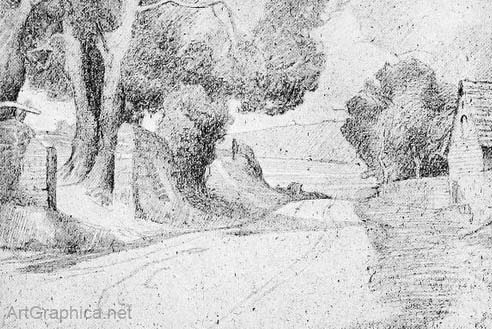
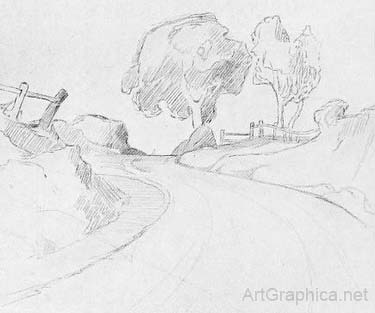
(1) Road running downhill. — Though a road runs downhill, we have to represent it running up our canvas. In order to make the illusion effective we must seize every feature that helps to give it a downward course. If its inclination is steep, the depth of the canvas occupied by its length will be slight. In this case we can utilise the stones and unevenness of the contours. Those near at hand will hide parts of the roadway behind and will by their overlapping suggest its steepness. Quite small banks at its sides may have their top lines running level or even downwards, and a piece of old fencing for the same reason may be valuable. Figures are even better for they are on the roadway itself—the head of a distant one level perhaps with the waist of another in the foreground explains that which the lines of the road with their upward direction might fail to do. Roadside trees from their greater height have more effect, the intermittent line of their tops running steeply down the canvas.
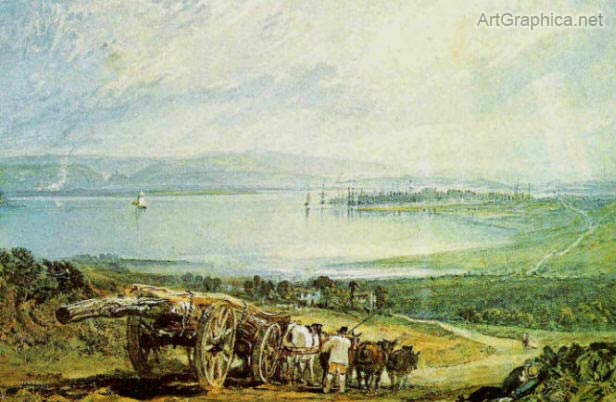
If the road is precipitous, so that its sides if we could see them would be running down the canvas, our troubles end. Then the head and shoulders of a man or the shelvings of a cart and the horse's head, with all else cut off by the nearer part of the road, arrests our attention and cannot fail to explain the situation. We have but to introduce a figure towering over them on the top of the hill to make the deception perfect. 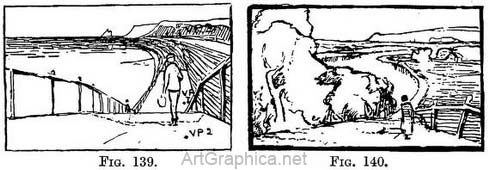
With a road as precipitous as we are talking of it is advisable to insure correctness in the size of the figures by sketching in the sides of the road to the " downhill " V.P. Of course we cannot really see the road, so we have to think of it as if it were the under- surface of a plank reared up. This done, we guess or copy the height of a figure, either at the top or bottom of the hill, and then take lines from his head and feet to the V.P. to which the sides of the road tend. If a figure at the bottom of the hill is chosen to give the height for this receding scale, the lines must be continued up the road. Figures on roadways. — If many figures are to be introduced on a road that turns, or changes its inclination, a figure must be placed at each junction where the change occurs in order to carry on the scale for measuring their height in the next section. Each receding scale will in every instance tend to the same V.P. as serves for the piece of road it runs on. The scale[1] for the figures may be thought of as an imaginary railing, 6 ft. in height, bordering the road, conforming with it in each dip and rise, and using the same vanishing points that are necessary for the roadway.
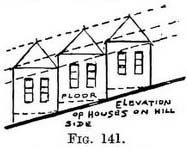
If we look at a side view of some houses of equal height (Fig. 141) we notice that each front forms as it were a step, and that lines drawn parallel to the road would touch each corner. Practice. — Sketch in roughly (Fig. 142) the height of the houses compared with the width of the road, so as to place the scene nicely on the canvas. Find horizon in Nature and draw it on the canvas as if it were an actual line in Nature. Copy direction of top or some line on house that would in Nature be level (1-2), and continue it to
the horizon to find the "level " V.P. Copy direction of the road B–A, and continue it till it comes immediately over " level " V.P. to find the " uphill " V.P. Copy accurately the depth of the same house B—C. You have now drawn a foreshortened square representing the front of the house (1-2–C–B). From its near bottom and top corners (I B ; 5 and 6) carry lines to the " uphill " V.P. to form scales ; they will give you the heights of each house and the depth of their frontage. 1. The receding scale for figures, etc., is fully explained in Figs. 46-49, Chap. II To introduce figures. — Draw a doorway the correct height for the house. Place a figure in front of it so that he could walk into the doorway ; take lines from his head and feet to " uphill " V.P. to form a scale and use it as already explained in Chap. II.
Sketch in roughly the scene. Find " level " V.P. on horizon (Fig. 144), and " downhill " V.P. under it. Carry scale for houses to " downhill " V.P., and all the receding lines on the houses that are level in Nature to the " level " V.P. Incidents on a hillside street. Doorways. — It must be no less puzzling to the builder than to the artist to find satisfactory solution of the difficulty occasioned by the line of the hill cutting across the level lines of basement windows, doorsteps, and level courses of his masonry. In cottages the ground floor is often laid at a level taken from the end where the ground is highest. The doorway is reached by means of a step or two from the high side leading to a stone or brickwork platform which may be protected by a rail on the low side and front ; or the steps may lead from the low side. Walls. — The courses of brick walls are sometimes laid parallel with the line of the bill ; more often they run on level lines, though the coping-stones or top-brick courses follow the line of the hill.
The top of these walls can be likened to the row of houses we have just erected, and the similar use of the receding scales will be recognised. The scale-lines meet at the "uphill" or "downhill" V.P. to which the sides of the road tend, the top of each tier (because it is level) has its V.P. on the horizon. Rule III applied to sloping land. (1) Hayfields — The symmetry of a hayfield is charming. Lines of swaithes, wind-rows, and foot-cocks follow one another in rise and dip over the undulations of the ground. All converge with varied regularity to some distant point. The alleys of fresh green grass receding from us expose their full width ; others, more to the side, appear as narrow bands, further still they are but threads of green until hidden from sight by the height of the hay at their margin. The T-square and plumb-line have no place here, but we must show a sympathetic appreciation of the beauty in Nature's perspective. The rule that teaches us to converge the straight lines of pavement to a point on the horizon, or to carry the clean-cut lines of the curb on a hillside road to a point above or below the horizon, come into play even with these delicate wavering edges of the new-raked hay. The height and width of hay-cocks or " hubs " are regulated by definite laws that could be demonstrated by a commonplace row of boxes, though the application were less harshly applied. The value of a receding scale with its V.P. at that level above or below the horizon to which the ground inclines, will be appreciated when we introduce a line of men in single file " turning," or separate figures in parts of the field where we may not have seen them. We just copy a man where he happens to be, obtaining his correct height for the exact spot of ground he stands on. He serves as a gauge for the scale whose use we have already described (Chap. II, Fig. 48 et seq.). (2) Cornfields. — At harvest-time when the stooks are set up one might almost think the farmer had it in his mind to demonstrate perspective laws. His sheaves nicely spaced stand one behind the other in even rows, and carry our eye to the fields beyond, row, gangway and row appearing to diminish in height and width on either side cover his field. Even the growing wheat seems, as it were, to carry on the game as we look over it and note towards the distance the lessening of the visible spaces of stalk between the heads of grain. This is but a beautiful rendering of the law that spaces appear less deep as they are further away. On hilly ground some care must be exercised in order that each block of sheaves and gangways shall show the inclination of the land (Fig. 147). 
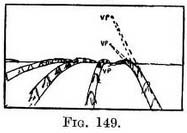
Make a scale from the near sheaf (Fig. 149) and carry it to the " uphill " V.P. at that level to which the rising ground tends. Use the scale to find the height of other rows of sheaves, and FIG. 149. carry a scale from each to the same point to give you the height of the sheaves and the width and direction of the gangways. From the sheaves that top the hill, carry scales to a " level " V.P. Where the hill begins to descend carry scales to the "downhill " V.P., as if you could see through the hill ; they will decide for you just how much of each sheaf in each row appears above the hill-top.
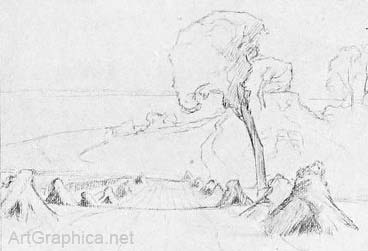
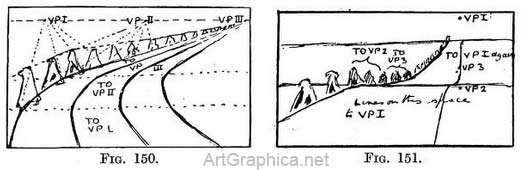 Examples of inclined planes. You need not do all this out of doors ; a few lines freehand based on this knowledge will give the look of reality. The training will make you quick to observe the charm in lines that is inherent to uneven ground. If the boundary of the field is not a straight one the reaper may follow its course instead of cutting a straight " road " for the machine. The sheaves then will be set up in a curved line. The employment of two or three vanishing points affords a rough and ready way of drawing these curves, as Fig. 150 explains. Curved lines of sheaves passing over the hill-top and coming into view again (Fig. 151 and Illus. XXIV) might be rendered in a haphazard manner that would be quite unconvincing if we had not these simple rules to guide us.
(3) The seashore. — We can see from the lines of the breakwaters just how steeply the upper stretch of sand slopes towards the sea. Each pile in a line was prObably driven in to the same height, but the lower ones, partly submerged by sand, their tops nibbled down by the waves, diminish in height more rapidly than those near the shingle. When looking across the groynes the lessening depth of sand between each row should be welcomed as an asset that helps us to convey the impression of mile after mile of shore. In a view from the top of the sand looking towards the sea, the V.P. (below the horizon) for the sand should be found, and others also for each section of shingle or sand that is at a different inclination. The sand, where it touches each groyne, forms a line running downhill. If the groynes are in Nature parallel to one another, you can copy the direction of two such lines and continue them until they meet ; the meeting-place will be the " downhill " V.P. for all lines in Nature parallel to the groynes on that stretch of sand, or every other that has the same tilt.[1] Other lines tending more to the right or left will have their V.P.'s correspondingly, but at the same height. The shingle sloping more steeply will have its V.P. under this one. The V.P. for the esplanade or level top of shingle will be on the horizon slightly above the distant sea level, as is presently explained. Figures on the shingle. — A scale for figures will be used as in previous examples. Be careful to use a V.P. at the same level as the one for the sand, and to have a fresh one for each section of sand that slopes differently. Place a bogey figure where one tilt ends and another starts, so that the scale shall be the right height where it begins to recede to a new V.P. Figures wading. — Figures wading are often drawn the wrong size. If you have found a V.P. for the sand they stand on, and through it have drawn a horizontal line, ycu can note the proportion of space occupied by a figure from this line to his feet. 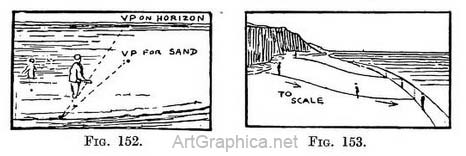
Suppose he occupies one-third of the space, then the other figures will also take up one-third of the space. In fact, you should draw the figures in the way we have learnt, just as if the sea were not hiding a portion of them. Mr. Wyllie[2] tells us how they should be partly submerged : " Mark the position of the heel of your man ; from the margin of the sea rule a line through the heel to some point on the vanishing line of the plane. Exactly over this point make a dot on the horizon, and from this dot rule a line back to join the first line on the margin of the sea. This will cut the figure at his correct water-line." The " vanishing line of the plane " that he mentions is the horizontal line we draw through the " downhill " V.P. for the sand (Fig. 152). 1. The height of a V.P. for the sloping land on which we stand, or shall we say the distance of its V.P. below the horizon, can be found by inserting a stick in the ground some little distance in front of you, and on it marking the actual height of your eye. The height of this mark is then indicated in your picture and a horizontal line drawn through it. The vanishing points for receding lines on the slope will be somewhere on that. line. If we are standing, this line will cut through the head of every figure on that slope, or if sitting, through his waist, as explained in Chap. II. 2. a "Nature Laws and the Making of Pictures," W. L. Wyllie. INCLINED PLANES 95As we look along the shore each slope of the surfaces from the upper shingle to the margin of the sea is seen as it were in profile. To obtain the height of figures. — Make a scale that shall follow the sea margin as if it were a railing where the sea laps. Mark the spot where the figure is to be ; follow the slopes of the shore down to the scale, see how tall he would be, and walk him up to the desired spot (Fig. 153). In following the slopes of the shore one must be careful not to bring the figure nearer or further away from us than he would be in a walk straight down from the shingle.
Next Page
How to Draw Circles Prev Page Inclined Planes
|
||||||||||||||||
 (2) A street on a hillside. View looking up. — It has been said that the thing to do in drawing is to make the lines run in the right direction. Follow this terse advice by remembering that level lines of doorsteps, lintels, flat roofs, window - frames, brickwork, or masonry, run towards a V.P. on the horizon ; but carry the lines of the pavement, roadway, and a scale for anything that is upon it to the " uphill " V.P. above the horizon and in a direct line above the " level " V.P.
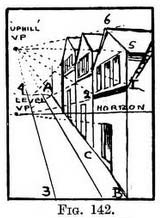 We may not want to draw so formal a row for our view up the street, but lines to mark the corner of each house and meeting at the " uphill " V.P. would act as a receding scale to decide the height of distant houses and also the depth of their front walls that face the street, and these could be altered at pleasure. This is but an application of the sloping scale we used for drawing steps.
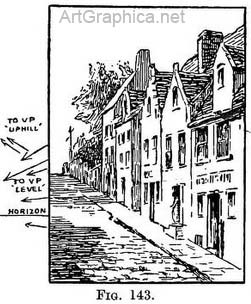 Touching the far side of the near house raise the near side of the next house to the to line (1 to uphill " V.P.) of the scale. From 5 run a line to " level " V.P. to form top of the windows. Draw the rest of the row in the same way as the first house. Carry lines (parallel to the horizon) from the bottom corners of these houses across the road until they meet the pavement line where the row facing them is to be raised. Carry lines also from the' top corners. In this way you find the height and depth of the right-hand row.
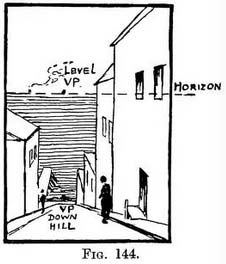 (3) Street on a hillside. View looking down. — After mastering the theory for an uphill view, you need no detailed instructions for applying it to a downhill scene.
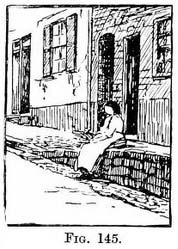 If the cottage stands back from the roadway the steps can lead directly from the front. These manoeuvrings lend a picturesque aspect to the village street. In towns the space-saving basement makes an area a necessity, and front and area door are reached by steps up and down. In poorer streets the foundations are level with the low side, and entrance is effected by a step sticking up at the low end and almost submerged at the high end—a mean device, but still one to be considered in an uphill or downhill drawing. Nor are basement windows, half-hidden by the rise of the ground, uncommon in similar surroundings. The pavement even may be made to accommodate itself to the slope of the road, as in Fig. 145.
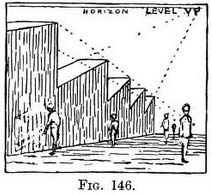 A more pleasing arrangement is that of level courses and top-stones built in tiers, so that the top of the wall forms, as it were, steps leading down the hill (Fig. 146).
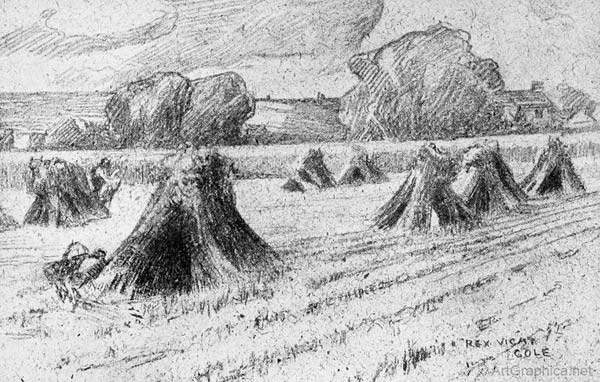
 Take, for instance, a rising field that continues over the brow. Here is a rough side-view of the idea (Fig. 148), but we have to look along the lines.
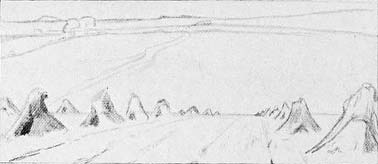


Online Art Books
Perspective for Artists Art Lessons Free Art Books Art Shop Art Links  
 |
